Creating a simple game with Super Tilemap Editor: Temple of Doom (Part 1)
Hi there!
This is the first part of a tutorial to create a simple game using Super Tilemap Editor (STME). It focuses on using the tools provided by STME more than on how to make a game in Unity — so think of this game as an excuse to show some of the features included in STME and how to use them.
Here’s a brief summary of the content for part 1:
- Game introduction
- Creating a tileset from an atlas texture
- Creating some tileset brushes
- Creating a tilemap group and a simple level using the tileset and the brushes
- Adding colliders to the wall tiles
- Making the broken wall tiles autotile with the Wall Brush using autotiling groups
To make it more fun, we’re going to make a game based on Pac-Man and Oh Mummy, and to make it more original it takes some ideas from the movie Temple of Doom.
1. Game introduction
The plot
You are an explorer looking for adventure, and you hear about a Temple of Doom in the middle of the Amazon with wonderful treasures and a mystic idol made of gold that you want to add to your collection of weird artifacts. But you’ve been told the temple is full of traps, and a mummy is protecting the idol from undesirable thieves.
The game
You start at the entrance of the temple. Your objective is to find the Golden Idol and leave the temple alive. Optionally, you can also find treasures to finance future expeditions, and items that will help you on this adventure.
Items
 Golden Idol: once you get the idol, the mummy will come for you and the broken floor tiles will fall, so you’d better run to the exit.
 Bag of Sand: if you have the bag of sand before taking the idol, it gives you some time before the events triggered by stealing the idol start.


 Golden Coins: give you 10, 20 and 30 golden coins when collected, to pay for future expeditions (in a future DLC; for this tutorial, consider them your score).
 Hammer: lets you break broken walls until the hammer breaks.
 Map: shows you the path to the Golden Idol and to the exit.
 Torch: illuminates the path and scares away the mummy.
Actors
 Explorer: the adventurer protagonist of this game, controlled by the player.
 Mummy: the guardian of the temple; it will kill anyone who dares to steal its precious Golden Idol. It’ll try to possess you, so stay away from it.
Credits
Thanks to oryxdesignlab for allowing me to use some of their graphics for this tutorial. All the graphics (except the Golden Idol) are part of the Oryx Sprite Packages:
They are intended as examples for this tutorial and not for reuse.
I used Aseprite to modify the graphics and create some of them, like the Golden Idol. It’s a really powerful tool for pixel art and very easy to use.
2. Creating a tileset from an atlas texture
I assume you’ve already created a new project and downloaded the latest version of Super Tilemap Editor. The next thing to do is download the resources used for this tutorial:
Temple of Doom resources — Part 1
Then import the resources into your project — in my case, into the folder Assets\_Game_\Tilesets.
Right-click the atlas image, then go to Create → SuperTilemapEditor → Tileset to create a tileset and assign the selected texture to it. You can also create a tileset first and select the atlas texture later, but this way is faster.
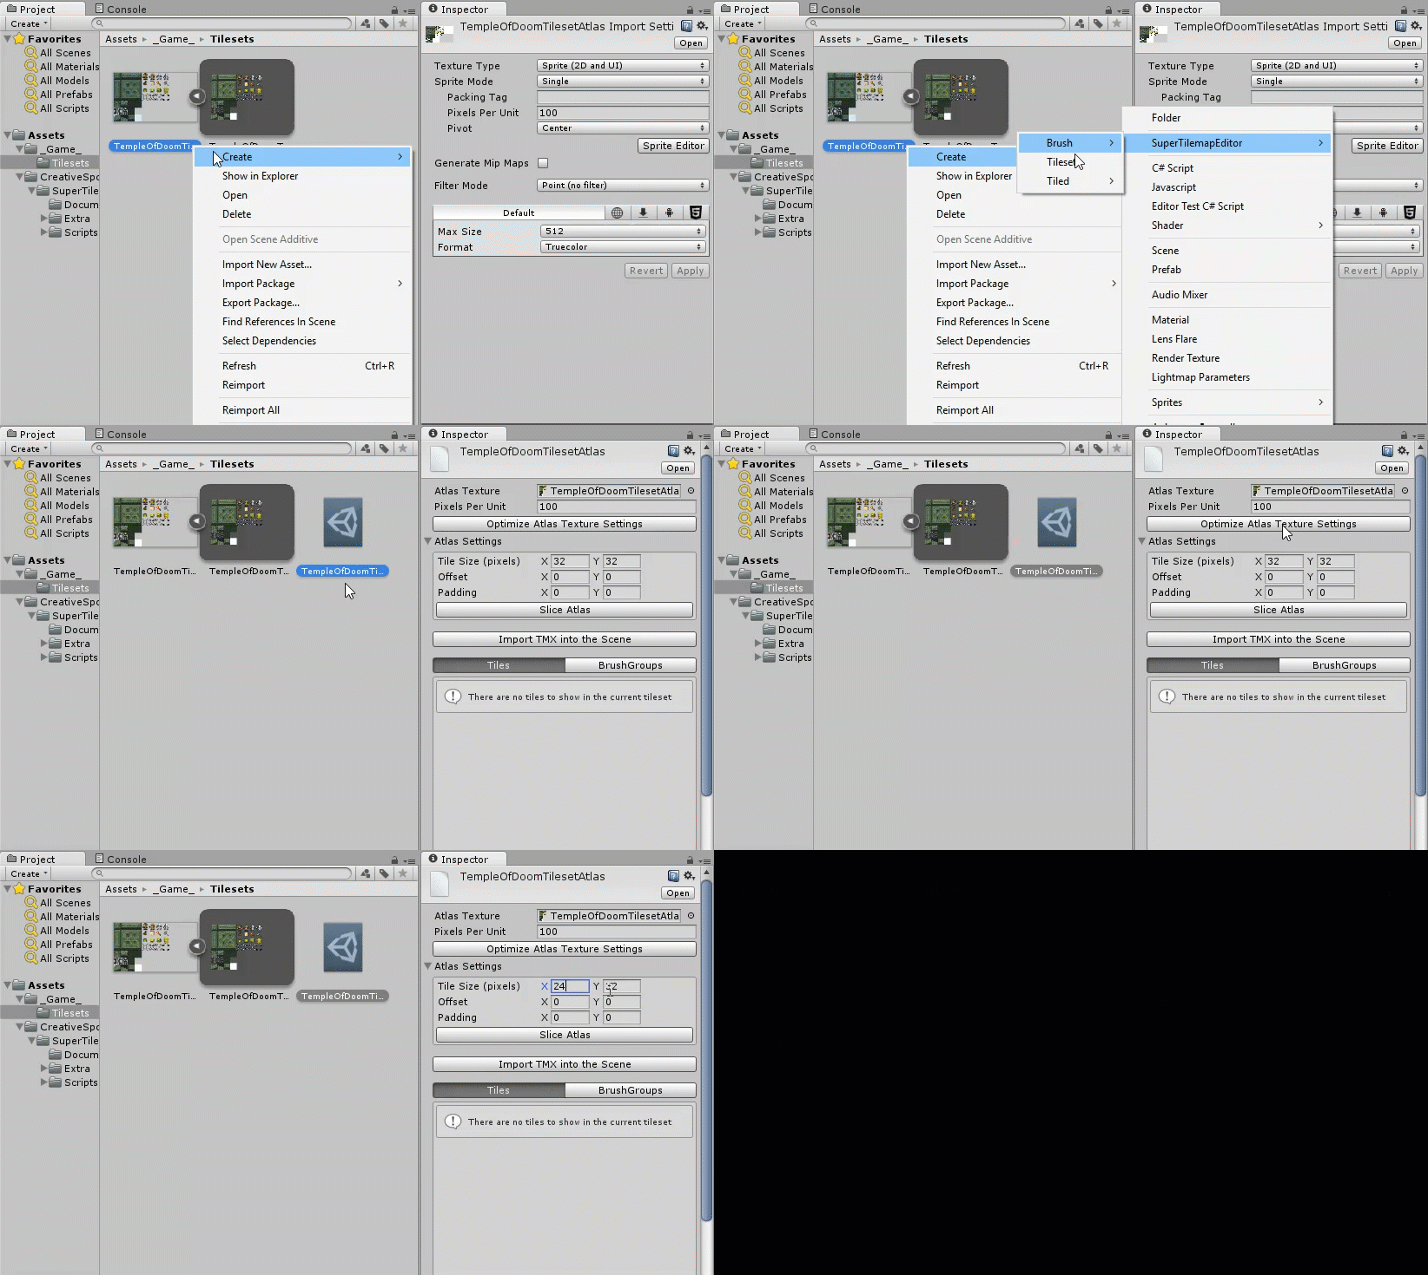
I added some space in the texture for more tiles in the future.
TIP: If you later need a bigger texture, you can extend it vertically (increasing the height) and press the Slice button to add the new tiles, keeping the previous tilemaps compatible with the new atlas texture. It won’t be compatible if you change the width, though, because the previous tile ids will change.
3. Creating some tileset brushes
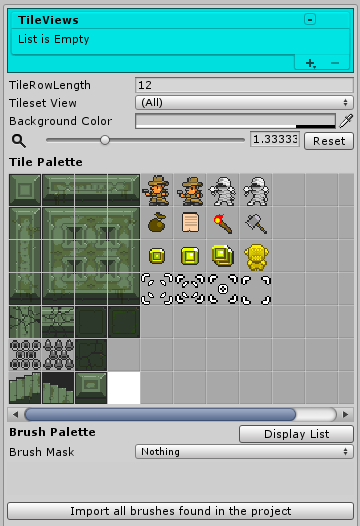
As you can see, the Brush Palette is empty. A brush is an asset with special code that changes the tile according to some rules. For example, it could select a tile depending on the neighbour tiles, change the tile over time to animate it, or just pick a random tile to reduce repetition.
We’re now going to create a Road Brush. This brush changes the tile according to the neighbour tiles on the top, right, left and bottom. We’ll use it for the walls.
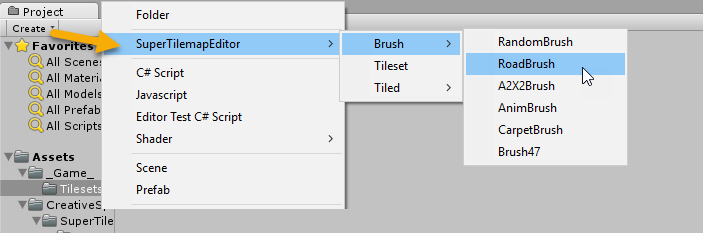 Create a Road Brush
 Assign the tileset. A brush can only be attached to a tileset.
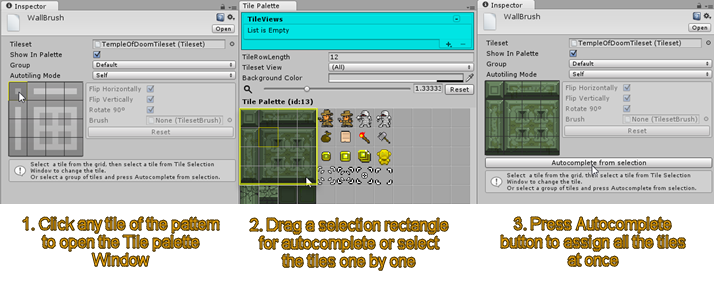
Creating a Wall brush was easy because the tile layout was the same as the Road brush layout. But what if the layout is different?
In that case, you select the tiles one by one for the first brush. After that, you can create a new brush by duplicating a previous one (e.g. select the brush and press Ctrl+D), change only one of the tiles, and press Autocomplete — the rest of the tiles change using the modified tile as reference. You can also change the RoadBrushEditor code to fit your custom layout.
Now let’s create a Random Brush for the floor. We can use the two different versions of the floor tile for that.
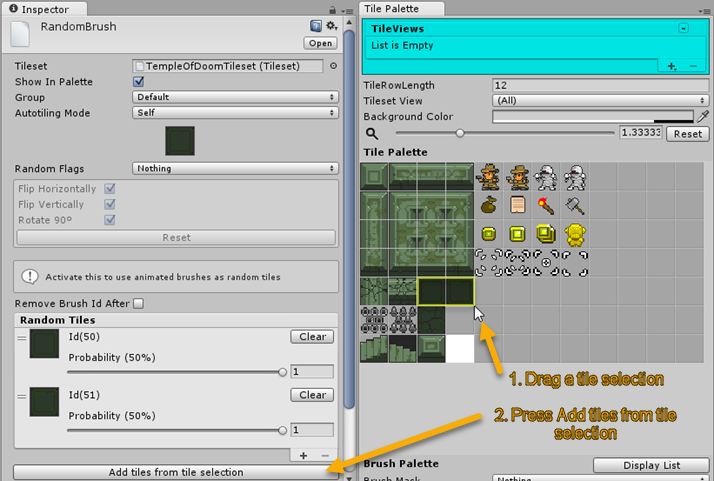
You can also add tiles manually by pressing ’+’ to duplicate the selected tile (or create a new one), then change a tile by clicking the tile preview and then the new tile in the Tile Palette. You can also change the probability of each tile appearing.
Finally, we can import the new brushes into the tileset by pressing the Import button:
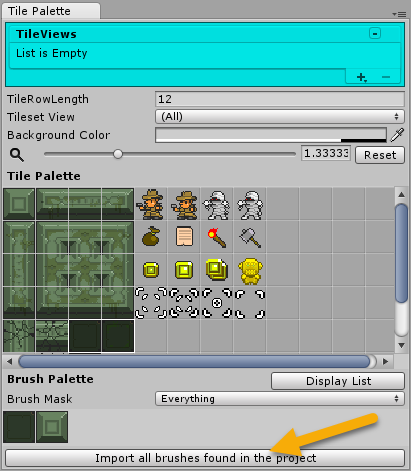
Now that we have a tileset and some brushes, we can start creating our first level.
4. Creating a tilemap group and a simple level using the tileset and the brushes
A tilemap group is basically a parent object that manages a group of tilemaps. It’s the same as an image made of different layers: the image would be the tilemap group and the layers would be the tilemaps.
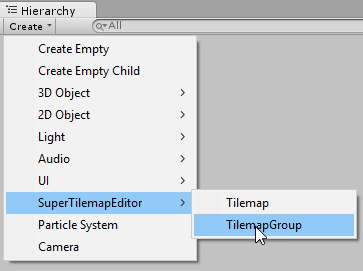 Creating a Tilemap Group is easy
Now we can add tilemaps to this group by pressing the ’+’ button in the tilemap list. We’ll create a tilemap first, assign the tileset to it, and then add 2 more tilemaps. This way, the new tilemaps copy the tileset from the first one and we can skip that step.
After that, we rename the tilemaps to Walls, Actors and Floor, and change the sorting order so the Walls render over the Actors and the Actors over the Floor.
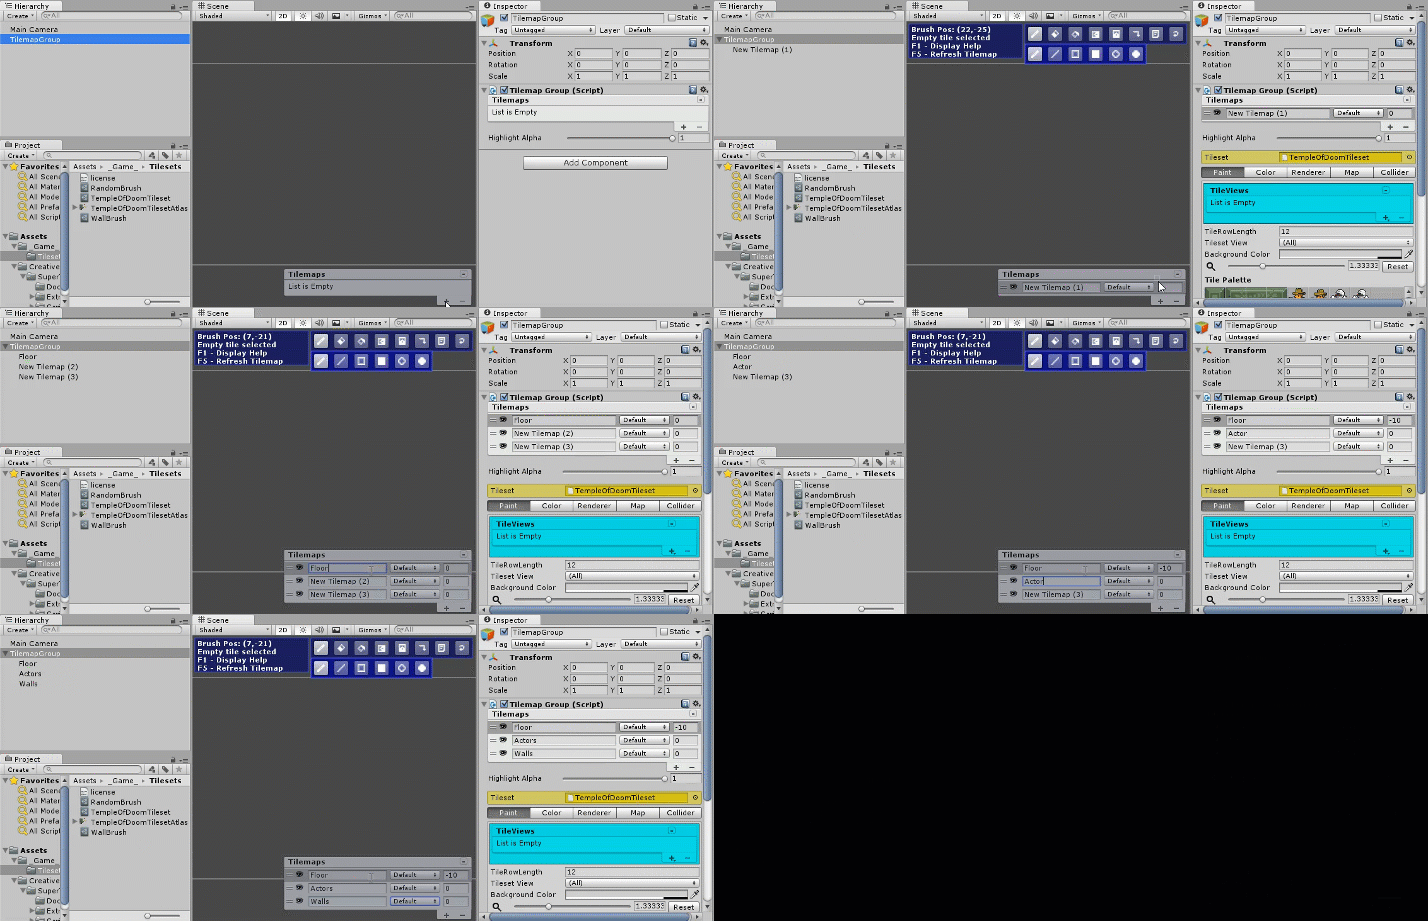
Drawing the level is easy. Select the tilemap you want to paint to (pressing the ’+’ and ’-’ keys cycles through the tilemaps in the group), then select the Paint tab and a tile to start painting. You can use the paint tools to draw basic shapes.
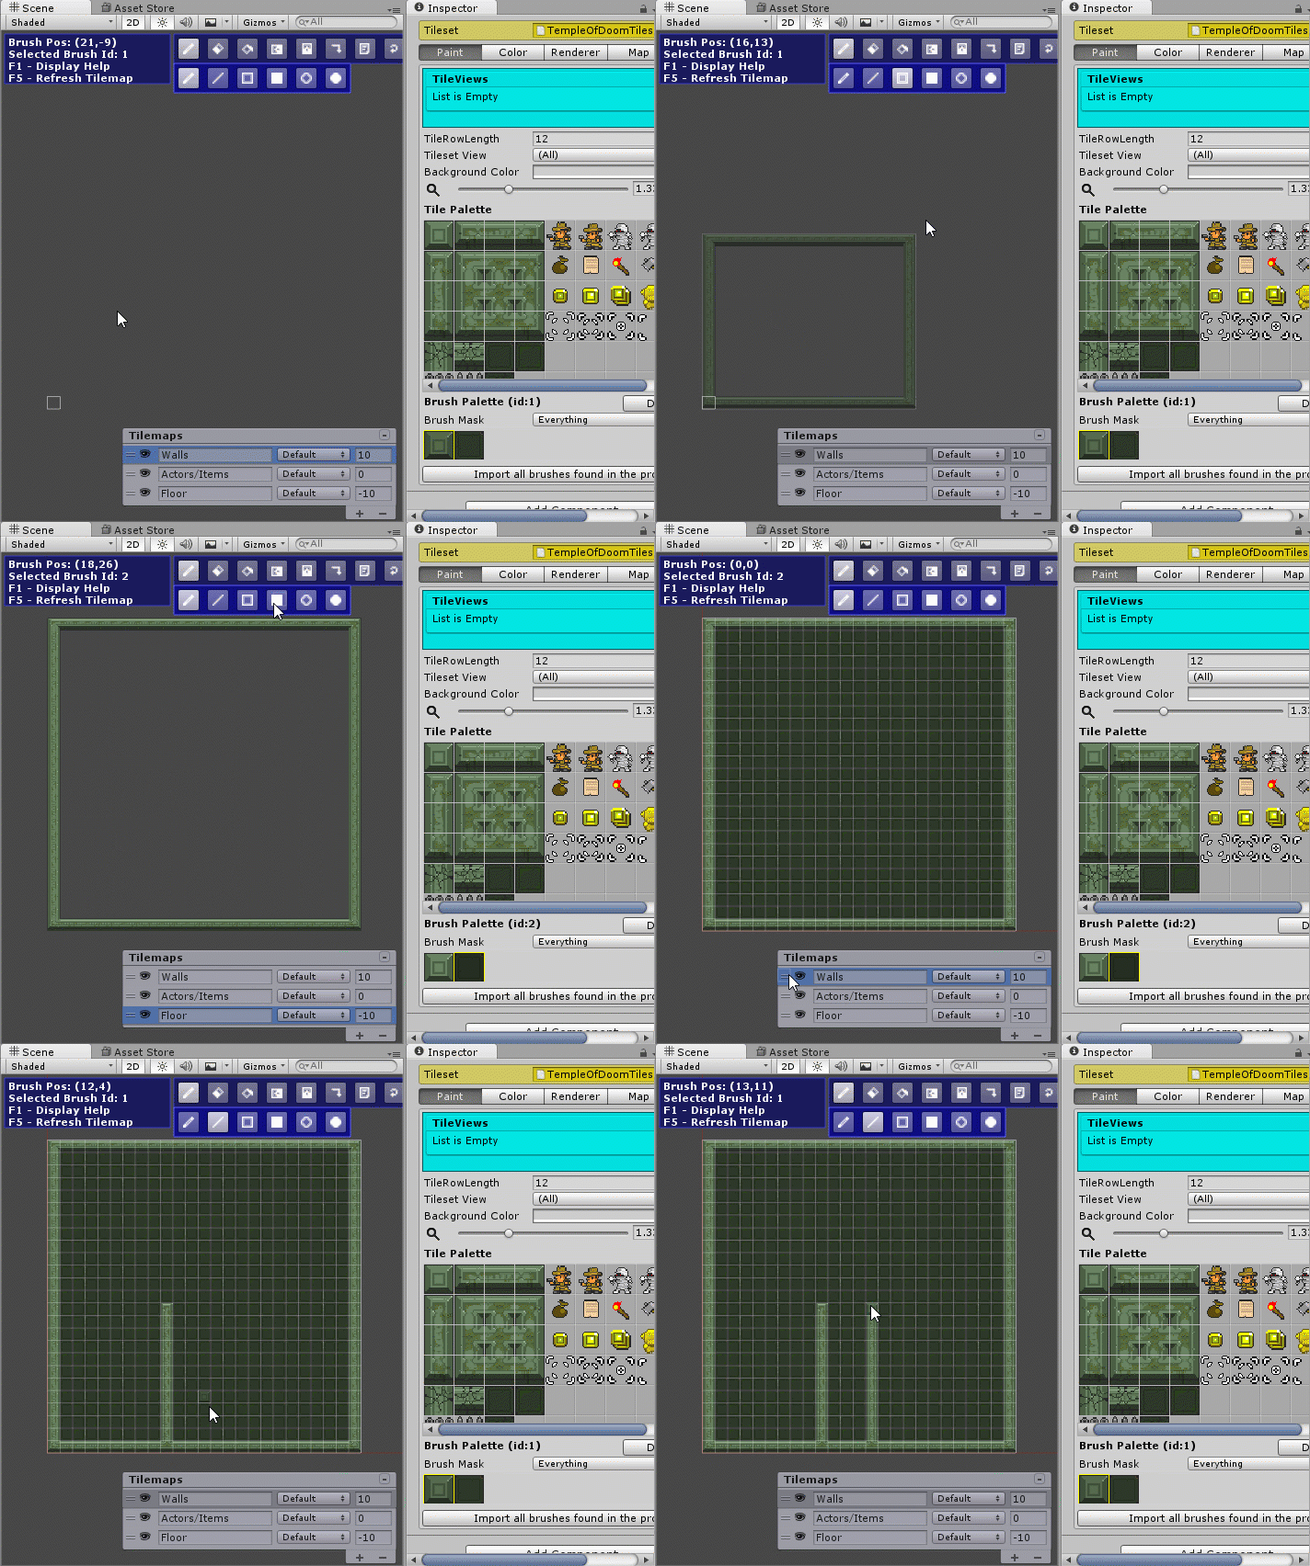
TIP 1: You can also right-click a tile to copy it, or make a selection of tiles. If you copy an empty tile, you can erase tiles (by painting the empty tile).
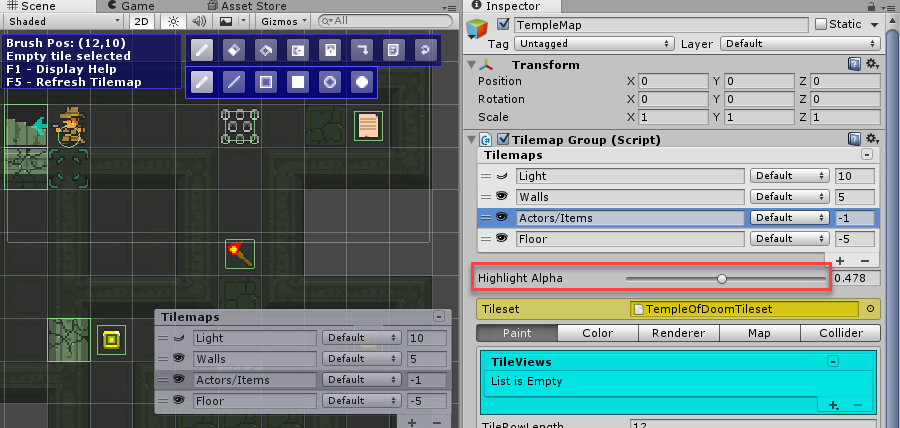
TIP 2: If you forget to switch to the right tilemap while painting, you can use the Highlight Alpha property to change the alpha of the unselected tilemaps.
5. Adding colliders to the wall tiles
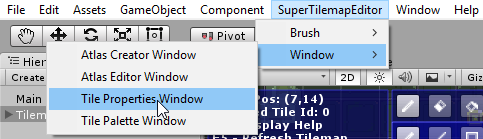
To add colliders to the walls, we first need to set up the collider data for the wall tiles. For this, open the Tile Property Window (right-click a tile in the tile palette, or go to menu → SuperTilemapEditor → Window → Tile Properties Window).
Then select the wall tiles, go to the Collider tab and press Full (because the collider will cover the entire tile). To make it faster, you can select more than one tile to modify them at once.
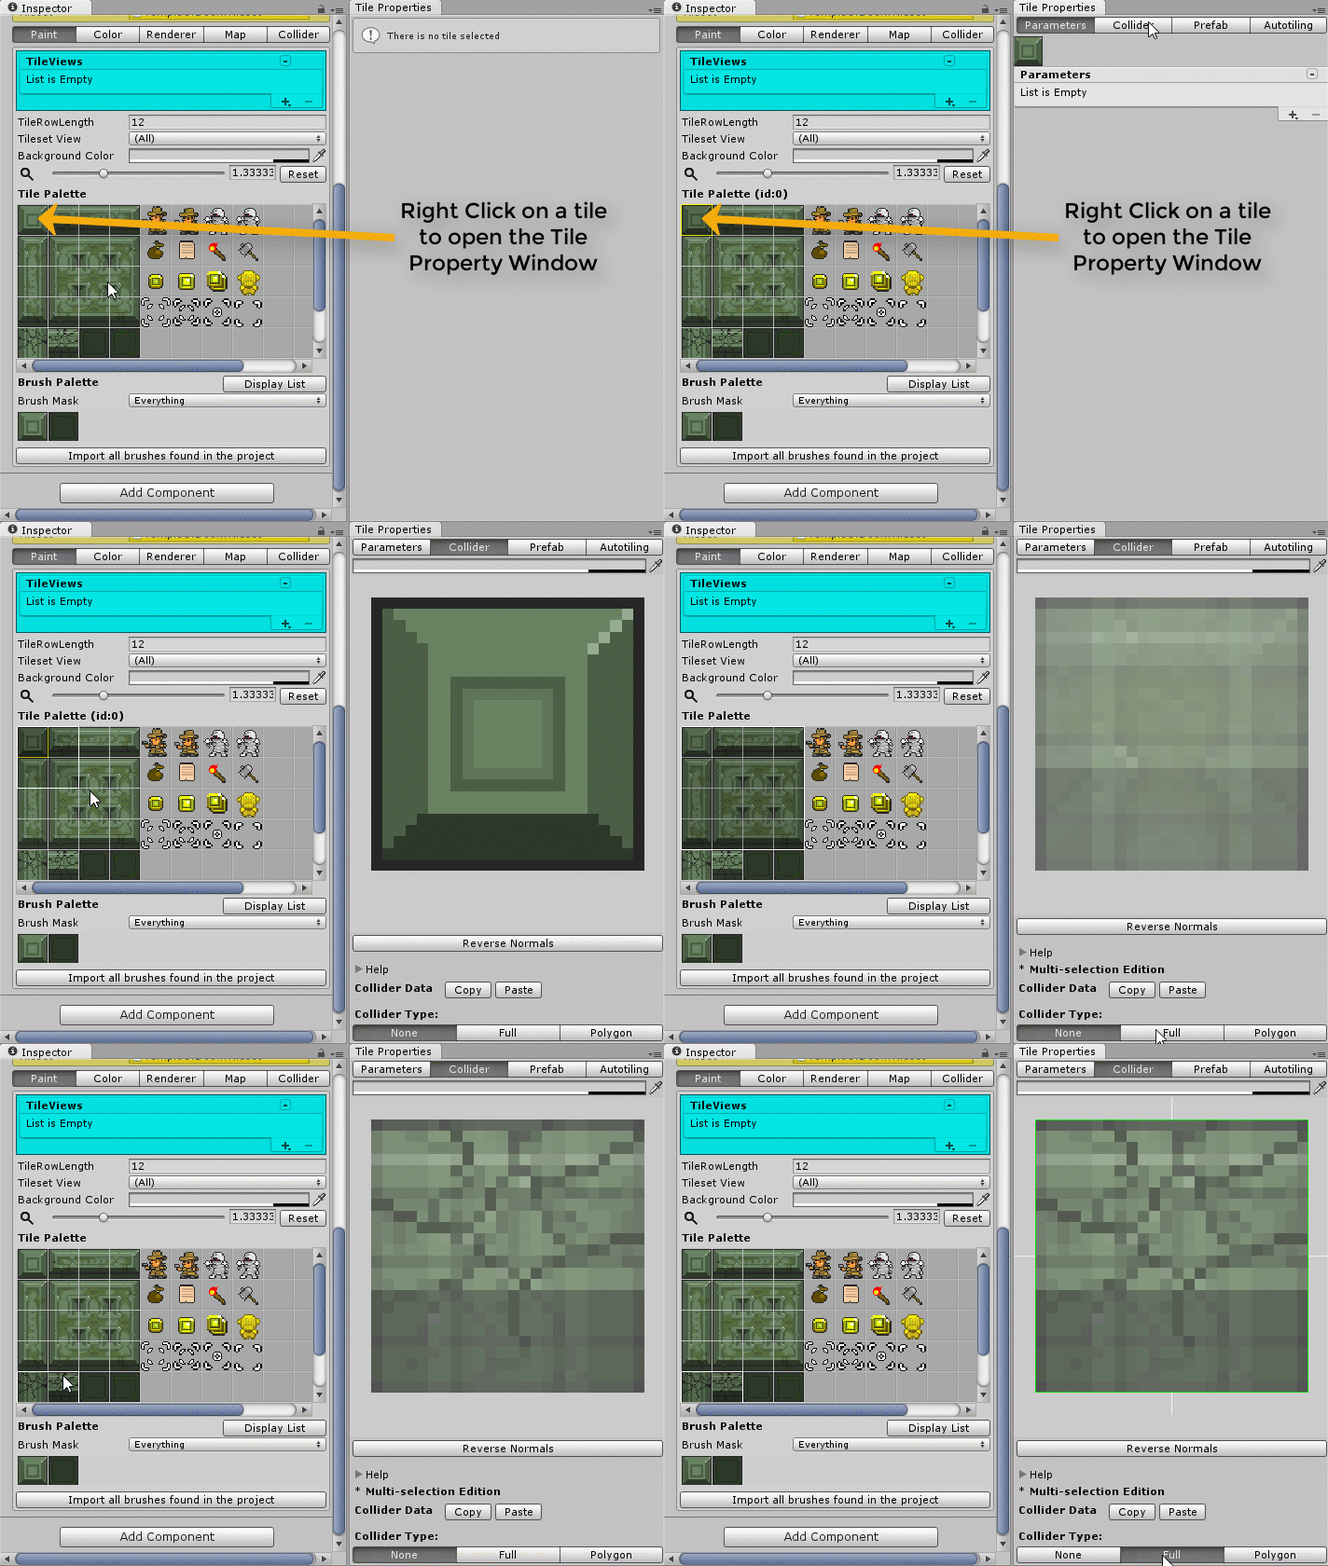
The tile collider properties only configure the shape of the collider, not its type. A Full collider is used for optimization, but its behaviour is the same as a Polygon collider — the only difference is that a Polygon collider lets you change the number of vertices and their positions to create different shapes.
Once we’ve configured the collisions of the wall tiles, we need to set the collider type of the wall tilemap. This makes the tilemap create a collider of the type we set. It can be a 2D collider (PolygonCollider2D or EdgeCollider2D) or a 3D collider (MeshCollider).
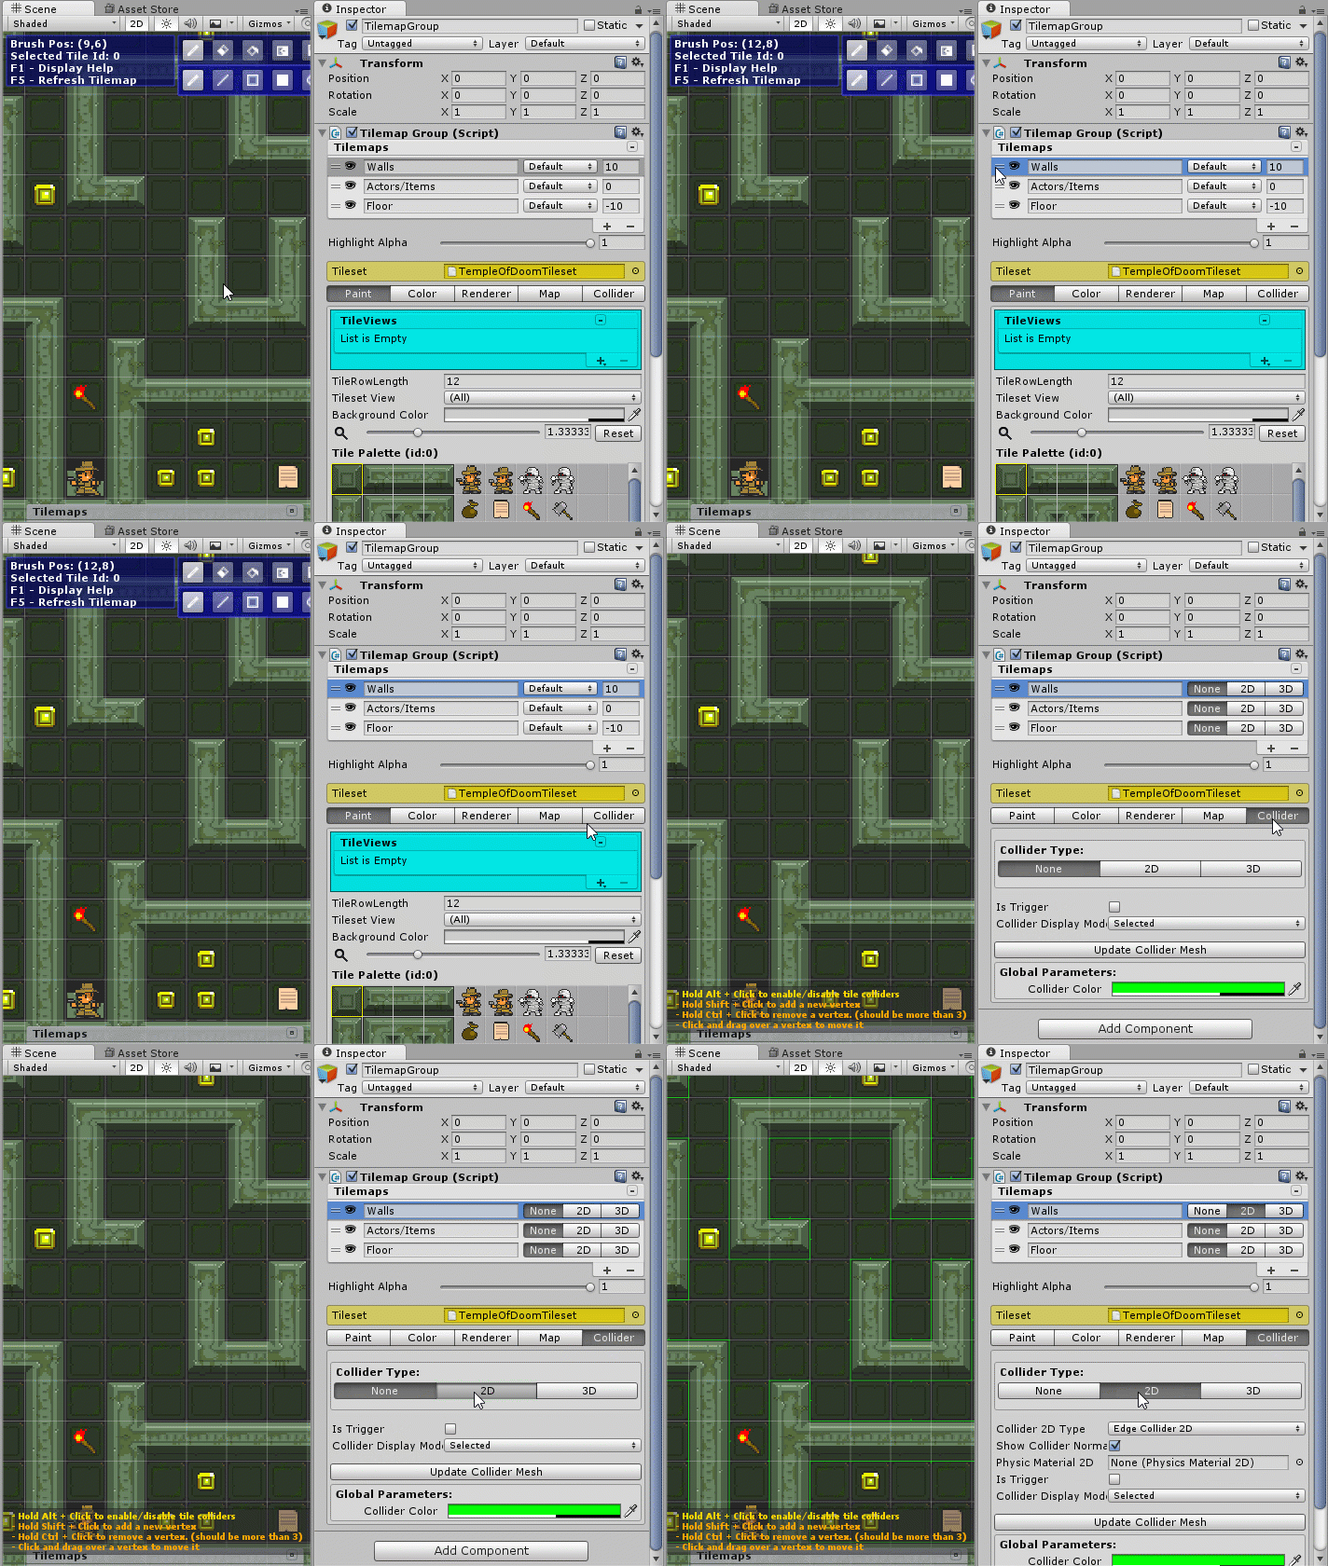 Configuring the Tilemap Walls to generate 2D edge colliders
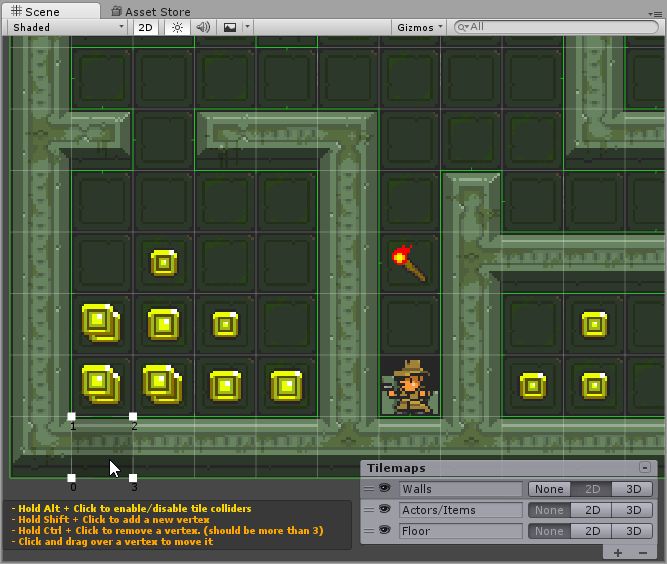
TIP: You can also configure the tile colliders directly in the scene view while the Collider tab is selected. Check the info box in the bottom-left corner to see how.
6. Making the broken wall tiles autotile with the Wall Brush using autotiling groups
If you tried to paint the broken wall in the middle of a wall, you’ll have noticed that the wall doesn’t autotile with this tile — as if it were a virus or a strange agent to avoid.
This happens because, by default, a brush autotiles only with itself. Brushes check the neighbours and decide the tile based on the autotiling check with them.
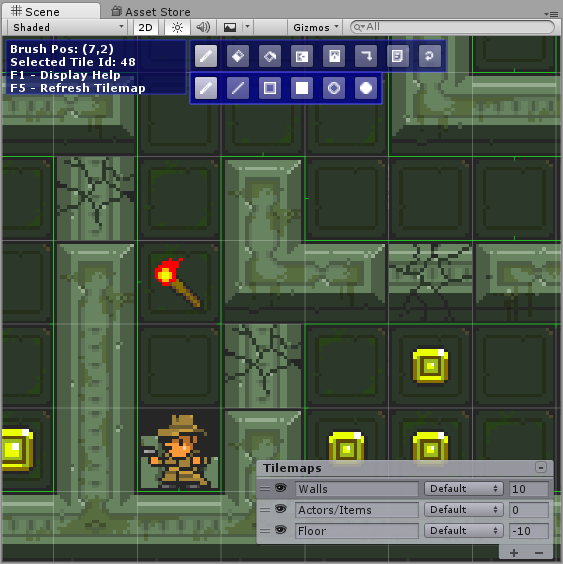 Wall brush doesn’t like the broken tiles
To make the Wall Brush consider another tile a friend to autotile with, you have a few options:
Changing the autotiling mode
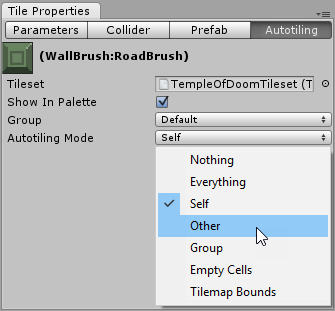 Brush Autotiling Properties (right-click the tile to open this window)
By default, a brush autotiles only with a brush tile of the same type. Here you can change the autotiling mode and combine them.
Autotiling modes:
- Everything: includes all the other modes.
- Self: autotiles only with brush tiles of the same type.
- Group: autotiles with tiles or brushes of the same group (explained next).
- Empty Cells: a cell where no tile is painted is treated as an empty cell.
- Tilemap Bounds: tiles that would be outside the tilemap bounds, even if there are no tiles at all.
So one way to make the broken tiles autotile with the Wall Brush would be making the Wall Brush autotile with Other tiles.
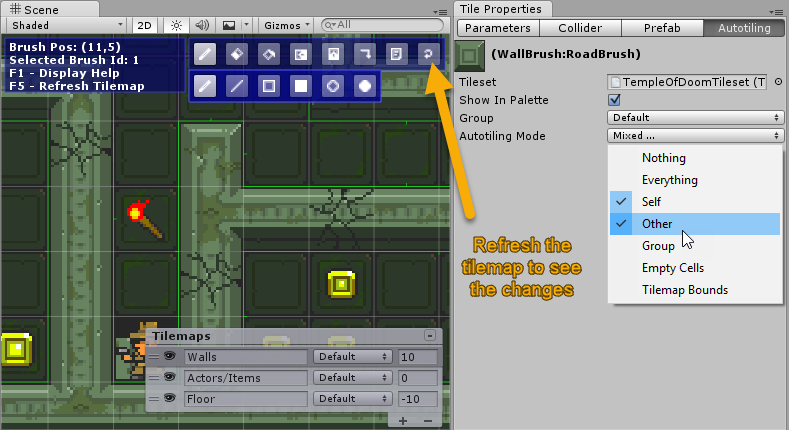
After changing the autotiling mode, you need to refresh the tilemap to see the changes.
Using autotiling mode Group for the wall tiles
There’s another way to make the broken tiles autotile with the Wall Brush. If we group the broken tiles and the Wall Brush together, we can make only the broken tiles — and no other tile — autotile with the wall.
For example, suppose we want to paint a door tile in the middle of a wall and we don’t want the door to autotile with the wall tiles:
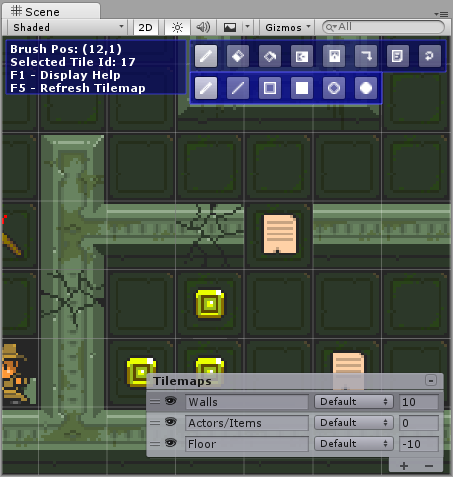 We don’t have a Door tile, so I used a Map instead
First we need to add the Wall group. Select the tileset (in the Project view, or double-click the tileset property in the Tilemap). Then select the BrushGroups tab and add the name “Wall” to Brush Group 1.
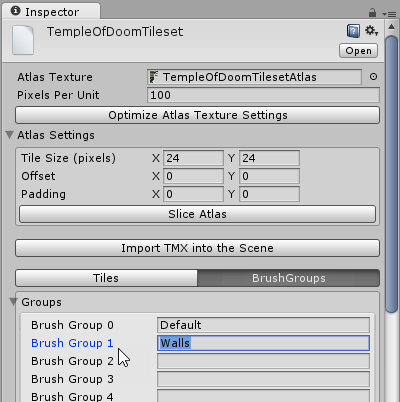 This works in a similar way to Unity Layers. If a group’s name is not empty, you’ll be able to select it in the Group drop-down menu.
Now select the Wall Brush, change the autotiling mode to (Self + Group), and change the Group from Default to Wall. Do the same with the broken wall tiles.
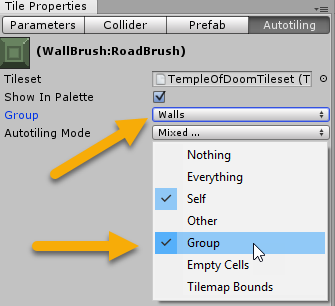
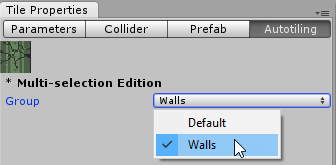 For the broken wall you can select both tiles to modify them at once
Now refresh the Wall tilemap to see the changes. The wall now autotiles with the broken wall, but not with the Map tile.
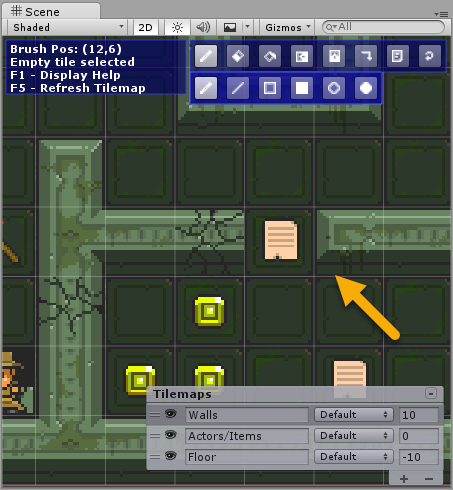
That’s the end of the first part of this tutorial.
You can download the example project here: Temple of Doom — Part 1 project.
I hope you enjoyed it. If you did, please share it and spread the word — that helps me create new tutorials. And if you have any suggestions to improve this tutorial, don’t hesitate to let me know.
In the next tutorial we’ll focus more on gameplay:
- Creating a player controller with tile-based movement and simple animation.
- Creating a mummy actor with AI to walk around and follow the player on sight using pathfinding.
- Collectibles picked up by the player on touch.
- A simple HUD showing the treasure taken by the player and lives.
- A touch controller for touch devices, or controlling the player by clicking on the screen with the mouse.
Originally published December 2017.