Getting Started
This page gets you from an empty project to a painted map. The quick way uses the demo tileset and takes one click. The second way builds the same thing by hand, so you know where each piece lives.
Concept
A map needs two assets and one component. The tileset (AutoTileset) holds the tile art. The map data (AutoTileMapData) stores the tiles you paint. The AutoTileMap component sits on a scene object, points at both, and draws the map. You paint from its inspector's Paint tab, in the Scene view.
Tiles you paint are kept in memory until you press Commit, which writes them into the Map Data asset. They are also saved when scripts recompile, when the scene closes and when play mode starts, so a forgotten Commit does not cost you work.
The quick way: Start Painting
- Open the welcome window from
Tools > RpgMapEditor > Welcome. - In the
Quick Startcard, clickStart Painting. - If the open scene has unsaved changes, Unity asks whether to save them.
- Choose where to save the new Map Data asset. It is called
New Map Dataunless you rename it.
You get a new scene with a map object called AutoTileMap, already selected. It uses the demo tileset from Samples/Scenes, which stays where it is. The map is 200 by 200 tiles with three layers: Ground, Ground Overlay and Overlay. The inspector is on the Paint tab with painting switched on, and the Scene view is in 2D mode looking at the top left corner of the map, where tile (0, 0) is.
Pick a tile in the palette in the inspector and left click in the Scene view to paint. Press Commit in the inspector when you are done. Carry on from Paint below.
Note
Start Painting is greyed out if the Samples folder is not in the project. Import it again from the Package Manager, or follow the steps below with your own tileset.
By hand
Add the map
Choose GameObject > RpgMapEditor > AutoTileMap. A new object called AutoTileMap is added to the open scene and selected. The inspector says which assets it still needs.
Assign a tileset
You have three choices for the Tileset field:
- Click
Use Demo Tilesetto use the sample tileset. Nothing is copied; the map refers to the asset inSamples/Scenes. - Drag an
AutoTilesetyou already have into the field. - Click
Createnext to the field. This makes an empty tileset calledNew AutoTilesetand selects it.
A new tileset has no atlas yet, and the map inspector says so. The tileset's own inspector asks for Horizontal Slots:, Vertical Slots: and Tile Size In Pixels:, then Generate Atlas of ... builds the atlas texture. After that, Edit Tileset... opens the tileset window, where you drop your RPG Maker sheets into slots. Tilesets and Tileset Window cover it step by step.
Assign map data
Click Create... next to Map Data and choose where to save it. The new asset is an empty 200 by 200 map with Ground, Ground Overlay and Overlay layers. You can also drag in a Map Data asset you already have. Scenes that share one share the same map.
Once both assets are set and the map has loaded, the inspector shows three tabs: Settings, Paint and Data. The map size lives on the Settings tab as Map Width and Map Height. Change them and press Apply New Dimensions to resize. See Maps.
Paint
- Open the
Painttab and pressEdit. Until you do, the tab only reminds you to. - Pick a layer in the
Map Layerslist. The name of the selected layer is shown above the list. - Choose a sub tileset from the
Tileset:popup above the palette, then left click a tile in the palette. To pick a block of tiles, right-drag across the palette instead. - Move the mouse over the Scene view. The brush follows it, snapped to the tile grid.
- Left click or drag to paint.
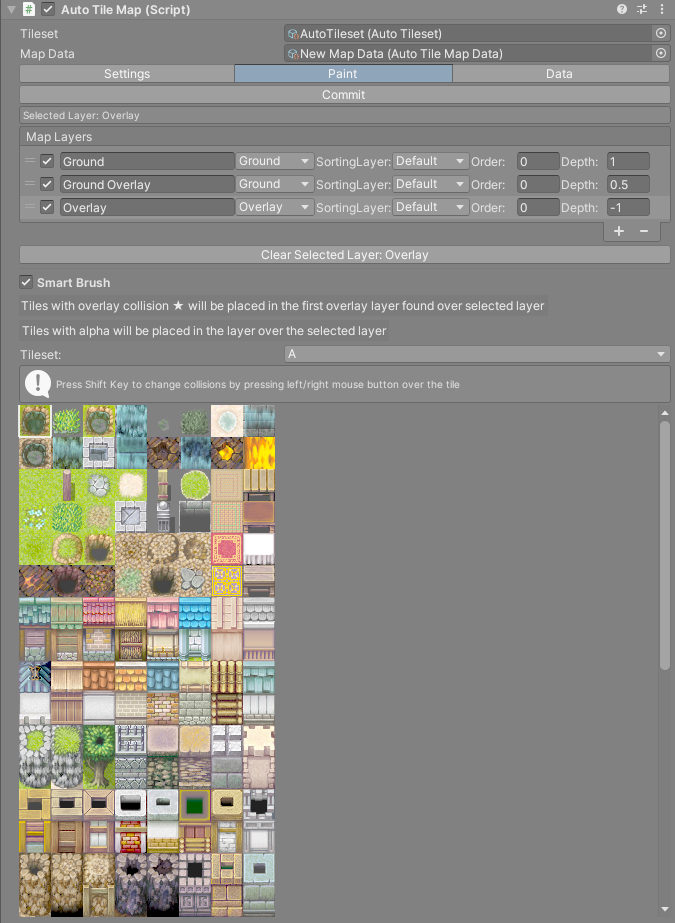
A few controls you will want straight away:
| Input | What it does |
|---|---|
| Left click or drag | Paint the selected tile. |
Shift + left click |
Paint the selected tile on the layer above the selected one. |
| Right click | Copy the tile under the cursor into the brush. Right-drag copies a block of tiles. |
Shift + Z / Shift + Y |
Undo and redo the last brush action. |
The tile does not always land on the selected layer. Smart Brush, a toggle below the layer list that is on by default, sends tiles with transparent pixels (a tree, a sign) to the layer above and tiles with the overlay collision type to the first Overlay layer. So you can paint grass and then trees with Ground selected. Which layer a tile goes into has the full rule.
To erase, click the eraser button in the RPG Map Editor overlay in the Scene view, then paint. The pencil button next to it switches back to painting. Every control is listed in Keyboard and Mouse, and Painting explains layers, the Smart Brush and copying.
Tip
Unity's Ctrl + Z does not undo painting. The map has its own undo on Shift + Z, one step per brush stamp.
Commit
Press Commit at the top of the Paint tab. It writes the map into the Map Data asset, saves it, and turns painting off. Press Edit to carry on.
While there are changes that have not been written yet, the Paint tab says Uncommitted changes. They are also written when scripts recompile, the scene closes, play mode starts, or you select another object. Saving the scene alone does not write them, because the tiles live in the Map Data asset and not in the scene. Saving and Loading has the details.
Press Play
The map needs no camera setup to show in the Scene view. To see it in the Game view:
- The map grows right and down from the world origin, because tile rows count downwards. Move the camera so it looks at that area. Keep the map object itself at
(0, 0, 0): the drawn tiles do not follow it, while tile lookups do, so a moved map paints and collides in the wrong place. See Maps. - Set
View Cameraon theSettingstab. The in-game map editor andRpgMapHelper.GetMouseWorldPositionuse it to find the tile under the mouse. If it is empty when the in-game editor starts, the Main Camera is used and a warning is logged.
A new map shows the in-game map editor when you press Play, because Show Map Editor On Play on the Settings tab starts on. It shows in player builds as well. Turn it off before you build your game. See In-Game Map Editor.
To walk around a map with a character, look at the Sample Scenes and the Gameplay Framework.