Maps
A map in the scene is an AutoTileMap component that paints with a tileset and stores its tiles in a Map Data asset. This page covers creating one, what its inspector shows before and after it is set up, and every field in its Settings tab.
Concept
A working map needs three pieces:
- the
AutoTileMapcomponent on a GameObject in your scene, - an
AutoTilesetasset with the tile art and collisions (see Tilesets), - an
AutoTileMapDataasset, shown in the inspector asMap Data, with the map size, the layers and every painted tile.
The tiles live in the Map Data asset, not in the scene. Two scenes that use the same Map Data asset show the same map, and a change painted in one appears in the other.
How to use it
Create a map
- Choose
GameObject > RpgMapEditor > AutoTileMap. A GameObject namedAutoTileMapis added and selected. - In its inspector, press
Use Demo Tilesetto paint with the sample art, orCreatenext toTilesetfor an empty tileset of your own. - Press
Create...next toMap Dataand choose where to save it.
The fastest route to a first map is the Welcome window's Start Painting button, which does all of this in a new scene. See Getting Started.
Leave the map's GameObject at position 0, 0, 0 with no rotation and a scale of 1. The Scene view brush and the tile meshes both work as if the map sits at the world origin, while tile lookups and collisions follow the object, so a moved map stops lining up. Since 1.6.1 the inspector warns when the map is off the origin, and Move To Origin puts it back (Undo reverts it).

What gets created
Adding the component also adds two companions: Auto Tile Map Gui, the in-game map editor, and Auto Tile Map Editor Behaviour, which reloads the map in the editor after scripts recompile or a scene opens.
When the map is selected or loads, it creates a few objects for itself:
BrushGizmo, a child that shows the brush in the Scene view,Minimap, a child that draws the map preview whenShow Minimapis on,AutoTileMap Data, a separate GameObject at the root of the scene that holds the meshes the tiles are drawn with. Its name is the map's name plusData.
Leave these alone. The map rebuilds the meshes under the Data object every time it loads. How It Works explains what is inside.
The empty inspector
Until both assets are assigned, the inspector says what is missing instead of showing tabs. The bold line reads This map needs two assets before you can paint., or names the one asset still missing.
| Button | What it does |
|---|---|
Create |
Creates an empty tileset named New AutoTileset in the Assets folder and selects it, so you can generate its atlas. |
Create... |
Asks where to save a new Map Data asset: an empty map of 200 x 200 tiles with the layers Ground, Ground Overlay and Overlay. |
Use Demo Tileset |
Assigns the sample tileset where it is. Nothing is copied. Greyed out when the Samples folder is not in the project. |
If the tileset has no atlas yet, a second box says The tileset has no atlas yet. Press Select Tileset to go to it and generate the atlas, or drag an atlas you already have into its Tileset Atlas field.
When both assets are set but the tiles have not loaded, the inspector shows Load Map. The map normally loads by itself within a moment, so you rarely need it.
The three tabs
Once the map is loaded, the inspector shows three tabs:
Settings, described below.Paint, where you pressEdit, pick tiles from the palette and manage the layer list. See Painting and Layers.Data, with buttons to reload, import, export, clear and generate the map. Import and export are covered in Saving and Loading. TheDatatab is empty in play mode.
The Settings tab
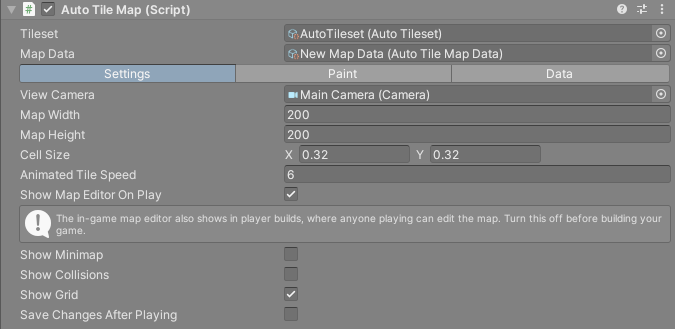
Map size
Map Width and Map Height are in tiles, 1 or more. Typing a new value does not resize the map yet. An Apply New Dimensions button appears, and pressing it resizes the map and saves the Map Data asset straight away.
Resizing keeps the top left corner in place. Growing adds empty tiles on the right and at the bottom, and shrinking cuts tiles off there. The cut tiles are gone, so back up the Map Data asset before you shrink a painted map.
Cell Size
Cell Size is the size of one tile in world units. It is set from the tileset the first time the map loads, at 100 pixels per unit: 32 pixel tiles give 0.32. Change it to scale the whole map, then press the Reload Map button that appears.
Characters, the camera and your own scripts all work in world units, so a different cell size changes how far a character travels per tile. See Tiles and Positions.
Reference
| Field | What it does |
|---|---|
Tileset |
The tileset this map paints with. Changing it reloads the map. |
Map Data |
The asset that stores the map. Changing it loads that map. |
View Camera |
The camera that shows the map in play mode. The in-game map editor and RpgMapHelper.GetMouseWorldPosition use it to find the tile under the mouse. When it is empty as the in-game editor starts, the Main Camera is used. |
Map Width / Map Height |
Map size in tiles, applied with Apply New Dimensions. |
Cell Size |
Size of one tile in world units, applied with Reload Map. |
Animated Tile Speed |
Frames per second for animated tiles such as water. Default 6. 0 stops them, and negative values become 0. |
Show Map Editor On Play |
Turns the Auto Tile Map Gui component on or off. See below. |
Collision Enabled |
Play mode only. When off, the map reports no tile collisions at points, so characters walk through walls and water. See Tile Collisions. |
Show Minimap |
Edit mode only. Draws a preview of the map in the Scene view, one colour per tile, and keeps it up to date while you paint. |
Show Collisions |
Tints the parts of tiles that block movement red in the Scene view while the map is selected. Not saved. |
Show Grid |
Draws the tile grid over the map in the Scene view while the map is selected. Needs Gizmos turned on in the Scene view. |
Save Changes After Playing |
Writes tiles changed in play mode into the Map Data asset. Off by default. See below. |
Show Map Editor On Play
This toggle turns the in-game map editor on or off. It is on for a new map. While it is on, and you are not in play mode, a box reminds you that the editor also shows in player builds, where anyone playing could edit the map. Turn it off before you build your game. The change can be undone with Ctrl+Z and is kept as a prefab override. See In-Game Map Editor.
Save Changes After Playing
When this is on, tiles changed in play mode are written into the Map Data asset when play mode stops or another scene loads. Nothing is written if no tile changed. A warning box names the asset that will be overwritten, because the write cannot be undone and every scene using that Map Data changes too. Saving and Loading covers when the editor saves the map.
The Data tab
| Button | What it does |
|---|---|
Reload Map |
Loads the map again from the Map Data asset, dropping anything not yet saved into it. |
Import Map... |
Replaces the map with one from an XML file. See Saving and Loading. |
Export Map... |
Saves the map into the asset, then to an XML file. |
Clear Map... |
Empties every layer after an Are you sure? dialog and saves the empty map into the asset. |
Generate Map... |
Fills the map with random terrain. See below. |
Generate Map
Generate Map... clears the whole map and paints random terrain from Perlin noise: water, water plants, dark grass, flowers, grass and mountains. It saves the result into the Map Data asset when it finishes, so the old map is gone. The dialog warns that it can take several minutes when the map holds 160,000 tiles or more, the size of a 400 x 400 map.
It is written for the sample tileset. It paints fixed tile numbers onto the first two layers, whatever they are called: ground and water from the first sub-tileset and flowers from the second. With another tileset you get whichever tiles sit at those numbers, which rarely looks like terrain. Use it to try out the sample tileset, or read AutoTileMapEditor.DrawDataTab as a starting point for a generator of your own.
The Map Data asset
An AutoTileMapData asset holds the map's width and height, and for each layer its name, type, visibility, sorting layer, order, depth and tiles. The tiles are stored in a compact form described in How It Works. There is no menu item for it: create it with Create... in the map inspector or with the Welcome window's Start Painting.
The map writes into the asset when you press Commit in the Paint tab and at the other moments listed in Saving and Loading. Layer settings are written along with the tiles and read back from the asset whenever the map loads.