Tileset Window
The Tileset Window is where you put RPG Maker sheets into the atlas slots of a tileset and set the collision of each tile. This page covers the atlas and sheet editing. Collisions have their own page, Tile Collisions.
Concept
The window has three tabs along the top:
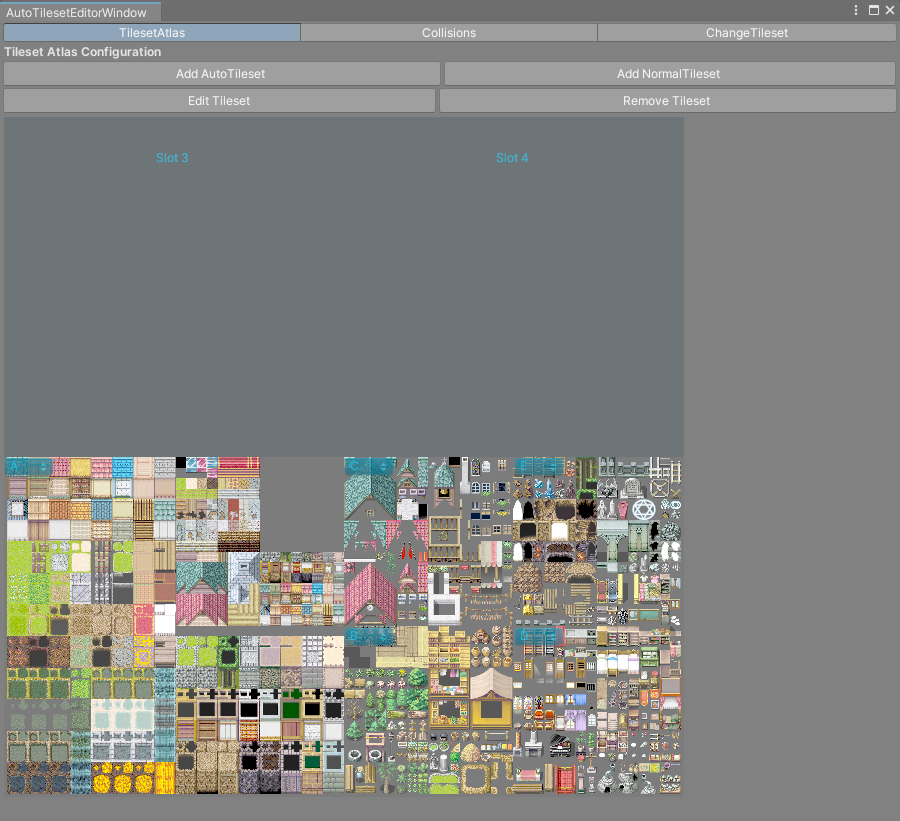
TilesetAtlasshows the atlas with its slots, and the buttons to add, edit and remove sheets.Collisionsshows one sub-tileset at a time, where you click tiles to set their collision type.ChangeTilesetholds the sheet fields of the slot you are adding or editing. You normally reach it from a slot button, not by clicking the tab.
The window works on one tileset. It closes itself if that tileset or its atlas goes away, and it also closes after scripts recompile.
How to use it
Open the window
- Select an
AutoTilesetasset that already has an atlas. If it does not, generate one first, as Tilesets explains. - Press
Edit Tileset...in its inspector.
The window has no menu entry, so this button is the only way to open it.
Add sheets to a free slot
- In the
TilesetAtlastab, pressAdd AutoTilesetfor the A1 to A5 sheets, orAdd NormalTilesetfor B to E sheets. The button stays highlighted. - Free slots now show a button of the same name. Click the slot you want. The window switches to
ChangeTileset. - Drag each sheet from the Project window into its field. Hover a field name to see what belongs there.
- Press
Accept.
The ChangeTileset tab first says what tile size the tileset uses (Tile Size: 32 px. Every size below is worked out from it.), and every field label carries the size it expects. An autotileset slot shows five fields, Animated (A1), Ground (A2), Building (A3), Wall (A4) and Normal (A5). A normal slot shows four, Objects (B) to Objects (E).
Cancel goes back to TilesetAtlas. For a slot you were adding, it also empties the slot again, so nothing is left half set up.
Cancel Action under the atlas turns off the highlighted button without clicking a slot.
What Accept does
Accept first checks the size of every sheet you dropped in. When they all fit, it:
- changes each sheet's import settings so its pixels can be read (readable, point filtering, no compression, no scaling),
- copies each sheet into its place in the slot,
- writes the atlas back to its PNG file,
- rebuilds the tileset's tile data,
- returns to the
TilesetAtlastab.
A field left empty copies nothing but clears its part of the slot to transparent. That matters when you edit a slot later: see below.
When a sheet does not fit
The check reads the size of the image file itself, not the imported texture. A 512x384 sheet that Unity rounded up to 512x512 on import is judged at 512x384, and Accept fixes the import afterwards.
If any sheet is the wrong size, a dialog titled Wrong sheet for this field (or Wrong sheets for these fields) explains each one. The wrong fields are cleared, and nothing is copied into the atlas until you press Accept again. The message depends on what the size matches:
| The sheet's size matches | What the message tells you |
|---|---|
| Another field of the same slot | Which field it belongs in, so you can move it. |
| An A sheet, but the slot is a normal tileset | To cancel, press Add AutoTileset and use a free slot instead. |
| A B to E sheet, but the slot is an autotileset | To cancel, press Add NormalTileset and use a free slot instead. |
| An RPG Maker sheet at another tile size, such as 48 pixel MV or MZ art | That the tile size cannot change once the atlas exists, and to create a new tileset with Tile Size In Pixels set to that size. |
| Nothing | The size the field expects, and that a cropped or resized sheet needs its original layout back. |
Tip
A1 and A2 sheets have the same size, so the check cannot tell them apart. A water sheet dropped into Ground (A2) passes. Look at the field names before you press Accept.
Edit a filled slot
- In
TilesetAtlas, pressEdit Tileset. Filled slots show an[A]Editbutton for an autotileset or[+]Editfor a normal tileset. - Click the slot.
ChangeTilesetopens with the sheets that slot was built from. - Swap the sheets you want to change and press
Accept.
Accept copies every field again. If a sheet the slot was built from has been deleted, its field is empty, and that part of the slot is cleared.
Tiles keep their numbers when you replace a sheet with another of the same kind, so maps painted from the slot show the new art in the same places.
Remove a slot's sheets
- In
TilesetAtlas, pressRemove Tileset. Filled slots show[A]Removeor[+]Remove. - Click the slot. A
Remove Tilesetdialog names the sub-tilesets it will remove. - Press
Remove.
The slot is cleared in the atlas image and the PNG is saved, so this cannot be undone.
Warning
Removing a sub-tileset changes the numbers of every sub-tileset in a later slot, and maps painted with this tileset can show wrong tiles afterwards. Collision settings are stored by tile number too: since 1.6.1 they move down with their tiles, while before they stayed in place and ended up on different tiles. The painted maps cannot follow, so remove sheets before you paint maps with the tileset, or only from the last filled slot.
Rename a sub-tileset
With none of the four buttons active, every sub-tileset in the atlas shows a small popup with its letter. Pick another free letter to rename it. The letter only labels the sub-tileset in the palettes. It does not change tile numbers.
Reference
| Control | Where | What it does |
|---|---|---|
Add AutoTileset |
TilesetAtlas |
Arms free slots to take the A1 to A5 sheets. |
Add NormalTileset |
TilesetAtlas |
Arms free slots to take four B to E sheets. |
Edit Tileset |
TilesetAtlas |
Arms filled slots to open their sheets in ChangeTileset. |
Remove Tileset |
TilesetAtlas |
Arms filled slots to be cleared, after a confirmation. |
Cancel Action |
TilesetAtlas |
Turns off the armed button. |
| Letter popup | TilesetAtlas |
Renames a sub-tileset. |
Accept |
ChangeTileset |
Checks the sheets, copies them into the atlas and saves it. |
Cancel |
ChangeTileset |
Goes back without copying. Empties a slot you were adding. |