Keyboard and Mouse
Every keyboard and mouse control RPG Map Editor adds, grouped by where you use it: the Scene view, the palette in the map inspector, the tileset window and the in-game map editor. The pages that explain each tool are linked at the bottom.
Before a control works
The Scene view controls only answer while an AutoTileMap is selected, its map has loaded, and you have pressed Edit in the Paint tab. The RPG Map Editor overlay in the Scene view shows the paint tools only in that state. Otherwise it says Press Edit in the Paint tab to paint.
In the Scene view the only modifier key is Shift. Ctrl, Alt and Command do nothing special there. Unity's own Ctrl + Z does not undo painting either, because the map keeps its own undo history.
Painting in the Scene view
| Input | What it does |
|---|---|
| Left click or drag | Paint the brush on the selected layer. The brush is the tile picked in the palette, or the block of tiles you copied. |
Shift + left click or drag |
Paint on the layer above the selected one. A tile with the overlay collision type still goes to the Overlay layer while Smart Brush is on. With a copied block, the part copied from the selected layer is painted one layer up. |
| Right click | Copy the cell under the cursor into the brush, every layer of it. |
| Right-drag | Copy the rectangle you drag over, every layer, into the brush. A green rectangle shows the area. |
Shift + right click or right-drag |
Copy only the layers above the selected layer. Use it to pick up a tree or a fence without the ground under it. |
Shift + Z |
Undo the last brush action. |
Shift + Y |
Redo. |
F1 |
Show or hide the painting help in the RPG Map Editor overlay. |
| Middle-drag, mouse wheel | Pan and zoom the Scene view. These are Unity's own controls and painting leaves them alone. |
Undo and redo work one brush stamp at a time. Dragging across ten cells makes ten steps.
Releasing the right mouse button always switches back to the paint tool, so copying a tile while the eraser is active leaves you ready to paint with it.
Smart Brush, below the layer list in the Paint tab, is on by default. While it is on, a tile picked from the palette can land on another layer than the selected one: tiles with the overlay collision type go to the first Overlay layer from the selected one down the list, and tiles with transparent pixels go to the layer above. Clear it to paint only on the selected layer. See Which layer a tile goes into.
The RPG Map Editor overlay
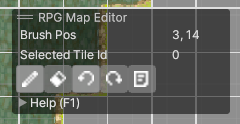
The overlay shows Brush Pos (the tile under the brush) and Selected Tile Id, then a row of buttons:
| Button | What it does |
|---|---|
| Pencil | Paint with the tile selected in the palette. |
| Eraser | Paint with an empty tile, which erases on the selected layer. |
| Undo | Same as Shift + Z. Dimmed when there is nothing to undo. |
| Redo | Same as Shift + Y. |
| Info | Show or hide the help, like F1. |
It is a regular Scene view overlay. You can move it, dock it, collapse it, or hide it from the Scene view's Overlays menu (the ` key by default). It only appears while a map is selected.
The palette in the map inspector
In the Paint tab:
| Input | What it does |
|---|---|
| Left click a tile | Select it. This clears any copied block from the brush and switches to the paint tool. |
| Right-drag across tiles | Select a block of tiles as the brush. |
Hold Shift |
Show the collision type of every tile instead of selecting. The help box above the palette turns into a legend. |
Shift + left click a tile |
Change its collision type to the next one. |
Shift + right click a tile |
Change it to the previous one. |
Collision types cycle in this order: passable (no mark), ■ block, □ wall, # fence, ★ overlay. The change is made on the tileset asset, so every map that uses the tileset gets it. See Tile Collisions.
The tileset window
On the Collisions tab of the tileset window, left click a tile to move its collision type forward and right click to move it back, in the same order as above. No modifier key is needed there. See Tileset Window.
In-game map editor
These work in play mode, and in a player build, while the map's Show Map Editor On Play is on.
The in-game editor reads one modifier key, and which key that is depends on where it runs:
- In the editor, it is
Shift.Ctrldoes nothing. - In a player build,
CtrlandShiftboth work.
The table writes it as Shift.
| Input | What it does |
|---|---|
| Left click or drag on the map | Paint the brush. The camera scrolls when you paint near the edge of the view. |
Shift + left click or drag |
Paint on the layer above the selected one, as in the Scene view. |
| Right click, right-drag | Copy a cell or a rectangle into the brush. |
Shift + right click or right-drag |
Copy only the layers above the selected layer. |
Delete |
Pick the eraser. Painting with it clears the cell on every Ground, Overlay and Fog Of War layer. Pick a tile in the palette to paint again. |
Shift + Z |
Undo. Hold the keys for a second and it repeats. |
Shift + Y |
Redo, with the same repeat. |
| Mouse wheel over the map | Zoom the camera in and out. |
| Middle-drag | Pan the camera. |
M |
Show or hide the minimap in the bottom right corner. |
| Left click or drag on the minimap | Move the camera to that point. |
C |
Show or hide tile collisions. Blocked areas are tinted red. |
| Left click a palette tile | Select it. |
| Right-drag across the palette | Select a block of tiles. |
Hold Shift over the palette |
Show collision types. Shift + left click or right click cycles them, as in the inspector. |
The buttons at the top of the in-game editor:
| Button | What it does |
|---|---|
Show Collisions (C) / Hide Collisions (C) |
Same as C. |
Show Minimap (M) / Hide Minimap (M) |
Same as M. |
Save / Load |
In the editor, export the map to an XML file or import one. In a build, save to and load from PlayerPrefs. See Saving and Loading. |
< |
Hide the editor panel. > brings it back. |
L |
Show or hide the layer menu: the Smart Brush Enabled toggle and the Layer: list that picks the layer to paint on. |
The buttons along the bottom of the panel switch between sub tilesets.
Warning
Collision types changed from the in-game editor are written to the tileset asset. In the editor they do not reset when you stop playing.
More in In-Game Map Editor.
Related
- Getting Started
- Painting
- Layers
- In-Game Map Editor
- Sample Scenes for the keys the demo characters use