Layers
A map is a stack of layers, and each cell can hold one tile per layer. This page covers the layer list in the Paint tab, what each layer type does, how layers are drawn and which layer a tile lands on when you paint.
Concept
Layers let tiles sit on top of each other: a tree over grass, a roof over a floor, a flower over a path. Each layer has a type that decides how the map treats its tiles, plus drawing settings that decide what appears in front.
A new Map Data asset starts with three layers:
| Layer | Type | Depth |
|---|---|---|
Ground |
Ground | 1 |
Ground Overlay |
Ground | 0.5 |
Overlay |
Overlay | -1 |
The names are only labels. You can rename, reorder, add and remove layers.
Layer types
| Type | Collision | Painting | Use it for |
|---|---|---|---|
Ground |
Its tiles collide by their collision type | The brush paints here | Terrain, and anything characters bump into |
Overlay |
Never collides | The brush paints here, and the Smart Brush sends Overlay tiles here | Things drawn over characters, such as treetops and roof edges |
Objects |
Never collides | The brush skips it | Tiles your own scripts place |
Fog Of War |
Never collides | The brush skips it | Covering the map until the player explores it. See Fog of War. |
Collision reads the Ground layers only, from the top one down. Tile Collisions explains how the layers combine.
The minimap shows Ground and Overlay layers, darkened by fog. It leaves Objects layers out.
How to use it
Open the layer list
- Select the map and open the
Painttab. - Press
Edit.
The layer list, headed Map Layers, appears below the Commit button. It is only shown while you are editing.
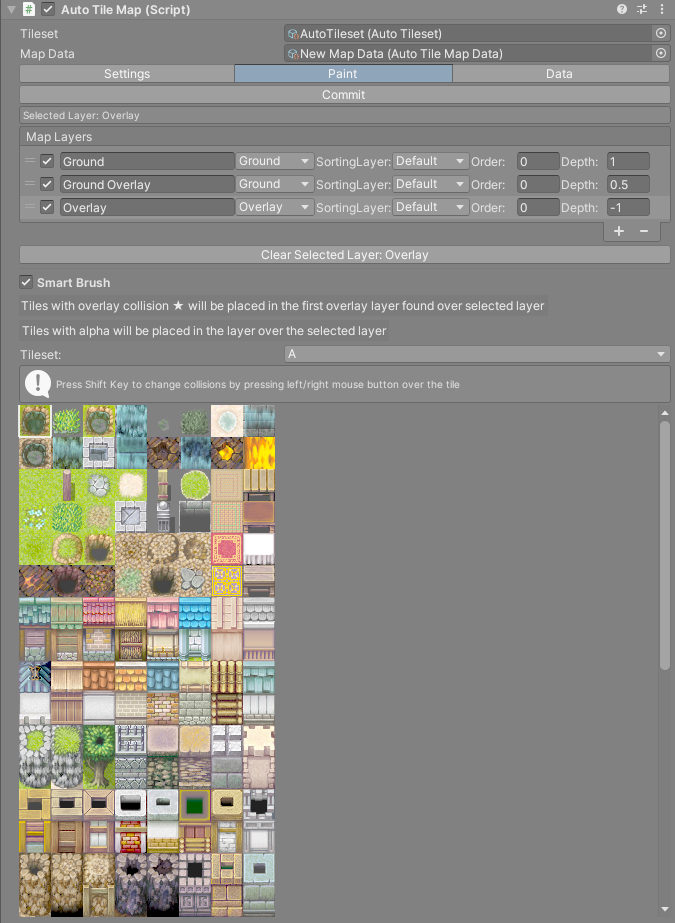
The row you select is the layer the brush paints on. Its name is shown above the list as Selected Layer: Ground, for example.
The columns
Each row has, from left to right:
| Column | What it does |
|---|---|
| Visible checkbox | Shows or hides the layer in the Scene and Game views. The brush does not paint on a hidden layer. A hidden Ground layer still collides. |
| Name | A label for your own reference. |
| Type | Ground, Overlay, Objects or Fog Of War. |
SortingLayer: |
The sorting layer of the layer's tiles, picked from your project's sorting layers. |
Order: |
Order in layer, the same setting as on a Sprite Renderer. Higher values draw on top within the same sorting layer. |
Depth: |
Z position of the layer in world units. Smaller values are nearer the camera. |
Changes to these columns show in the Scene view straight away. They reach the Map Data asset the next time the map is saved, so press Commit when you are done. Loading the map reads layer settings back from the asset.
Add, remove and reorder
- Press
+under the list to add a layer. It copies the type, sorting layer, order and depth of the last layer and is namednew layer 0,new layer 1and so on. - Select a layer and press
-to remove it with its tiles. - Drag a row by its handle to move it.
Each of these saves the Map Data asset and reloads the map at once. On a large map that takes a moment.
Clear a layer
Clear Selected Layer: Ground (with the selected layer's name) empties that layer after a Clear Layer dialog. It cannot be undone with the brush's undo.
Which layer a tile goes into
The brush does not always paint on the selected layer. The Smart Brush toggle, below the layer list in the Paint tab, decides. It is on by default, and the box under it sums up the current rule.
With Smart Brush on, a single tile picked from the palette goes:
- to the first
Overlaylayer at or above the selected layer, when the tile's collision type isOverlayand such a layer exists; - otherwise to the layer just above the selected layer, when the tile has transparent pixels;
- otherwise to the selected layer.
A tile has transparent pixels when any pixel of its palette picture is not fully opaque. A3 and A4 tiles, the building and wall autotiles, always count as opaque.
With Smart Brush off, tiles go to the selected layer.
Holding Shift while you paint a single tile sends it to the layer above the selected one, whether Smart Brush is on or off. The one exception is an Overlay tile with Smart Brush on, which still goes by rule 1.
A group of tiles picked from the palette with the right mouse button follows the same rules tile by tile, measured from the layer that was selected when you picked them. A group copied from the map keeps each tile on the layer it came from. Painting covers picking, copying and the brush tools.
Tip
With the sample layers, select Ground and paint. Opaque ground tiles land on Ground, a bush with transparent edges lands on Ground Overlay, and a tile you marked Overlay in the tileset lands on Overlay. You never change the selected row.
Warning
When the selected layer is the top one, there is no layer above it. A tile that should go up a layer is then not painted at all. Select a lower layer, or turn Smart Brush off.
How layers are drawn
Each layer is drawn by its own set of meshes, one per block of 62 by 62 tiles. Those meshes are children of a node per layer, named after the layer, under the map's Data GameObject. The node sits at the layer's Depth on the Z axis, and every mesh renderer under it gets the layer's sorting layer and order.
That makes layers play by the same rules as sprites:
- With the same sorting layer and order, the one nearer the camera, with the smaller
Depth, draws in front. - A different
Order:orSortingLayer:overrides depth, as it does for a Sprite Renderer.
To place characters between two layers, give them a Z position between the two depths, or a sorting layer and order between the two. The sample characters use the Z position. See Characters and Vehicles. How It Works has more on chunks.