Swarm Debug
Swarm Debug is an editor window that shows the live steering state of one agent at a time during Play mode. Use it when something looks wrong on a specific enemy (wrong movement, unexpected facing, a behavior with no visible effect) and you need to trace the cause back to a specific steering contribution or configuration value.
Open the debugger when...
- An agent runs in the wrong direction and you can't tell which behavior is responsible.
- Dormancy seems to activate or not activate unexpectedly.
- A behavior profile change has no visible effect on a specific agent.
- Surface Flow routes an agent into a wall or off the grid.
Menu path: Tools > Massive Swarm System > Swarm Debug
The window docks anywhere in the editor layout. Its data only populates in Play mode.
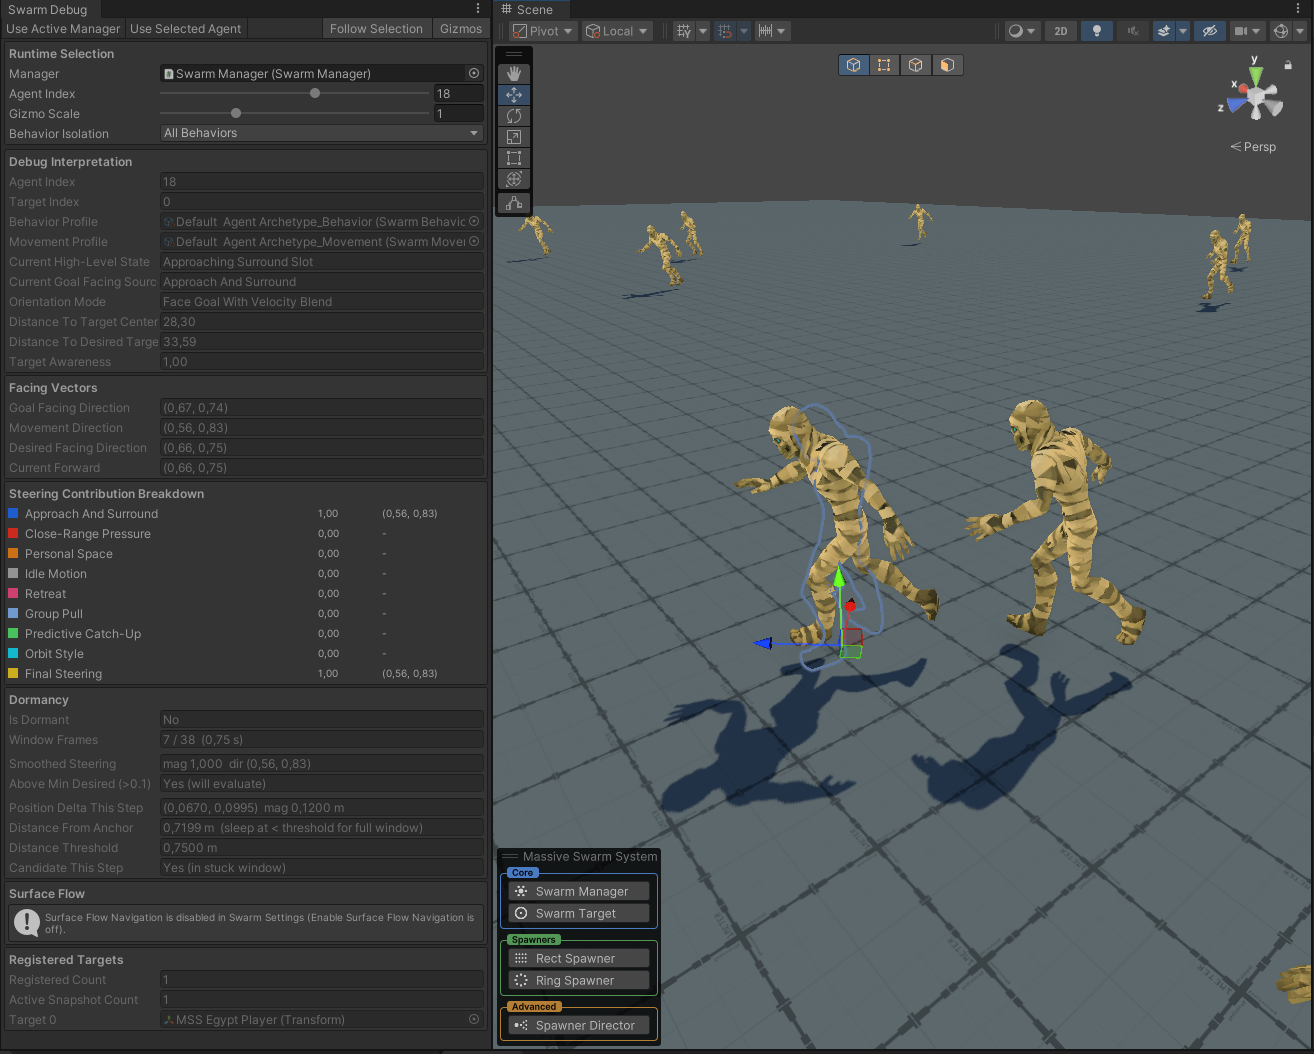
Gizmos toggle draws those same contributions as colored vectors from the agent. Perception States is on in this capture, so every agent wears a capsule in the color of what it knows and the legend sits at the bottom left.Selecting an agent
Three ways to point the debugger at an agent:
- Click an agent visual in the Scene view with
Follow Selectionenabled (the default). The window automatically updates to the selected agent's manager and index. - Click a
SwarmManagerGameObject in the Hierarchy. The window keeps the current index but switches to that manager. - Set the index manually using the
Agent Indexslider or field in the Runtime Selection panel.
The toolbar also has two explicit buttons: Use Active Manager picks the first active SwarmManager in the scene; Use Selected Agent reads the manager and index from whatever is currently selected in the Scene or Hierarchy view.
Agent Index is the agent's slot in the simulation arrays. Slots are not stable identities: when any agent despawns, the last active agent is moved into the freed slot, so the debugger can quietly start showing a different enemy after a kill somewhere else in the swarm. If the panel contents jump while you are watching one agent, that is why. Re-pick the agent with Use Selected Agent.
Toolbar controls
| Control | What it does |
|---|---|
| Use Active Manager | Assigns the first active SwarmManager found in the scene. |
| Use Selected Agent | Reads the manager and index from the currently selected agent visual. |
| Follow Selection | When on, any scene or hierarchy selection that contains an agent automatically updates the debugger target. |
| Gizmos | When on, steering contribution vectors are drawn as colored lines in the Scene view for the selected agent. |
Runtime Selection panel
This panel sits below the toolbar and is always visible.
| Field | What it shows |
|---|---|
| Manager | The SwarmManager being inspected. Drag a different manager here to switch. |
| Agent Index | The simulation slot index (0 to active count − 1). A slider appears when agents are active. |
| Gizmo Scale | Scales the length of the Scene-view steering vectors. Range 0.25 to 3. |
| Behavior Isolation | Switches the manager's behavior isolation mode. See Behavior Isolation Mode below. |
A yellow warning appears when isolation is active, because the simulation is no longer running all behaviors, so results shown are diagnostic only.
Scene Gizmos
The Scene Gizmos foldout sits between the Runtime Selection panel and the scrolled content. It controls per-agent overlays drawn in the Scene view while the window is open in Play mode. Close the window and all per-agent overlays disappear, and debug state no longer serializes into scenes.
These gizmos apply only to the manager the window is currently inspecting.
| Control | Default | What it draws |
|---|---|---|
| Desired Target Position | On | A dotted line from each agent to the point it is steering toward: its standoff position near the target, or, for an agent that has lost contact and is searching, the spot it remembers or the opening it is routing through. |
| Movement Direction | Off | An arrow along each agent's current velocity. |
| Arrow Length | 1 | World-unit length of each movement-direction arrow. Range 0.25 to 5. Enabled only when Movement Direction is on. |
| Personal Space | Off | Each agent's personal-space radius and its spatial-hash grid cell. |
| Dormancy | Off | Tints sleeping agents and shows the stuck-window progress ring. |
| Sight Cones | Off | What each agent can see, drawn from the direction the simulation has it facing rather than from its visual. The bright wedge is where it can notice a target; the faint circle behind it is how far it keeps one it has already noticed, which is a matter of Range alone. Green means it can see a target right now, amber that it knows about one it has lost, grey that it has nothing. An agent with no Perception Profile draws nothing. |
| Search Destination | Off | Where an agent that lost contact is walking: a line to the spot it remembers, with the Searching Arrival Radius ring it means to settle on. While it is routing around a wall the line goes to the opening instead, and the rest of the walk is dashed in. A ring with no line is an agent that found no way round and stopped where it stands. When the spot is inside a shut door the agent batters, only the line to the door is drawn, with no dashed remainder and no Arrival Radius ring. |
| Selected Agents Only | On | Limits the gizmos above to the focused agent (set by Agent Index) plus any agents selected in the Scene or Hierarchy. Turn off to draw them for every active agent, which is expensive in large swarms. Perception States and Alert Calls, below, do not follow this toggle: they always draw for the whole swarm. |
| Perception States | Off | Colors a shape under every active agent by what it knows about its target: chasing something it can see (green), traveling with an informed neighbour (cyan), walking to a remembered spot (amber), walking to a noise it heard (blue-violet), blind with nowhere to go (red), or with nothing to do (grey). Sleeping agents get a dim slate of their own. Drawn for the whole swarm regardless of Selected Agents Only, because seeing who knows what across the crowd is the point of it. |
| Shape | Capsule | Capsule stands the color up where the camera can see it, which suits a normal play angle. Ground Disc paints a flat marker at the agent's feet instead: it never stacks into a wall of color in a packed crowd and reads from straight above, but the agent's own body hides it from any other angle. Enabled only when Perception States is on. |
| Opacity | 0.55 | How strongly the state shapes paint over the scene. Range 0.05 to 1. Lower it in a packed crowd, where hundreds of overlapping shapes otherwise read as one solid color. Enabled only when Perception States is on. |
| Legend | On | Draws the color key in the corner of the Scene view, with a live count of agents in each state. Enabled only when Perception States is on. |
| Alert Calls | Off | A pink ring wherever an agent calls out to the ones around it, growing to the Alert Spread Radius that call reached, with a dashed line to the target it called about. A call is an event rather than a state, so it flashes for about a second and fades. Drawn for the whole swarm regardless of Selected Agents Only. |
Scene Gizmos vs. toolbar Gizmos: these are separate controls. The toolbar Gizmos toggle draws steering contribution vectors for the focused agent (the colored lines matching the Steering Contribution Breakdown rows). The Scene Gizmos foldout draws the per-agent overlays listed above. Both can be on at the same time.
Debug Interpretation panel
Shows high-level agent intent for the selected simulation step.
| Field | What it means |
|---|---|
| Agent Index | The simulation slot index, confirmed from the snapshot. |
| Target Index | Which active target slot this agent is pursuing, not the registration order of the SwarmTarget. The manager chases a limited set of targets each tick and these are its slots. Shows None if no target is assigned. The Registered Targets panel maps the two together. |
| Behavior Profile | The SwarmBehaviorProfile asset driving this agent. Shows Built-in Defaults if no profile is assigned. |
| Movement Profile | The SwarmMovementProfile asset driving speed and acceleration for this agent. |
| Agent Roll | The agent's fixed roll from 0 to 1, the value every Shared field on its profiles reads. Always shown. |
| Current High-Level State | A readable summary of what the agent is trying to do. See High-level states below. |
| Current Goal Facing Source | Which behavior is currently supplying the goal facing direction, the direction the agent wants to face before blending. |
| Orientation Mode | The orientation mode from the agent's SwarmMovementProfile: Face Goal With Velocity Blend, Face Goal, or Face Velocity. |
| Distance To Target Center | Planar world-unit distance from this agent to its target's position. N/A if no target. |
| Distance To Desired Target Position | Distance to that same steering point: the standoff near the target, or, while the agent is searching, the resolved search destination. N/A if not applicable. |
| Target Awareness | A 0 to 1 value for how strongly the agent is currently engaged with its target. It rises and falls with detection, set by the Perception Profile: climbing while the agent can see a target, over Acquire Time (it has no target until the climb finishes), and falling after contact is lost, over Forget Time. An agent walking to a noise it heard reads the noise's strength here instead, when that is higher. Retreat, Predictive Catch-Up and Orbit Style also pin it to 1 on any step they are actively steering the agent. Nothing scales the Approach & Press seek by it. What it does scale: Idle Motion fades out as it climbs, and Chase Wander, the extra drift that keeps a converging crowd from reading as a clean circle, fades in. |
| Goal | What the agent is going for: A target it sees, Where it last saw its target, A noise it heard or Nothing. Shown only for an agent with a Perception Profile. |
| Heard At | The (x, z) position of the noise the agent heard, or Nothing heard. Shown only for an agent with a Perception Profile. |
While an agent is searching, the two distances above stop measuring the same journey: Distance To Target Center is against where the target actually is, and Distance To Desired Target Position is against where the agent is walking. The Searching panel below says which route it picked and why.
High-level states
| State | Meaning |
|---|---|
| Idle / No Clear Goal | No target, not walking to a noise and not noticing one, or arrived at the standoff with no combined steering left this step. |
| Following The Crowd | Approach & Press is on, the agent lost contact, and it is reading a heading off a nearby informed neighbour right now, per the Perception Profile's Following The Crowd settings. |
| Searching | Lost contact, nobody informed nearby, so it is walking toward the last spot it had the target, per the Perception Profile's Searching settings. |
| Heading To A Noise | No target, but the agent heard a noise and is walking to it the way a searcher walks to a remembered spot. It needs a Perception Profile with Search on, and it forgets the noise after Forget Time. |
| Noticing A Target | No target yet, but the agent can see one and its Acquire Time is still running. It keeps doing what it was doing until the time is up. |
| Lost Contact, No Lead | Approach & Press is on, the agent cannot see its target, and neither Searching nor Following The Crowd found anything to steer by, so this pass produces nothing this step. |
| Approaching Standoff | Beyond Arrival Distance from its standoff seek position (still moving in toward the target), or steering with no target-relative desired position. |
| Pressing Target | Arrived within Arrival Distance of the standoff seek position and still steering (pressing in at the combat standoff). |
An agent with no Perception Profile never reads Searching, Following The Crowd, Heading To A Noise, Noticing A Target or Lost Contact, No Lead. It always sees its target, so it only ever shows as Idle, Approaching Standoff or Pressing Target.
Facing Vectors panel
Shows the four direction values the simulation tracks for orientation blending.
| Field | What it means |
|---|---|
| Goal Facing Direction | The normalized direction supplied by the highest-priority behavior for facing. For an agent that is searching and not currently following a neighbour's heading, this substitutes the resolved search destination for the live target position, with target velocity treated as zero, so a lost agent turns to face where it is walking rather than staring through a wall at a target it cannot see. This mirrors what the simulation itself does. An agent following the crowd is excluded from the substitution: it has no idea where the target actually is, so there is nothing to substitute. |
| Movement Direction | Where the agent is trying to go: the final steering vector, falling back to the sampled combined steering, and only falling back to actual velocity when both are near zero. It is the facing fallback when no behavior claims priority. Do not confuse it with the Scene Gizmos Movement Direction arrow, which draws real velocity. |
| Desired Facing Direction | The blended target direction before the movement profile's turn-speed clamping is applied. |
| Current Forward | The agent's actual forward direction this step, after turn-speed clamping. |
All vectors show as (x, z) normalized pairs. A dash (-) means the vector is near-zero.
Steering Contribution Breakdown panel
Each row shows one behavior's contribution to the final steering direction. Each row has a color swatch, a magnitude, and a normalized direction.
| Behavior | Color |
|---|---|
| Approach & Press | Blue |
| Personal Space | Orange |
| Idle Motion | Light grey |
| Retreat (the Retreat When Too Close block of the Behavior Profile) | Pink |
| Group Pull (the Hold Nearby Swarm block of the Behavior Profile) | Light blue |
| Predictive Catch-Up | Green |
| Orbit Style | Cyan |
| Final Steering | Yellow |
Final Steering is the accumulated result after all weighted contributions are combined. When a behavior's magnitude reads 0.00, it is either disabled, not active this step (due to LOD tier), or its conditions are not met.
When Gizmos is on in the toolbar, these same contributions are drawn as colored vectors in the Scene view from the agent's position, each with its name written next to the arrow tip. A ninth arrow is drawn that has no row in the panel: a violet Facing arrow for the desired facing direction, lifted slightly above the others. It is violet rather than one of the eight contribution colors because it is not a steering force.
The same toggle also draws a Surface Flow cell overlay around the agent, which is easy to mistake for part of the steering display. The green outline is the cell the agent occupies; the edges to its neighbours are drawn green where movement is allowed and red where the bake blocked it; and a cyan arrow shows the baked flow direction out of that cell. It is the fastest way to see that an agent is stuck because the bake sealed the edge it wants, rather than because a behavior is fighting it.
Dormancy panel
Shows the dormancy system state for the selected agent. Only relevant when Enable Dormancy is on in SwarmSettings.
| Field | What it means |
|---|---|
| Is Dormant | Whether the agent is currently sleeping (no steering computation). |
| Idle Walk And Rest | Shown only while the agent is in an idle walk or rest. Reads Walking or Resting, then the seconds left. A walking agent is kept out of the stuck test; a resting agent may sleep and wakes when the rest ends. |
| Window Frames | Frames spent in the stuck-detection window, and the required frame count before sleep triggers. |
| Smoothed Steering | The low-pass filtered steering magnitude used to decide if the agent is trying to move. |
| Above Min Desired (>0.1) | Whether the smoothed steering magnitude is high enough to even evaluate dormancy. Agents that aren't trying to move skip the dormancy check entirely. |
| Position Delta This Step | How far the agent moved in the last simulation step. |
| Distance From Anchor | Distance from the position where the stuck window started, or where the agent fell asleep once it is dormant. It does not by itself wake the agent: see Stuck Distance for what decides sleep, and the wake fields below for what wakes it. |
| Stuck Distance | How far this agent may drift and still count as stuck, in world units. It is half of what the agent's own max speed covers across the stuck window, with a floor of 0.1 units and a ceiling of Dormancy Distance Threshold, so a slow walker crossing open ground is never judged stuck for simply being slow. |
| Candidate This Step | A summary of why this agent is or is not a dormancy candidate this step. Reads No (idle walk in progress) while the agent is on an idle walk. |
When dormant, additional fields appear: the frozen desired direction, wake lookahead distance, wake cone half-angle, required blocker count to stay asleep, whether a target move triggers an immediate wake, the random-wake probe interval, and the nearby-motion-wake radius and minimum speed.
Two rows in this table change their reading when the agent has surrendered (see below). Smoothed Steering is annotated (zeroed by surrender), because a surrendered agent stops driving itself. Above Min Desired then reads Yes (surrendered: counts as blocked with intent) instead of the usual Yes (will evaluate) or No (skipped, agent not trying to move), so a carried agent is still evaluated for dormancy rather than being skipped for looking idle.
Above Min Desired has one more reading: Yes (resting: allowed to sleep), for an agent in the resting half of an idle walk and rest.
Surrender panel
Appears when Enable Surrender is on in SwarmSettings, which is the default. Surrender is what stops an agent from fighting a crowd it cannot possibly push through: once too many bodies are packed around it, it stops steering and lets the crowd carry it.
| Field | What it means |
|---|---|
| Is Surrendered | Whether the agent has given up driving itself this step. |
| Neighbours Within Counting Radius | How many bodies are packed around it. The count is only computed exactly when it matters, so you may instead see at or under N (exact count not needed). |
| Enters Above | The neighbour count that triggers surrender, described as more bodies than can physically fit. |
| Exits At Or Below | The count it has to drop back to before the agent starts steering again. |
While the agent is surrendered the panel also explains what still works: contacts, attacks and knockback all apply at full strength. A surrendered agent is passive, not disabled.
Use this panel when agents deep inside a pile look like they have stopped responding. If Is Surrendered is Yes, that is intended crowd behavior, not a stuck agent, and the Dormancy panel is the wrong place to look.
Searching panel
Shows what a lost-contact agent is walking toward and why. It needs a Perception Profile with Search enabled to show anything at all.
If the agent has no Perception Profile, the panel explains that it always knows where its target is and never searches. If Search is off on the profile, it explains that the agent keeps chasing the target's live position after losing contact, walls included, until Forget Time runs out.
| Field | What it means |
|---|---|
| Searching Now | Whether the agent has lost contact but still remembers its target well enough to walk back toward it, instead of chasing the target's live position. |
| Last Seen Spot | The world position where the agent last had contact. Reads Noise Spot instead when the agent is walking to a noise it heard. |
| Distance To Last Seen Spot | Planar distance from the agent to that spot. Reads Distance To Noise Spot for a noise. |
| Route | How the agent is closing that distance: straight at the last seen spot, through an opening on the way, battering the shut door the spot is inside (Battering the shut door at the spot), or milling in place because nothing gets it closer. Reads Deciding for a step right after contact is lost, before one of those resolves. |
| Walking To | The resolved destination: the last seen spot itself, or the opening Route picked instead. Only shown once a route has resolved. |
| Distance To Destination | Planar distance from the agent to Walking To. |
| Arrival Ring In Use | The standoff radius the arrival seek is actually closing on for this destination. An opening on the way uses 0, since it is walked through rather than stood off from, and so does a shut door being battered, since the agent walks up to the door instead of standing back from it. Only a commitment to the last seen spot itself uses the Perception Profile's Arrival Radius. |
| Commitment Holds For | Seconds left before the route is re-checked. |
| Wall On The Way | Distance to an obstacle blocking the line to Walking To, or Clear. |
| Opening Search Radius | How far around the last seen spot the agent looks for an opening once the direct line is blocked. |
Only Searching Now shows while the agent can still reach its target directly. The rest fills in the moment it loses contact.
When Opening Search Radius is 0, the panel warns that the detour around obstacles is off and a blocked searcher stops where it stands. When the radius is set but nothing within it gets the agent closer, the panel notes that this is the designed fallback rather than a fault: the seek switches off and Idle Motion mills the agent in place until Forget Time releases the target.
If the agent is standing still with a wall between it and its own Walking To, the panel warns about it. That usually means it was pushed off the line its route was picked on, and the next scheduled re-check clears it by picking again from where the agent now stands. The warning stays quiet while the agent is battering a door, because standing against it is the point.
Surface Flow panel
Shows the flow field state for the selected agent. Only populates when Enable Surface Flow Navigation is on in the SwarmManager.
| Field | What it means |
|---|---|
| Resolved Target Slot | Which flow goal field is bound to this agent's current target. |
| Goal Cell Index | The grid cell index the flow field routes toward (the target's cell). |
| Reachable / Unreachable | Grid-wide count of reachable vs. unreachable cells in the current bake. |
| Bake Data Version | Increments each time the field is rebaked. Useful for confirming a bake has completed. |
| Grid Size | Grid dimensions in cells and the world-unit size per cell. |
| Cell Coords | The (x, z) grid coordinates and flat cell index for the agent's current position. |
| Cell Status | One of: Flow (routed), Goal cell, Unreachable (no path from goal), Unwalkable (no surface sample), Off Grid, Invalid Field. The last one means the agent has no usable field at all, rather than a bad position within one: no bake, or a bake that failed. Check the manager's bake state before looking at the agent. |
| Agent Nav Status | The same set of values as Cell Status, but this is what the agent's own last navigation pass decided rather than a fresh read of the bake. The two differ on purpose: a searching agent can read Unreachable here while standing on a cell that Cell Status reports as Flow (routed). |
| Cell Surface Y | The baked surface height at this cell, plus how far above it the agent currently sits. |
| Cell Flow Direction | The compass direction the flow field sends agents from this cell toward the goal. A dash means no flow (goal cell or blocked). |
| Neighbour Connections | A 3×3 compass grid showing which of the eight adjacent cell connections are open (green) or blocked (red). |
On a dormant agent, Agent Nav Status and the flow direction it last resolved are frozen at the step it fell asleep, because the flow pass skips a sleeping agent. Cell Status stays current, since that one is read straight from the bake.
If the agent is off the grid, the panel shows a warning and the Cell Status only. If the field has no bake yet, a warning indicates the bake may still be in flight.
Doors & Barricades panel
Shows what is in the way of the selected agent: a door, a barricade or a pushed prop. It draws after the Surface Flow panel and only appears when the scene has at least one flow modifier. See Doors and Barricades for the components themselves.
| Field | What it means |
|---|---|
| Way Blocked By | The modifier that closes the way to where the agent is going, within the press reach along its heading. Reads Nothing within N units on the way to its goal when there is none. |
| Agents Pressing It | How many agents pressed that modifier on the last step. Shown only when Way Blocked By names one. |
| Hit Noises | How many noises that modifier has emitted since it registered, and how long ago the last one was (2, last 1.4 s ago). Reads None yet before the first. Shown only when Way Blocked By names one. |
| State | The Swarm Breakable state of that modifier (Intact, Damaged or Broken), with its health percentage when this is the Way Blocked By modifier. Shown only for a modifier that has a Swarm Breakable. |
| Last Damaged | Seconds since the Swarm Breakable took damage, or Not yet. Shown with State. |
| Shoved By A Moving Prop | Yes when a pushed prop carried the agent along on the last step, otherwise No. |
| Pressed Against | The modifier the agent was pressed against on the last step, or Nothing. The rows below appear only when it names one. |
| Doing | Hitting it, Pushing it, Hitting and pushing it or Stopped by it. A line underneath adds that the modifier blocks the way to where the agent is going when the agent is hitting it. |
| Route Cost | The route cost the modifier adds, in units, or Blocked when the route always goes around it. |
| Health | The modifier's health as a percentage. Shown only when it has a Swarm Breakable. |
Way Blocked By and Pressed Against are usually the same object. When they differ, State and Last Damaged repeat for the one the agent is pressed against.
Registered Targets panel
The last panel in the window. It lists every SwarmTarget registered with the manager, and unlike the panels above it, it keeps drawing when no agent is selected and when the swarm has not spawned yet. Targets register on enable, so the counts stay at zero until you enter Play mode.
| Field | What it shows |
|---|---|
| Registered Count | How many targets have registered with this manager. Registration is unbounded. |
| Active Snapshot Count | How many of them the manager is actually chasing this tick, capped by Max Active Target Count. |
| Target i | The target's Transform. Rows the manager is currently chasing read Target i (chased, slot N), where N is the slot number that the Debug Interpretation panel's Target Index refers to. A target holding enough agents to earn a slot on its own merit additionally appends (engaged), which can appear even for a step or two before that target is actually chased. |
It answers two questions the other panels cannot. Did my targets register at all, and are the ones I care about inside the active set. A target that registers but never shows (chased, slot N) is losing the contest to closer or higher-priority targets, which is a different problem from a target that never registers.
Behavior Isolation Mode
Behavior isolation is an editor-only debug tool. It overrides the simulation on the selected manager so only a subset of behaviors runs. Use it when a behavior change has no visible effect and you want to confirm it is actually contributing, or to identify which behavior is causing an unexpected result.
Isolation changes live simulation
While isolation is active, the whole swarm on that manager runs with reduced behaviors, not just the selected agent. Results are not representative of real gameplay. Always reset to All Behaviors before testing performance or tuning values.
The Behavior Isolation dropdown in the Runtime Selection panel sets the mode. Options:
| Mode | What runs |
|---|---|
| All Behaviors | Normal blended simulation. This is the default. |
| Approach And Press Only | Only the Approach & Press pass runs. All others are suppressed. |
| Personal Space Only | Only the personal-space separation pass runs. |
| Idle Motion Only | Only the idle motion pass runs. |
| Retreat Only | Only the retreat pass runs. |
| Group Pull Only | Only the group pull pass runs. |
| Predictive Catch Up Only | Only the predictive catch-up pass runs. |
| Orbit Style Only | Only the orbit style pass runs. |
| Mute Approach And Press | All behaviors run except Approach & Press. |
| Mute Personal Space | All behaviors run except personal space. |
To return to normal blending: set the dropdown back to All Behaviors.
Isolation mode lives on the SwarmManager component, in editor-only memory. It is never written to your behavior profile or settings assets, so it cannot follow a build. Because it is not serialized, Ctrl+Z will not take it back and a script recompile resets it to All Behaviors. Set the dropdown back by hand when you are done.
Swarm Handle Integrity Monitor
A development-only watchdog for a specific class of bug: your code holding a SwarmAgentHandle that quietly starts resolving to the wrong agent. Agent slots get reused as the swarm churns, and the handle indirection exists to make that safe. This component proves it is working.
Add it to any GameObject in a test scene via Component → Massive Swarm System → Debug → Swarm Handle Integrity Monitor, press Play, and let real spawn and despawn traffic run. It keeps a rolling sample of live handles and re-checks that each one still resolves to the same agent, or has cleanly stopped resolving because that agent is gone. Anything inconsistent is logged as an error and counted.
| Field | What it controls |
|---|---|
| Manager | Which manager to watch. Found automatically from this GameObject or the active instance when left empty |
| Tracked Handle Sample Size | How many live handles to hold and re-verify each check. Default 64. Raising it samples more of the swarm and costs very little |
| Check Interval | Seconds between checks. Default 0.5 |
| Run Full Sweep | Also run the full integrity sweep over capacity on each check. On by default, and cheap at a few thousand agents. Turn it off if it shows up in the profiler at very high capacity |
| Log Interval | Seconds between summary lines. Default 5. Set it to 0 for silence, and errors are still logged the moment they happen |
| Show On Screen Summary | Draws a one-line summary in the Game view. On by default, which is what makes it usable in an on-device development build where reading the console is awkward |
The whole file is wrapped in UNITY_EDITOR || DEBUG, so it does not exist in a release build and cannot be shipped by accident. Use it while stress-testing your own handle-holding code, not as something to leave in a scene.
Related pages
- Behaviors: behavior descriptions and the runtime blending model.
- Performance: Stats Overlay and step timing tools for aggregate swarm metrics.
- Troubleshooting: common setup and behavior problems with fixes.
- Navigation: Surface Flow Field setup and bake configuration.