Getting Started
Your first working swarm chasing the target, in four steps. The defaults do the work, so none of the four steps below asks you to change a setting.
Prerequisites
- Massive Swarm System imported into your project.
- A scene with at least one collider on the ground layer (agents raycast against it for grounding).
The Welcome window (Tools → Massive Swarm System → Welcome) covers these same steps with one-click buttons and can generate a starter scene (camera, directional light, and a floor plane) if you don't have one yet.
It opens by itself once per Editor session, so a domain reload will not keep reopening it and a restart of the Editor shows it again. Untick Show this window on startup in its footer to stop that. The setting is stored per project, so turning it off here does not silence it in your next project. The menu item always works regardless.
If your project is not on URP
The package checks the active render pipeline and, on a project that is not using URP, logs one warning per Editor session rather than nagging on every reload. The Welcome window shows the same message in a help box with an Open render pipeline help button. The warning names the pipeline you are actually on and tells you the honest consequence: agents render magenta until you switch, because the shipped materials are URP materials. The simulation core is pipeline-agnostic, so supplying your own materials is a real option if you are committed to another pipeline.
Scene View Overlay
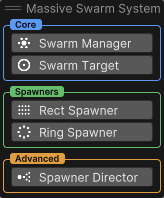
When you open any scene after importing Massive Swarm System, a "Massive Swarm System" overlay appears in the Scene View. It is shown by default, and you can hide or show it at any time via the Scene View overlays menu (the stacked-squares button in the top-right of the Scene View). See Create Overlay for the full reference.
The overlay groups the create actions into three labeled cards:
- Core: Swarm Manager, Swarm Target
- Spawners: Rect Spawner, Ring Spawner
- Advanced: Spawner Director
These are the same actions as GameObject → Massive Swarm System and the Hierarchy right-click menu. Both surfaces call the same factory code, so the result is identical either way. The overlay is the only surface with branded icons, because native Unity menus expose no icon API.
The overlay can also show contextual read-only groups while you work. For example, when manager-owned Surface Flow gizmos are visible, a Surface Flow Legend appears after the create cards.
When an object is missing from the scene, a gold dot and highlight appear on the relevant button or group to prompt you. The Swarm Manager button highlights when no SwarmManager exists in the scene; the Swarm Target button highlights when no SwarmTarget exists; the Spawners group highlights when no spawner exists. These are guidance cues, not errors, and the gold color is intentional.
Step 1: Create the Swarm Manager
In the Hierarchy, right-click empty space → Massive Swarm System → Swarm Manager, or click Swarm Manager in the overlay's Core card.
This single click creates:
- A
Swarm ManagerGameObject withSwarmManagerandSwarmVisualManagercomponents. - A sibling
Swarm AgentsGameObject (the parent for pooled agent visuals at runtime). - Auto-assigns a default
SwarmSettingsasset to the manager.
Tip
Want level-specific tuning? The manager you just created points at the shared project default, so its inspector shows a Create Custom Swarm Settings button. One click clones the asset and assigns the copy, and from there you tune this scene without touching any other. The same behavior and movement profiles can still be shared across scenes.
Step 2: Add a Target
The swarm chases anything with a SwarmTarget component. Pick whichever fits your scene:
- Use your existing player: select the player GameObject → in the Inspector, Add Component → SwarmTarget.
- Drop in a ready-made target: right-click in the Hierarchy → Massive Swarm System → Swarm Target, or click Swarm Target in the overlay's Core card. This creates a visible target with
SwarmTargetalready attached, the fastest way to see the swarm working before you have a player.
SwarmTarget registers with the SwarmManager automatically on enable. You can add as many targets as you like. The manager chases the closest few at once (its Max Active Target Count, 10 by default).
Step 3: Add a Spawner
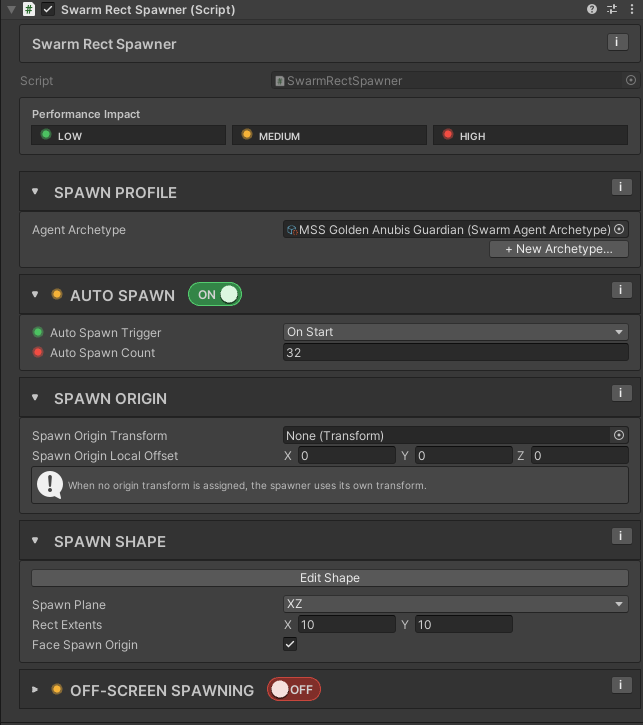
Right-click in Hierarchy → Massive Swarm System → Spawners → Rect Spawner (or Ring Spawner), or use the Spawners card in the overlay.
- Rect Spawner: spawns a rectangle of agents. Good for waves entering from a side.
- Ring Spawner: spawns a ring around a point. Good for ambushes or encirclement.
Position it where enemies should appear. The Scene view gizmo shows the spawn area.
The spawner is ready to run immediately: it comes with the default archetype already assigned, and Auto Spawn is on with a count of 32 agents and an On Start trigger. You can press Play right now and see a swarm.
To adjust the swarm size, change Auto Spawn Count in the inspector. To use your own enemy type instead of the default, assign a different SwarmAgentArchetype asset to Spawn Profile → Agent Archetype: or create one from scratch with the Archetype Wizard (Tools → Massive Swarm System → New Archetype...), which sets up the archetype and all required profiles in one step. See Swarm Agent Archetype for the full walkthrough.
Step 4: Press Play
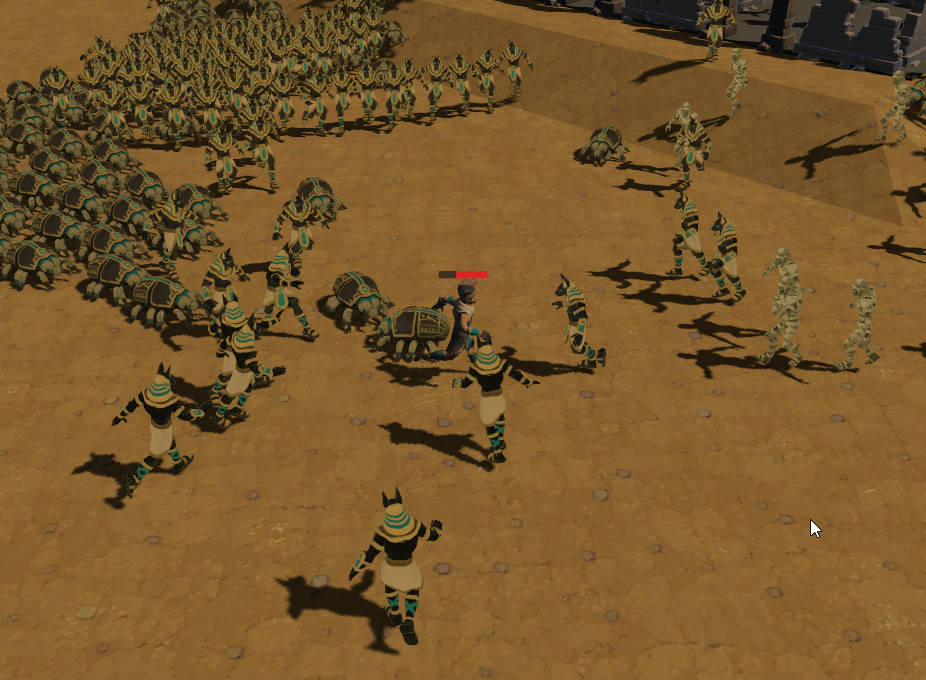
The swarm spawns and approaches the target.
What each asset does
These four assets cover everything you need to get a swarm moving. Two more are optional: SwarmAttackProfile only matters once agents attack, and SwarmPerceptionProfile only matters when agents should notice targets instead of always knowing where they are:
| Asset | Role |
|---|---|
SwarmSettings |
Global sim params: capacity, grounding, LOD, body blocking. A new Swarm Manager is assigned the project's shared default asset. |
SwarmAgentArchetype |
One enemy type in one asset: visual prefab, agent radius, push resistance, and the behavior, movement, attack and perception profiles it uses. |
SwarmBehaviorProfile |
Which steering behaviors are active (Approach & Press, Personal Space, Idle Motion...) and their weights. |
SwarmMovementProfile |
Max speed, acceleration, turn rate. |
The included sample profile enables Approach & Press, Personal Space, and Idle Motion as a starting point. You can swap behavior profiles per archetype without touching the manager.
What about all those settings?
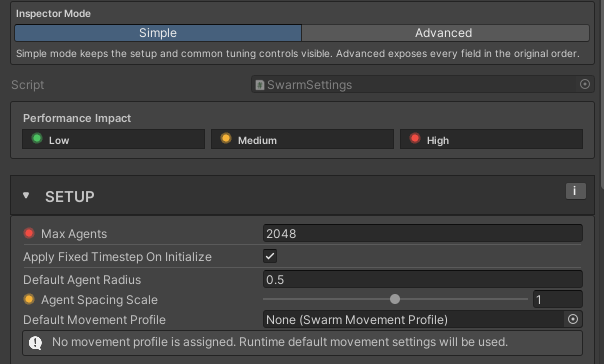
Everything above ran on defaults, which is the intended first experience. The inspectors do hold a lot of fields, so they open with most of them hidden.
The three inspectors you will spend the most time in, SwarmManager, SwarmSettings and the SwarmBehaviorProfile, each carry a Simple / Advanced toggle at the top and open in Simple. Simple shows the settings most projects touch first and hides the rest. Hiding is not disabling: a hidden setting keeps running with the value it has, which is what the note at the bottom of the Simple Swarm Settings inspector tells you. The mode is remembered for the Editor session, so an inspector you switch to Advanced stays there until you restart Unity.
Advanced is for specific jobs rather than for general tuning:
| What you want | Where it is |
|---|---|
| The five behaviors Simple does not list: Predictive Catch-Up, Retreat When Too Close, Hold Nearby Swarm, Orbit Style, Idle Motion | Behavior Profile, Advanced |
Tuning fields for the Surface Flow Field. Turning it on and baking it live on SwarmManager, which needs no mode switch |
Swarm Settings, Advanced |
| Ground probe intervals and Grounding Execution Mode, the levers that matter on mobile | Swarm Settings, Advanced |
| Fixed Timestep, Visual Interpolation, and the dormancy thresholds | Swarm Settings, Advanced |
You never have to browse Advanced to find something. Swarm Settings and the Behavior Profile have a search box that covers both modes at once and matches symptom words as well as field names, so typing "jitter" or "falls through floor" lands on the right row.
Fields also carry a small colored dot rating what they cost as the swarm grows, green for low through red for high. Finding a Setting covers the search box and the dots.
Common first-run issues
| Symptom | Fix |
|---|---|
| Agents fall through the ground | In the SwarmSettings asset, set Ground Layer Mask to include your floor's collider layer. |
| Agents clip into walls | In the SwarmSettings asset, set Obstacle Layer Mask to the layer your wall colliders are on. With Surface Flow on, see Physics & Colliders instead. |
| No agents appear | Confirm the spawner has a Spawn Profile (archetype) assigned and Auto Spawn Count > 0. Confirm the archetype has a prefab assigned, or that the manager's SwarmVisualManager has a Fallback Agent Prefab. |
| Agents face the wrong direction | The prefab's visual mesh must face local +Z. Open the prefab and rotate the mesh to fix it. |
See the Troubleshooting page for the full list.
See it running: MSS Pyramid Level
The fastest way to see what the system can do is to open the MSS Pyramid Level scene at Assets/CreativeSpore/MassiveSwarmSystem/Samples/Egypt/Scenes/MSS Pyramid Level.unity and press Play.
It has multi-level Egyptian terrain, a player-controlled SwarmTarget, a SwarmSpawnerDirector running three spawners with the difficulty ramp on, and a baked Surface Flow Field handling stairs, obelisks, and ruins routing. The crowd starts at 8 and keeps thickening for as long as you leave it running, so let it play a minute before judging it. Copy from this scene when starting a horde-survivor project.
See Sample Scenes for the full list of shipped scenes and what each demonstrates.
Next steps
- Read Concepts to understand how the manager, data, and visual layers divide responsibility before customizing.
- Browse Behaviors to pick the steering set that matches your game (survivor, melee pack, harasser, flanker).
- Visit Core Setup for the full reference on every component and ScriptableObject field.
- See Spawners when you need waves, attrition, or maintained populations instead of a single burst.
- Move to Animation and Performance if you are targeting mobile and need 1000+ agents at frame rate.