Navigation
Surface Flow Field is the optional route-authority system for levels with walls, islands, or uneven walkable surfaces.
When to use it
Massive Swarm System works without a flow field for flat arenas. Behavior steering, body blocking, and obstacle blocking keep agents moving toward the target and clear of walls in simple geometry.
Use the Surface Flow Field when:
- Agents need to route around walls, pillars, or closed rooms.
- The level has stairs, ramps, or uneven terrain that steering alone cannot handle.
- Agents get persistently stuck at corners or thin corridors.
Do not use it when:
- The level is an open flat arena with no routing obstacles.
- You need the lowest possible runtime overhead for very large agent counts.
How it works
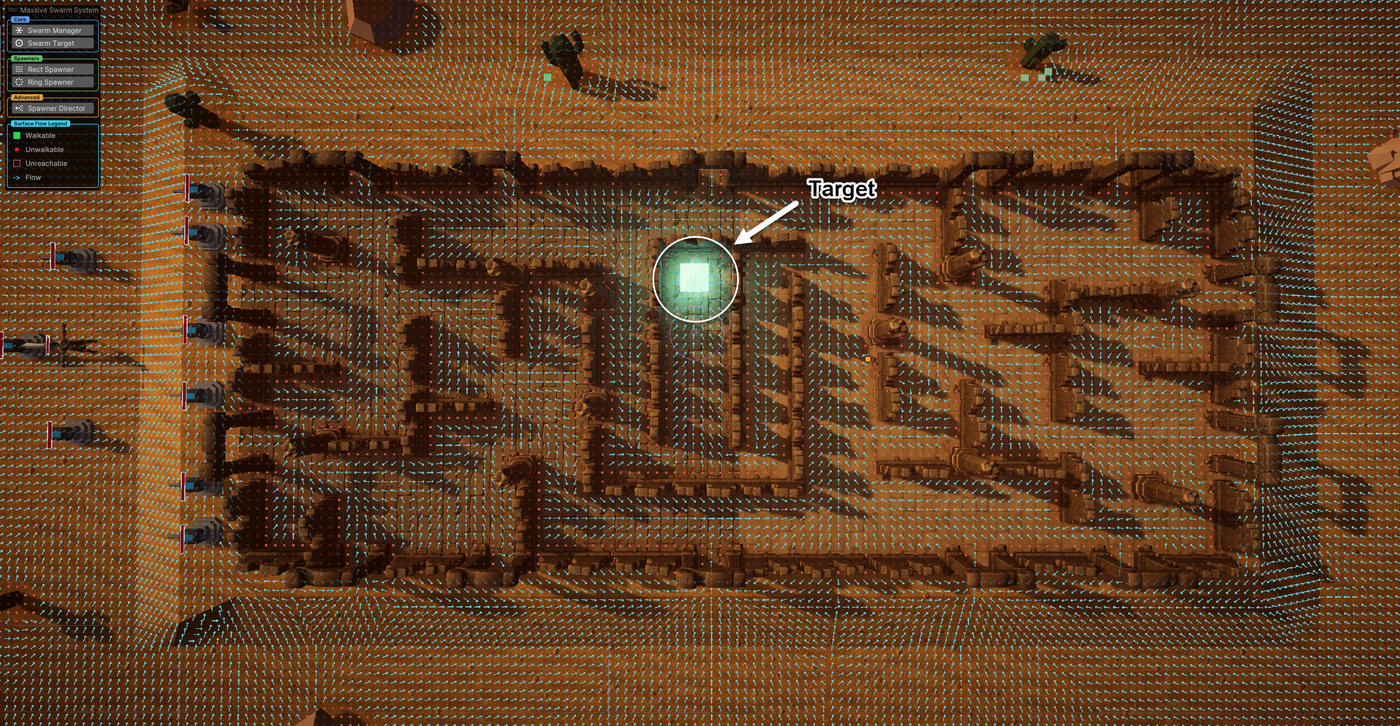
The Surface Flow Field bakes a grid over the scene. Each cell stores a direction toward the swarm target. At runtime, agents sample their cell and blend the field direction with their behavior steering.
Bake cost scales with grid cell count, not agent count. Once the map is baked, a Cheap-tier agent costs a single cell lookup. Full and Reduced agents cost a few more on Smooth or Eikonal quality, because Smooth Direction Blend ships on and blends the cells around them so headings do not step at cell borders. Congestion Bias, when you turn it on, adds a weighted sample of the neighboring cells on top for agents of every tier, and its result is the one used.
The baked field does not change at runtime, but a closed door or a barricade can still change the routes through it. A Swarm Flow Modifier on the object restamps its cells with no rebake. See Doors and Barricades.
Footprint and overhead clearance
The bake can reason about the agent's size so cells map cleanly around walls, gaps, and overhead obstacles. Two settings on SwarmManager drive it. Both are bake-time only and add no runtime cost.
- Clearance Radius (footprint width). The ground probe is a sphere of this radius. A gap between two walls narrower than twice the radius bakes as non-passable, while a doorway wider than the footprint stays walkable. Closely-spaced raised blocks separated by sub-footprint gaps bake as one continuous top surface the agent bridges, instead of an alternating top/floor row.
- Agent Height (standing height). With a non-zero height and an Unwalkable Layer Mask set, each cell checks a capsule of Clearance Radius spanning Agent Height above the floor. A floor under an overhead obstacle (a door lintel, a low arch, an overhang) bakes walkable when the agent fits under it and blocked when the obstacle is too low. Door jambs and full-height walls still block.
This requires floors and obstacles on separate layers: floors in Walkable Layer Mask, walls/overhead in Unwalkable Layer Mask. The bake samples the union of those two masks; there is no separate surface include mask to maintain. If the two masks overlap or Walkable is empty, the inspector warns and overhead detection turns off. Setting Clearance Radius to 0 reproduces the legacy single-ray point-sample bake.
Clearance Radius vs Wall Clearance
Clearance Radius is the agent's assumed footprint size, and it decides what counts as passable. It is not Wall Clearance, the bake setting below that bows the route off walls, nor the runtime Surface Flow Wall Margin. See the Glossary.
Targets never bake as ground
The bake skips any collider that belongs to a SwarmTarget (and its children) while sampling. You can leave your player or boss on a layer that's also in the Walkable Layer Mask. The swarm chases it, but the bake won't carve a walkable patch out from under it. The exception is a target collider parented above the SwarmTarget object; keep the collider on the target or below it.
Single surface per cell
The field is a height map: each XZ cell stores exactly one walkable height. Two consequences to plan around:
- Walking under an overhead obstacle is supported (one floor, obstacle above it). Two stacked walkable floors in the same column are not: a catwalk crossing over open floor bakes as only one of the two (the higher one the agent fits on).
- The bake takes the topmost walkable surface the agent fits on. If that surface fails the height check, the cell is blocked; it does not retry a lower walkable surface in the same column.
Keeping a berth from walls
By default the route follows the shortest path, which can send agents right up to a wall before turning them along it, because only the cells touching the wall redirect them. The Wall Clearance settings add a soft cost near obstacles so the route bows away earlier and rounds corners with a margin, instead of grazing the wall and peeling off at the last cell.
- Wall Clearance Strength sets how hard the route is pushed off walls.
0turns the berth off, so routes graze walls and corners as before. - Wall Clearance Distance sets how far the margin reaches, in world units.
The cost is soft: a corridor or doorway barely wider than an agent still routes through, because the berth only makes near-wall cells costlier to cross. It never closes a passage or strands a reachable cell. It is computed once at bake time and adds nothing to per-frame cost.
Wall Clearance vs Wall Margin
These Wall Clearance settings shape the baked route. They are separate from Surface Flow Wall Margin on SwarmSettings, which holds a moving agent's body off wall cells at runtime, and from Clearance Radius, the agent's footprint size. See the Glossary.
Setup
Disabled by default
Surface Flow Field Navigation is off by default. You turn it on per scene from the SwarmManager, so one scene can run the field while another that reuses the same SwarmSettings does not. Agents use behavior steering and obstacle blocking until you enable it.
- On
SwarmManager, enable Surface Flow Field Navigation. - On
SwarmManager, set the Sampling Bounds for the bake volume: - Edit Bounds Center and Bounds Size directly to place the volume, or click Snap Bounds To Scene to fit it automatically around scene colliders that match the Walkable and Unwalkable masks.
- Set Bounds Source to scope the snap to one object's geometry only (useful when a large floor elsewhere would inflate the fit).
- Set the bake layers on
SwarmManager: - Walkable Layer Mask: the floor/ground the bake stands agents on. Put your floors and ramps here.
- Unwalkable Layer Mask: walls, columns, overhead bars, and props that block. Keep this separate from Walkable.
- Enter Play mode. The manager bakes the map at startup.
Keep agents off the bake layers
Put your agent prefabs on a layer that is not in the Walkable, Unwalkable, or Obstacle masks. The field rebakes with agents present, so an agent that shares a bake layer reads as a wall and carves holes in its own route. The sample archetypes ship on layer 7 for this reason. It is named Enemy only after you press Configure Demo Project in the Welcome window; until then it shows as an unnamed layer. The archetype inspector warns when an assigned prefab's layer overlaps a mask.
Key settings
Surface Flow settings live in two places: the per-scene on/off toggle and bake-time grid configuration on SwarmManager, shared runtime routing parameters on SwarmSettings.
Switch SwarmSettings to Advanced first
The SwarmSettings inspector opens in Simple mode every session, and its whole Surface Flow Field Navigation section is Advanced-only. If you are looking for the fields in the second table below and cannot see them, that is why. The SwarmManager side needs no mode switch: its Surface Flow section shows in both.
On SwarmManager
| Field | What it does |
|---|---|
| Surface Flow Field Navigation | The checkbox on the section header itself, not a field inside it. Turns the field on for this scene. Lives on the manager, not the shared settings asset, so another scene reusing the same SwarmSettings is unaffected. With the section off, its body offers an Enable Surface Flow Field button that does the same thing. |
| Cell Size | Grid resolution in world units. Smaller cells route more precisely but cost more to bake and store. |
| Walkable Layer Mask | The floor/ground layers the ground probe lands on. The down-cast targets these layers only, so it passes through an overhead obstacle (door lintel, low arch) and resolves the floor beneath it. Leave empty and the ground probe targets the combined Walkable + Unwalkable mask instead. The probe is still a footprint sphere cast, but the topmost surface now decides the cell, so a cell whose top hit is unwalkable is rejected and nothing passes under an overhead obstacle. To get a true single-ray point sample, set Clearance Radius to 0. |
| Unwalkable Layer Mask | Obstacle layers (walls, columns, overhead bars, props). The lateral wall test and the standing-clearance check query this mask. Must stay separate from Walkable Layer Mask. |
| Clearance Radius | Agent footprint radius the bake reasons about, in world units. The bake sphere-casts at this radius, so a gap narrower than the footprint reads as solid ground the agent bridges, while a wider opening stays walkable. A slot between two walls narrower than twice this radius bakes non-passable. 0 = legacy single-ray point sample. |
| Agent Height | Agent standing height the bake reasons about, in world units. With a non-zero height and an Unwalkable mask set, each cell checks a capsule spanning this height above the floor, so a floor under an overhead obstacle bakes walkable only when the agent fits under it. 0 = footprint-only (no overhead detection). |
| Quality | Cardinal (fastest) stores 8-way direction arrows. Smooth stores an integration field for wall-aware gradient sampling, which is more accurate around walls and corners, and it unlocks the per-agent Smooth Direction Blend on SwarmSettings. Eikonal (smoothest) solves that same field with Fast Marching so flow directions vary by continuous angle instead of the eight grid steps, best where a wide front should fan out instead of collapsing onto one path, at a heavier bake. Smooth and Eikonal are also what Sight's Navigation Path occlusion needs. On Cardinal, agents with that occlusion see through walls, and Alert Spread on the same profile stops calling altogether. Nothing is logged at runtime. The Perception Profile inspector warns about the sight half and offers a button that sets the quality to Smooth. See Sight and Alert Spread. |
| Climb Cost Bias | Soft penalty against routes that climb upward, as extra step cost per world unit of climb (in multiples of one flat step). 0 ignores climb; 1 makes a 1-unit climb cost as much as one extra flat step. A steep climb is still taken when no comparably short flatter route exists. |
| Wall Clearance Strength | How hard routes bow away from walls, as extra step cost at the wall face (in multiples of one flat step). 0 keeps the shortest path that grazes walls and corners; higher values push the route farther off. Soft: it never seals a gap an agent could otherwise fit through. |
| Wall Clearance Distance | How far the wall berth reaches, in world units. The penalty is strongest one cell off the wall and fades to zero at this distance. Below half a cell it rounds to off. |
On SwarmSettings
| Field | What it does |
|---|---|
| Surface Flow Target Mode | How targets map to goal fields. Every mode follows the baked route once a target is picked, so what really changes between them is how that target gets picked. Per Swarm Target bakes a separate field per active target slot and each agent picks its own target by straight-line distance, adjusted by Priority. Primary Swarm Target bakes one field toward the active target with the highest Priority, so the whole swarm converges on it and ignores the others. Give that target a Priority above the rest, or the mode falls back to the first target that claimed a slot. Nearest Swarm Target bakes one field seeded from every active target at once, and each agent ends up at whichever target is cheapest to reach along the route rather than the one that is nearest in a straight line, so agents walk past a target sitting behind a wall or up a slope in favour of one they can actually get to. Priority has no effect in this mode. Both shared modes bake a single field rather than one per target, so they cost less when a scene has many targets. |
| Surface Flow Authority | How strongly the flow field overrides behavior steering. 1 means the field fully controls direction; lower values blend with behavior steering. |
| Surface Flow Aligned Behavior Weight | Of the agent's own steering, how much of the part already pointing along the route survives. Default 0.25. |
| Surface Flow Lateral Behavior Weight | How much of the sideways part survives: neighbour separation, and any pull toward the target that is not along the route. Default 0.65. This is the dial for a crowd that single-files down a corridor when you wanted it to spread. |
| Surface Flow Opposing Behavior Weight | How much steering that points back against the route survives. Default 0.05, small on purpose. It exists so a packed crowd can give itself breathing room without agents turning around. |
| Surface Flow Direct Approach Distance | How close to its target, measured along the flow route, an agent must be before it steers straight at the target instead of following the route. Stops agents beelining a target that is near in a straight line but far by path, such as one on a ledge reached by a ramp. In world units along the path; a sloped or raised route counts as farther. 0 turns the hand-off off so seek always blends in. Needs Quality Smooth or Eikonal. Pairs with Goal Release Distance, the final hand-off to surround. |
| Surface Flow Goal Release Distance | Agents inside this distance from their target ignore the flow field and use behavior steering directly. |
| Smooth Direction Blend | Blends the flow direction from the four cells around each agent so headings turn smoothly across cell borders instead of stepping at each boundary. Smooth or Eikonal quality only; applied to Full and Reduced importance agents, while Cheap agents keep the snapped per-cell direction. Cosmetic: it does not change the route. |
| Surface Flow Enforce Cell Boundaries | Prevents agents from crossing into cells the bake marked as blocked. Recommended on. |
Authority decides how much steering survives, the three weights decide which parts
Surface Flow Authority at 1 does not silence behaviors. The route wins, and then the agent's own steering is split into three pieces by direction relative to that route, each scaled by its own weight. Raise Lateral for a crowd that should still fan out while it walks a corridor, and lower it for a disciplined column. Defaults are 0.25 / 0.65 / 0.05.
Fallback behavior
These modes apply when an in-field agent has no valid route. That means no baked field, no goal flood reaching the cell, or a sealed target:
| Fallback mode | What happens |
|---|---|
| Keep Behavior Steering (default) | Agent uses behavior steering without flow field influence. |
| Stop | Agent stops moving. |
| Use Last Flow Direction | Applies when the target is sealed outside the field. Agents keep walking the last heading they sampled until the field rebakes. An agent standing in a cell that has no route does not coast. It falls to behavior steering. |
Searching and perception-gated agents
An agent that is searching, or that carries a Perception Profile and currently cannot detect its target, gets no flow direction even while standing inside the baked field. None of the fallback modes above apply to it either: its status reads Unreachable and its cached direction is zero, on purpose. The field is baked toward where the target actually is, so following it would let a blind agent track a target it cannot see, which undoes the sight gate the behavior pass just applied.
A searching agent gets a destination instead of a route. With no flow field to steer by, that destination resolve is its whole route knowledge: it walks straight to the remembered last-seen spot when the line is clear or the only blocker is still far off, otherwise through an opening found within Opening Search Radius, otherwise it gives up and mills in place instead of grinding into the wall. Finding that opening is a bounded flood over the baked cell connectivity, not a visibility test, so it needs a baked map at any Quality setting rather than an integration field.
See Perception for Sight and the rest of the detection ladder, and Searching for the full parameter reference.
Grounding with the flow field
The field stores the ground height at each baked cell. When Surface Flow Grounding Mode is Prefer Field Height, agents on the field lerp their Y position to the cell's baked height. This replaces or supplements physics grounding for agents on the walkable surface.
Prefer Field Height: uses field height for agents on the field; falls back to physics grounding for off-field agents.Replace Physics When Available: uses field height for agents on the field; off-field agents always use gravity regardless of theEnable Groundingsetting.Disabled: flow field does not control Y. Physics grounding runs independently.
How fast that lerp runs is Surface Flow Height Follow Speed on SwarmSettings, default 12. If the swarm stair-steps up a ramp or floats over a crest under either field-height mode, that is the field to change. It is documented with the rest of the Advanced surface-flow settings on the Swarm Settings page.
Runtime rebake
Runtime Rebake is on by default in SwarmSettings, so goal fields rebake automatically as targets move. The checkbox sits in the foldout header, and checking it enables the whole feature. The bake is throttled by Surface Flow Rebake Interval and only triggers when the target moves past Surface Flow Goal Move Rebake Distance.
- Surface Flow Max Runtime Rebakes Per Step: how many new rebakes may be scheduled in a single fixed step. Default
1. With several moving targets inPer Swarm Targetmode this is what makes their fields refresh in turn rather than all at once. A field that has been waiting longer goes first, weighted toward targets with more followers, so no target's field is left stale for long. Raise it if routes visibly lag behind moving targets, and expect the bake cost to arrive in one lump when you do. - Surface Flow Bake Scheduler:
Background Thread(default) orMain Thread. Background keeps the flood-fill off the simulation thread. - Surface Flow Concurrent Bakes: how many background bakes may run at once. Default
2.Main Threadmode always runs one regardless of this value.
Background thread baking falls back to Main Thread automatically on WebGL. V1 ships no Jobs/Burst scheduler.
Congestion bias
When dense crowds funnel through a single corridor, a flow field alone tends to single-file every agent through the lowest-cost cell. Enable Congestion Bias in SwarmSettings to spread that traffic across parallel routes.
How it works:
- Each fixed step the manager counts how many agents currently sit in each surface-flow cell.
- When an agent samples its next direction, candidate neighbor cells that are already occupied are scored as less attractive, but never blocked.
- An agent will only divert if another route is also valid (lower-cost). In a one-cell-wide corridor it still walks straight through.
Settings:
| Field | What it does |
|---|---|
| Congestion Bias (toggle) | Master toggle. The checkbox sits in the section header, and checking it enables the whole Congestion Bias feature. Off by default. |
| Strength | 0 disables the penalty. 1 strongly prefers equally valid lower-occupancy cells. Default 0.65 reads as a noticeable but not overpowering bias. |
| Free Cell Capacity | How many agents can sit in a candidate cell before the soft penalty starts. Default 1 keeps single-occupancy cells neutral; raise it for crowds that should pack more tightly before re-routing. |
Requirements:
- Quality must be
SmoothorEikonalon the SwarmManager.Cardinalquality skips the integration field this feature samples; the bias has no effect there and a one-time warning is logged at runtime. - Settings take effect immediately, with no rebake or restart needed when toggling the feature or adjusting Strength / Free Cell Capacity in Play mode.
When to use it:
- Dense crowds that pile up at chokepoints or single-file along corridors that have parallel alternatives.
- Bullet-heaven / survivor scenes where agents should spread out around the player rather than stack into one column.
When to skip it:
- Open arenas with no corridors, where there is nothing to spread.
- Very low agent counts where a single-file route is acceptable and you want to save the per-step occupancy pass.
Congestion reroute
Experimental
Congestion Reroute is experimental. Tuning defaults and trigger heuristics may change in future updates, and it is not covered by the support promise. See Experimental Features for what that means in practice.
Where Congestion Bias nudges an agent's sampled direction at runtime, Congestion Reroute rebakes the surface flow itself. When a corridor stays crowded, the next bake charges those cells extra Dijkstra cost and the new field routes agents through alternative corridors.
How it works:
- Each fixed step the manager counts occupancy per surface-flow cell (the same data Congestion Bias reads).
- Agents moving slower than Stuck Speed count as more than one toward occupancy, so a single-file queue still trips the trigger even when no two agents share a cell.
- Reaching Trigger Crowding is not enough on its own. The excess has to hold for a moment before a rebake is scheduled, so a crowd that briefly bunches while flowing past a pillar does not trigger one. Congestion far above Trigger Crowding skips the wait and reroutes immediately.
- The manager then schedules one extra goal-field rebake for that target, at most once per Interval seconds, with a short recovery window after a clean bake.
- Rerouted fields do not stack penalties. After a bake that carried congestion weighting, the next congestion-triggered bake is forced back to unweighted, so the route relaxes instead of drifting further from the direct path with every reroute.
- The rebake runs on the background bake scheduler. While it is in flight, agents keep following the previous field with no stall.
Settings (under SwarmSettings → Congestion Reroute):
| Field | Default | What it does |
|---|---|---|
| Congestion Reroute (toggle) | Off | Master toggle. The checkbox sits in the foldout header, and checking it enables the whole feature. |
| Interval | 2.0 s |
Minimum seconds between rebakes per target. Smaller values respond faster but burn more CPU on Dijkstra rebakes. Recommended 1.5 to 3.0. |
| Cost Scale | 4.0 |
How heavily congested cells weigh the Dijkstra cost. 0 disables the penalty. 1 means one extra agent costs as much as one extra horizontal step. Tight bottlenecks where agents can only stack 1 to 2 per cell often need 4 to 8 to overcome the extra length of the alternate route; wide bottlenecks reroute fine at 1 to 2. |
| Trigger Crowding | 2 |
Minimum total congestion weight before a rebake is scheduled. Lower values react faster to small pile-ups; raise it to avoid rebakes from transient crowding. With cell size ≈ the agent footprint (Clearance Radius × 2), keep this at 1 to 3. |
| Stuck Speed | 1.0 units/sec |
Agents below this speed count as 2 toward occupancy; faster agents count as 1. 0 disables the bonus. Typical agent speed is 3 to 5 units/sec, so the default catches body-blocked queueing without flagging normal motion. |
The Free Cell Capacity setting from Congestion Bias is shared, and it controls how many agents a cell can hold before either feature treats it as congested.
Requirements:
- Works at any Quality setting (Cardinal, Smooth, or Eikonal) because it only modifies edge costs, not the integration field.
- Settings take effect immediately. Changes to Interval / Cost Scale / Trigger Crowding / Stuck Speed do not require a manual rebake.
- Per-target rebake state is cleared automatically when targets disconnect or the swarm is reset.
When to use it:
- Persistent bottlenecks where Congestion Bias alone cannot spread the crowd because no parallel route is visible to the local sampler.
- Levels with two or more roughly equal paths to the same target, where the rebake will discover the alternative and divert traffic.
When to skip it:
- One-corridor levels with no alternative route. The rebake cost buys nothing because the field has no other path to find.
- Scenes where bake cost is already tight, since every triggered rebake is a full goal-field bake.
Use both together for the best spread: the bias smooths distribution in the moment, the reroute commits the change to the field over a few seconds.
Performance guidance
- Bake cost scales with total grid cells. For a 50 × 50 unit scene at 1-unit cell size: 2500 cells.
- Use Cardinal quality and a coarser cell size for maximum throughput. Use Smooth when routing near corners matters, or Eikonal for the smoothest flow at a heavier bake.
- Keep Surface Flow Concurrent Bakes low (1 to 2) to avoid bake traffic spikes when multiple targets are moving simultaneously.
- Reduced and Cheap tier agents resample the field less frequently (configured by Surface Flow Reduced LOD Sample Interval and Surface Flow Cheap LOD Sample Interval in
SwarmSettings). Cached directions are reused between samples.
Troubleshooting
Target moves off the field and the swarm scatters or idles
When the target moves off the baked grid, inside a wall, or onto walkable ground that belongs to a different connected region from the crowd (ground outside a perimeter wall bakes as its own separate region), the system searches for a stand-in goal at the nearest reachable edge cell on the crowd's side that also has a clear straight line to the target. The crowd routes to that cell, and agents that reach it direct-seek the live target from there.
The stand-in is the closest of the nearest edge cells that has a clear line to the target. A target in a disconnected region, or off the grid, still gets one if any of those cells has a clear line. The crowd falls to fallback only when none does, for example in a closed room or sealed corner. In that case, agents apply the configured Surface Flow Fallback Mode in SwarmSettings. Keep Behavior Steering lets agents use plain steering; Stop freezes them in place.
- Confirm Surface Flow Fallback Mode in
SwarmSettingsmatches the behavior you want (see Choosing a fallback mode below). - Make sure Sampling Bounds on
SwarmManagercover the full play area. A target far outside the grid can still get a stand-in goal, but only if one of the nearest edge cells has a clear line to it. - If the crowd moves toward a gap or opening and then flows toward the target, the stand-in proxy is working as designed.
Some agents chase while others wander or stand still
Agents with a valid route follow the field normally. Agents that are off the grid or standing in an unwalkable cell get no flow direction and keep their plain behavior steering. In-field agents whose route is sealed off (the target sits in an isolated patch or on the wrong side of a sealed wall) get no direction and fall to the configured fallback instead. Either way the field is correctly reporting that those agents have no path.
A fourth case looks the same from a distance but has nothing to do with the route: an agent that is searching, or carries a Perception Profile and cannot currently detect its target, also gets no flow direction even while standing inside a perfectly good field. If you assigned a Perception Profile, this is the most likely reason a chaser suddenly looks like it lost the field. See Searching and perception-gated agents above.
Restore a reachable target position, or choose a fallback mode that fits the look you want.
Console: 'a successful bake reached only X of Y walkable cells'
The goal flood reached far less of its own walkable region than expected, so the bake covered only part of the area the target sits in. Usual causes: Sampling Bounds that stop short of the full floor, so the flood ends at the bounds edge mid-area, or geometry that splits one apparent area into pieces the route cannot bridge.
Fixes: - Click Snap Bounds To Scene so the bounds cover the whole floor, then confirm no part of the play area sits outside them. - Check that a wall, gap, or steep drop isn't cutting one intended area into separate regions the route can't cross.
Ground that sits outside the play area, past a perimeter wall, is handled for you (the crowd routes to the nearest reachable edge) so a stray outer strip on its own does not trip this warning.
Agents on a walkable patch never follow the field
The bake groups walkable cells into connected regions. Two cells belong to the same region only when a passable path connects them. A sealed room, a raised island, or an area cut by a full-height wall bakes as its own region.
When the goal floods from a target in a different region, it cannot reach the isolated patch. Agents there have no direction and fall to fallback.
Fixes:
- Add a walkable passage connecting the isolated area to the main region: a doorway, a ramp, or a lower wall.
- Add a SwarmTarget inside the isolated area so agents there have a reachable goal.
Choosing a fallback mode
The Fallback behavior section above lists the three modes. In tight walled layouts the choice matters, so here is when each fits.
Keep Behavior Steering (the default) leaves behavior steering untouched when agents lose the flow field. This works for mostly-open levels where off-field agents can still navigate roughly toward the target on their own. In tight walled layouts the field normally prevents agents from steering into walls. Do not count on obstacle blocking to catch the ones that lose it: with Surface Flow on, the manager removes both surface-flow layers from the obstacle mask, and wall containment belongs to the cell-boundary clamp that an off-field agent has lost. Only dynamic obstacles on layers outside both masks still block. See Physics & Colliders.
Stop zeros the steering accumulator for any agent that loses its route. The agent stays awake (obstacle and body blocking still run) and re-engages the moment the field bakes a valid route. Use this when you want agents to hold position rather than spread out.
Use Last Flow Direction reuses the cached heading from the last successful field sample. It applies when the target is sealed outside the field: agents keep walking the heading they had instead of stopping. The cache becomes invalid when the goal field rebakes, and after that agents fall to behavior steering until they get a new successful sample. It does nothing for an agent standing in a cell with no route, and a bake that has not landed yet never reaches fallback, because the previous field keeps serving until the new one is ready.
The standalone SurfaceFlowField component
Everything above describes the surface flow the SwarmManager bakes and owns for the swarm. There is a second, separate one: a SurfaceFlowField component you add to any GameObject, which bakes its own map and its own flow field toward a single goal. The swarm does not read it. It exists so non-swarm objects can route through the same kind of field, and it is what the Simple Flow Field Follower below looks for.
Add it via Component → Massive Swarm System → Surface Flow Field.
Baking one
Three buttons sit at the top of the inspector, and the order matters:
- Map Surface: rasterizes the bounds into cells, probes for ground, and works out which cells connect. This is the geometry pass. Re-run it after changing anything in the Sampling section or after editing the level.
- Bake Flow Field: floods outward from the cell under Goal Transform so every reachable cell stores the direction to step next. Stays greyed out until a surface is mapped and a goal is assigned.
- Clear Map: throws both away.
The inspector reports walkable cell count, reachable and unreachable counts, and the last bake time under the sections, so you can tell a bad bake from a bad goal.
Sampling
Cell size, bounds, layer masks, slope and step limits, and the agent footprint the bake reasons about. The field names match the bake settings on the Swarm Manager, with two buttons of its own:
- Snap Bounds To Scene: fits the sampling box around the scene colliders on the Walkable and Unwalkable masks, so you do not size it by hand.
- Apply Bake Sampling From Swarm Manager: copies the manager's bake settings onto this component. Use it when you want a follower routing on the same geometry rules as the swarm, so the two do not disagree about what is walkable.
The starting values do not match the manager
Clearance Radius and Agent Height both start at 0 on a fresh component, against 0.5 and 1.5 on the SwarmManager. Baked at those zeroed defaults, the standalone field skips the footprint-width and overhead checks entirely and can disagree with the swarm about what is walkable. Click Apply Bake Sampling From Swarm Manager before the first bake if this field needs to agree with the swarm.
Walkable Layer Mask and Unwalkable Layer Mask must stay separate. The down-cast only targets Walkable, which is what lets it find the floor under a door lintel that sits on Unwalkable.
Cell Gizmos
Scene-view appearance only. Sampled cells draw as filled tiles, unsampled ones get a red marker, and Gizmo Draw Radius (default 50) caps how far around the Scene-view focus the cells are drawn so a big map stays responsive. The bounds wire and the goal highlight always draw.
Flow Field
- Goal Transform: where the flood starts. Without it there is nothing to bake.
- Quality:
Cardinal (fastest)snaps to eight directions,Smoothsamples a continuous gradient,Eikonal (smoothest)solves the same field with Fast Marching so headings vary by continuous angle. Re-bake after changing it. - Arrow and highlight colors, plus the goal-cell and unreachable markers.
Simple Flow Field Follower
A sample component that moves any non-swarm GameObject along a baked surface flow field. Use it for player characters, companion bots, or anything else that should route around the level without joining the swarm simulation. The field it reads is the standalone SurfaceFlowField component's own bake, not the manager's.
Add it via Component → Massive Swarm System → Samples → Simple Flow Field Follower.
It needs a baked SurfaceFlowField component in the scene before it does anything at all, so set that up first: add one, map the surface, assign a goal, bake. Pointing the follower at the swarm's own field is not an option, because the manager keeps that one to itself.
It runs in Update and calls SurfaceFlowField.TrySample each frame to read the flow direction at its current world position, then moves along that direction at Move Speed.
| Field | What it controls |
|---|---|
| Flow Field | The SurfaceFlowField to follow. When not assigned and Auto Find Field is on, the component finds the first active SurfaceFlowField in the scene at startup |
| Auto Find Field | Automatically locates a SurfaceFlowField at Awake when Flow Field is empty |
| Move Speed | Horizontal movement speed in world units per second |
| Height Offset | World-unit offset above the sampled ground height |
| Height Follow Speed | How quickly the object lerps toward the sampled ground height. 0 snaps immediately. This one belongs to the follower component only; the swarm's own version is Surface Flow Height Follow Speed on SwarmSettings |
| Face Flow Direction | Rotates the object to face the current flow direction each frame |
| Turn Speed | Maximum turn rate in degrees per second when Face Flow Direction is on |
| Stop When No Flow | Stops movement when the current cell has no direction, which typically means the object reached the goal or landed in an unreachable cell |
| Enforce Cell Boundaries | Prevents the object from crossing into cells the bake marked as blocked. Mirrors the containment pass the swarm uses. Recommended on |
| Radius | Body radius used to keep the object clear of blocked cell edges, in world units |
| Wall Margin | Extra clearance beyond Radius. Increase if the body still clips into walls |
Runtime API. The component calls SurfaceFlowField.TrySample for the flow direction, TrySampleHeightFromCell or TrySampleHeight for ground height, TryWorldToCellIndex and IsCellWalkable for cell containment, and CanMove to test whether a given cell transition is permitted by the bake. It also reads TryWorldToCell, CellSize, GridWidth, Origin and HasFlowFieldData. You can call these methods directly from your own scripts to build a custom follower without the sample component.
Reach for it when a non-swarm object should route around the level instead of walking into walls. If it has to agree with the swarm about what is walkable, click Apply Bake Sampling From Swarm Manager on the field first. Skip it when the object needs physics-driven movement, or when no SurfaceFlowField is baked in the scene.