Swarm Settings Asset
SwarmSettings is a ScriptableObject that lives in your project. One instance applies to the whole swarm. Create a new one via right-click → Create → Massive Swarm System → Swarm Settings.
The first time a SwarmManager needs settings and none are assigned, Massive Swarm System writes you a copy at Assets/MSS/Settings/MSS Swarm Settings.asset and assigns that. It is yours to edit. Everything the package ships stays under Assets/CreativeSpore/MassiveSwarmSystem/, and an update overwrites that folder, so keeping your tuning outside it is what stops the next version from resetting your work. The Archetype Wizard follows the same rule and writes to Assets/MSS/Archetypes. The VAT baker writes to Assets/VAT.
Duplicate your settings asset for level-specific tuning and assign the variant to the manager's Settings slot.
Finding a setting fast
This inspector has a search-and-filter bar at the top. See Finding a Setting to search by word or symptom, show only the performance-heavy settings, or show only the rows that differ from the factory default. That last filter is labelled Non-default, and it means what it says: a preset asset that tunes a value on purpose shows up there too, not just the edits you made yourself.
Capacity
- Max Agents: total agent slots allocated at startup. Raise this before spawning more agents than the default allows. Lower it to reduce memory overhead on mobile.
Some settings are read once, at startup
Max Agents, Grid Cell Size (under Default Spawn Profile), the fixed timestep pair, the two render smoothing fields (under Timing & Visuals), Obstacle Blocking Max Colliders Per Agent and Ground Probe Max Hits Per Agent are all consumed by SwarmManager.Initialize. Editing them while the game is running looks like nothing happens, because nothing does: the agent arrays, the spatial grid and the physics hit buffers are already allocated at their old size. Exit Play Mode and re-enter, or re-initialize the manager. Every other setting on this page is sampled during the simulation step and applies live. The inspector prints this same reminder at the top of the asset while you are in Play Mode.
Timing & Visuals
These fields appear in the Timing & Visuals section of the Advanced inspector. The Simple inspector shows only Apply Fixed Timestep On Initialize (in its Setup section) and the two Render Smoothing fields (in its Performance section); Fixed Timestep, Maximum Allowed Timestep, and Visual Interpolation are Advanced-only. The defaults suit most projects, so switch to Advanced to change them.
- Apply Fixed Timestep On Initialize: on by default. The swarm writes the two timestep values below to Unity's
Time.fixedDeltaTimeandTime.maximumDeltaTimeat startup, locking the simulation rate and capping the catch-up window without you editing Project Settings. Turn it off only if you drive Unity's Time Manager yourself. - Fixed Timestep: physics and swarm simulation timestep in seconds, applied when the toggle above is on. It is written to
Time.fixedDeltaTime, so it also sets the physics step of every Rigidbody in your project. The default0.0333runs the swarm at 30 Hz. Smaller values mean more simulation steps per second and higher CPU cost. - Maximum Allowed Timestep: caps the fixed-step catch-up window in seconds, applied when the toggle above is on. This is what stops the low-frame-rate spiral: when a frame runs long, Unity would otherwise run several catch-up simulation steps in the next frame, each of which costs more under load and drops the frame rate further. Capping the window near Fixed Timestep lets in-game time slow down instead of snowballing. The inspector's
OnValidatekeeps this at or above Fixed Timestep; a value set from code at runtime is applied as-is, and Unity ignores any value below Fixed Timestep. - Visual Interpolation: controls how pooled agent visuals are positioned between fixed simulation steps.
None: visuals snap to the last simulated position each frame.Interpolate: visuals blend between the previous and current simulated positions. Smooth at normal frame rates; adds one fixed step of visual lag.Extrapolate: visuals project ahead using the agent's current velocity. Responsive but can overshoot on sharp direction changes.
- Enable Render Smoothing: filters each agent's drawn position through a velocity-adaptive low-pass so a dense crowd packed around a target stops trembling in place. The filter runs on the pose Visual Interpolation produces, so the two combine. The simulation, attack reach, and containment all work from the agent's true position; only the rendered body is filtered. It is allowed to drift some way behind the true position while the filter catches up, and if the gap opens past a snap threshold that grows with the agent radius, the visual snaps back rather than trailing further. The agent's collider moves with the rendered body, so raycasts and trigger checks hit what the player sees. If a check needs the true position instead, see Physics & Colliders: Hitting agents. On by default.
- Render Smoothing Cutoff: how strongly the filter damps jitter, in Hz. Lower values smooth more, giving calmer dense piles but slight visual lag on fast movers. Higher values track motion more tightly. The default is
0.6; adjust in small steps (about0.2at a time) and judge by eye. Useful values sit near the default, well below the allowed maximum of10. Raise it if fast-moving agents look rubbery; lower it if a settled pile still shimmers.
Warning
Maximum Allowed Timestep must be at least as large as Fixed Timestep or Unity ignores the value. The OnValidate clamp enforces this automatically in the inspector, but watch for it when setting values from code.
Default Spawn Profile
Fallback values used when an agent is spawned without an archetype, or when an archetype does not provide its own movement profile.
- Default Agent Radius: fallback agent radius in world units used for body blocking, Personal Space, and grid queries when no archetype radius is provided.
- Agent Spacing Scale: multiplies each agent's radius for agent-to-agent separation.
1uses the archetype radius directly.0disables separation (and also disables Personal Space entirely). Values above1spread agents wider than their physical radius. - Default Movement Profile: fallback
SwarmMovementProfileasset for speed, acceleration, and turning when an agent has no profile of its own. If unassigned, built-in default movement values are used. - Default Push Resistance: how hard default agents resist external shoves. Higher values mean external forces like pushback affect the agent less.
- Correct Spawns In Obstacles: on by default. An agent asked to spawn inside a wall is moved to the nearest walkable spot instead of starting inside geometry. Turn it off to place every agent exactly where the spawner asked, walls included. It needs a baked Surface Flow Field to know what walkable means.
- Spawn Placement Search Radius: how far to look for a walkable spot around an agent that spawned inside an obstacle, in units. Default
3. Nothing found within this radius means the agent spawns where it was asked and the console gets one warning. Larger values rescue agents deeper inside thick geometry and widen the search each spawn pays for. The search is limited to 16 grid cells of the Surface Flow Field, so with a Cell Size of0.1it stops at 1.6 units however large the radius is. When that limit is what stopped it, the warning says so. - Grid Cell Size: spatial hash cell size for neighbor queries. The default
1.5is three times the default agent radius, which suits a typical crowd. Very small cells increase hash overhead; very large cells increase per-cell neighbor checks. The only hard rule the asset enforces is that the cell cannot be smaller than Default Agent Radius.
Warning
Setting Agent Spacing Scale to 0 disables Personal Space entirely, and the runtime skips the separation pass regardless of behavior profile settings. Keep it above 0 for any profile that needs visible crowd separation.
Agent Reactions
Controls how agents respond to external forces: pushback from weapons, explosions, or any code that calls SwarmAgent.AddImpulse (one-shot knockback) or SwarmAgent.AddForce (sustained force). See SwarmAgent.
- Default External Control Duration: seconds that an external force influences an agent after it is applied. After this window, normal steering resumes.
- External Velocity Damping: how quickly the external velocity component decays per second. Higher values cause agents to return to normal steering sooner.
- External Force Steering Authority: fraction of normal steering that remains active while an external force is in effect (
0to1).0means external force overrides steering entirely;1means steering runs at full weight alongside the external force. - Max External Velocity: speed cap on the velocity component contributed by external forces. Prevents agents from flying off at extreme distances when large impulses are applied.
Grounding
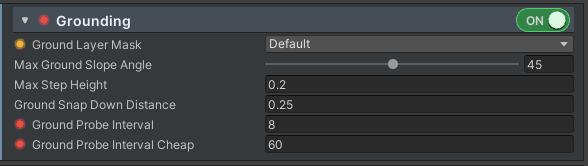
Simple mode shows the three that matter for setup: Ground Layer Mask, Max Ground Slope Angle and Max Step Height, under a Grounding foldout with the on/off checkbox on its header. Everything else below is Advanced. Listed in inspector order.
- Enable Grounding: the checkbox on the section header. Turns on physics-based ground probes, step-up smoothing, and gravity. Leave it on for 3D scenes; turn it off for top-down flat levels. Surface Flow Field grounding is a separate system with its own toggle, covered under Surface Flow Field below.
- Ground Layer Mask: which collision layers count as walkable ground. Defaults to the built-in
Defaultlayer. Add terrain layers explicitly, and keep agent collider layers out. ASwarmTarget's own colliders never count as ground, even on a layer in this mask, so the horde won't climb onto the player or a boss. A collider added to a target after it registered is not covered until the target registers again. - Allow Agent Colliders As Ground: experimental, off by default. Lets other agents register as ground hits, so a crowd can stack and climb over itself. An agent still ignores its own colliders, and the step-height rule still applies, so nobody teleports onto a pile. Expensive: every ground probe now has more candidates to sift.
- Max Ground Slope Angle: steepest slope agents can stand on, in degrees. Default
45. - Ground Probe Up Distance: how far above the agent the probe starts, in units. Default
1.5. Raise it if agents on steep terrain miss ground that sits above their feet. - Ground Probe Down Distance: how far below the agent the probe reaches. Default
4. This sets how big a drop an agent can fall down and still find the floor. - Ground Probe Radius Scale: probe radius as a fraction of the agent radius. Default
0.85. A fatter probe finds ground earlier on ledge edges, and it also collects more physics hits per agent. - Ground Skin: clearance kept above the detected surface, in units. Default
0.02. Stops feet from z-fighting into the floor. - Ground Snap Down Distance: how far an agent is pulled back down to stay attached over slopes and small drops. Default
0.25. Too small and agents launch off crests. - Max Step Height: tallest ledge an agent can step up onto, in units. Default
0.2. Anything higher blocks them. - Smooth Step Up: on by default. Eases the vertical move when stepping up instead of teleporting the agent to the new height.
- Step Up Speed: vertical speed used for that easing, in units per second. Default
2. Greyed out while Smooth Step Up is off. - Gravity: downward acceleration applied to agents that are not grounded. Default
30, deliberately heavier than real gravity so agents settle fast instead of floating down. - Max Fall Speed: terminal speed for that fall. Default
40. - Ground Probe Max Hits Per Agent: caps how many physics hits one agent's probe will process. Default
8. A direct per-agent cost multiplier at high counts. - Ground Probe Interval: runs the expensive ground probe every N fixed steps instead of every step. Default
8. Applies to Full and Reduced tier agents. Lower it if agents visibly lag behind fast-changing terrain. - Ground Probe Interval Cheap: the same stride for Cheap tier agents, the far and undrawn ones. Default
60, which at the shipped 0.0333 timestep is a 2 second stale window. It is clamped to at least Ground Probe Interval, so the cheap tier can never probe more often than the base one. - Ground Query Trigger Interaction: whether ground probes hit trigger colliders. Defaults to
Ignore. - Grounding Execution Mode: how those probes actually run. See below.
Grounding Execution Mode
All three modes produce the same ground result. What changes is when the work happens and how much of it lands on the main thread.
- Immediate (default) runs one
Physics.SphereCastper agent on its scheduled step. The reference path. - Batched: the same casts run together as a
SpherecastCommandbatch on worker threads, inside the same fixed step. Results are ready before anything reads them, so the outcome is identical to Immediate and the main thread does less work. This is the free upgrade at high agent counts. - Batched Deferred: the batch is scheduled on one step and applied on the next, so the main thread never waits on it. Lowest main-thread cost of the three, at the price of ground height always being one step stale. Render interpolation hides that in most scenes, but a sharp height change can show a brief sink or pop.
The inspector prints an explanatory help box under the field for both batched modes.
Where the cost actually is
Ground Probe Interval, Ground Probe Interval Cheap, Ground Probe Max Hits Per Agent and Allow Agent Colliders As Ground all carry a High impact badge in the inspector. If grounding is showing up in your profile, those four are the ones to look at before anything else in this section.
Warning
Ground Layer Mask must include the layer your floor and terrain colliders are on. If it is empty or wrong, agents fall through the ground. The grounding system uses physics probes: it reads collider layers, not NavMesh.
Agent Query Colliders
- Agent Collider Is Trigger: off by default. Each agent gets a collider at spawn so your raycasts and overlap checks can find it. With this off the collider is solid, which is what makes an agent a static obstacle to Unity physics. Turn it on when you want agents detectable by queries but invisible to physics collisions, for example when your own character controller should walk through the crowd rather than shove it. The swarm's own body blocking is unaffected either way, because it never uses these colliders.
The swarm sets this flag on the collider at the root of the agent prefab every time an agent spawns. A sphere there gets its radius and center from the archetype's Agent Radius. A capsule gets that radius, is stood upright, is made at least twice the radius tall and is centered at half its height. A sphere or capsule hitbox you authored there is resized; any other collider type keeps its shape and only gets the trigger flag. Colliders on children keep their own shape and flags. See Physics & Colliders: Hitting agents.
This changes which callbacks fire on your scripts
A trigger collider raises OnTriggerEnter, a solid one raises OnCollisionEnter, and neither fires at all unless the other object brings a Rigidbody. See the knockback recipe in SwarmAgent for wiring that works against the shipped default.
Body Blocking
Body Blocking is the physics pass that resolves overlaps between agents so they hold space instead of sharing it. It runs in the simulation step, separate from Personal Space: Personal Space is a steering behavior that nudges a crowd apart through movement, while Body Blocking corrects whatever overlap is left over.
- Enable Body Blocking: agents resolve overlaps with each other. Keep on for readable dense crowds.
- Body Blocking Correction Strength: fraction of each overlap resolved per simulation step (
0to1). Higher pulls agents apart faster but can jitter in a tight pack; the default0.65settles smoothly. - Body Blocking Max Correction Per Step: cap on the separation distance applied to one agent in a single step, in world units. Stops a deep overlap from launching a body.
- Body Blocking Velocity Push: velocity impulse added while correcting an overlap, so separation carries a little momentum rather than being pure position fix-up.
0corrects position only. - Body Blocking Max Pairs Per Agent: caps how many overlapping neighbors each agent resolves per step. Only real overlaps count toward the limit. Below
8causes clumping that is hard to undo;12to16is the safe range for dense swarms. This cap applies to soft blocking only. It has no effect while Hard Agent Separation is on (see below). - Body Blocking Reduced Interval: how often Reduced-tier agents (visible, but not near the target) resolve overlaps, in fixed steps.
1is every step; the default is8. Lower toward2to4if mid-distance crowds show pile-up jitter. Full-tier agents always run every step. - Body Blocking Cheap Interval: how often Cheap-tier agents (far or off screen) resolve overlaps, in fixed steps. Higher saves more on distant crowds. At the shipped timestep the default
16is about 0.53 seconds, which is longer than the 0.35 second Off Screen Quality Grace, so an agent crossing back into view can be drawn for a step or two before its next overlap resolve.
Warning
Agent Spacing Scale (in Default Spawn Profile) sets the radius used for agent-to-agent separation, for both Body Blocking and Personal Space. Setting it to 0 disables separation entirely, and the runtime skips the pass regardless of behavior profile settings. Keep it above 0 for any swarm that needs visible crowd separation.
Hard Agent Separation (Layer 1)
Soft Body Blocking resolves a fraction of each overlap per step and shares a per-agent budget, so a very dense pack (hundreds of agents crushing toward one target) can stay partly interpenetrated. Hard Agent Separation is an optional pass that resolves awake agents to their full minimum spacing each step, so the crowd keeps usable spacing under that pressure. It is off by default; turn it on for scenes that visibly pile up.
While it is on, it takes over agent-to-agent spacing from soft Body Blocking, and the two do not stack. It runs every step on every awake agent with its own neighbor budget, so it costs more than soft blocking. Leave it off unless a scene needs the guarantee.
- Enable Hard Agent Separation: turns the pass on. It runs only while Enable Body Blocking is on (the inspector greys these controls out otherwise), Agent Spacing Scale is above
0, and Correction Strength is above0. A0correction strength returns from the whole blocking pass before the hard branch is reached, so it switches hard separation off as completely as the toggle does. - Hard Separation Max Iterations: maximum separation sweeps per step. Neighbors are gathered once and replayed across the sweeps, so each extra sweep is cheap, and it stops early once the crowd is separated. Raise it to make a dense crush separate in fewer steps, at little extra cost.
- Hard Separation Max Step Radius Fraction: caps how far the pass may move an agent in one step, as a fraction of its radius. This keeps separation within a step's safe travel so it cannot push a body through a wall before containment re-clamps it.
1is a full radius (the safe maximum); lower settles slower but gentler. - Hard Separation Residual Threshold: the pass stops sweeping for the step once the deepest remaining overlap is below this distance, in world units. Keeps a settled crowd at one sweep per step.
What changes while Hard Agent Separation is on
The hard pass resolves all of each awake agent's overlaps every step to reach full spacing, so the soft-path throttles drop out: Max Pairs Per Agent has no effect (the hard pass sizes its own budget to clear the whole crush), and the Reduced/Cheap Intervals above no longer apply, since every awake agent runs every step regardless of Importance LOD tier. Correction Strength and Velocity Push still tune how agents resolve against dormant neighbors, and a Correction Strength of 0 switches the hard pass off entirely rather than leaving it running. Dormant agents stay on the cheap dormant-to-dormant heartbeat (see Dormancy).
Warning
Hard Agent Separation is validated on Surface Flow Field scenes. On scenes with physical obstacle walls, re-check the per-step cost at your target agent count before shipping, because the pass runs on every awake agent, every step.
Target Crowd Blocking
Despite the name, this one does not block anything. It measures how hard the crowd is pressing on each target and hands the result to your game code. Every step it sums the directions of the agents packed around a target into a single vector, weighted by how close each one is, and stores it per target slot. The swarm itself never reads that vector, so switching this off changes nothing about how agents move. The sample DemoPlayerController asks for the same measurement at the player's own position, through TryGetCrowdBlocking, so while this is off its Crowd Blocking Radius, Crowd Blocking Strength and Crowd Push Speed do nothing. Every sample settings asset ships with it off.
Read it with SwarmManager.TryGetTargetCrowdBlocking(targetIndex, out Vector3 normal, out int agentCount). The vector points the way the pressure is coming from and its length grows with the crush, while the count tells you how many bodies contributed. Use it to stagger a player who gets swamped, shove the pile back with your own impulse, or fire a panic animation once the count crosses a threshold.
- Enable Target Crowd Blocking: turns the measurement on. Ships off, since the pass costs a neighbor query per target and produces nothing you can see. Switch it on when your game reads the vector.
- Target Blocking Falloff Distance: how far beyond the target's body surface an agent still counts, in world units. Agents past this contribute nothing; the closer ones weigh more.
- Target Blocking Strength: scales the vector that comes out. It changes the number your code reads, not the way anyone moves.
- Target Blocking Max Agents: caps how many agents are counted per target each step. This is the cost knob.
Note
The body radius used by both Target Crowd Blocking and Target Body Blocking is configured per-target on the SwarmTarget component (Body Radius Source = Auto Detect or Manual). See Targets.
Target Body Blocking
Target Body Blocking resolves hard physical overlaps between agents and the target's body. This is the pass that keeps the crowd out of the player: it physically separates any agent that has clipped inside the target radius.
- Enable Target Body Blocking: turns the correction pass on. Leave on for any target with a physical body agents should not clip through.
- Target Body Blocking Correction Strength: fraction of the overlap resolved each simulation step. Higher values snap agents out faster but can produce visible jitter near the target surface.
- Target Body Blocking Max Correction Per Step: hard cap on the correction distance applied in a single step, in world units. Prevents runaway corrections when agents clip deeply.
- Target Body Blocking Velocity Push: velocity impulse added while correcting overlaps. A small value gives the correction a sense of physicality;
0applies position correction only with no velocity change.
Obstacle Blocking
Obstacle Blocking keeps agents out of level colliders (walls, pillars, props). When its query runs, each agent tests a capsule volume spanning the path it travelled since the last check against the configured layer mask (so a fast or low-frame-rate step cannot tunnel through thin geometry) and is pushed back out toward the side it came from. That directional push is what holds a dense crowd behind a wall rather than letting pressure squeeze bodies through to the far side.
- Enable Obstacle Blocking: turns the pass on. Leave on for any scene with physical level geometry agents should not walk through.
- Obstacle Layer Mask: which collision layers count as blocking obstacles. Keep agent collider layers and ground layers out of this mask; those are handled by Body Blocking and Grounding respectively. Targets need no such care. A collider belonging to a registered SwarmTarget is skipped here automatically, on any layer, because Target Body Blocking already holds agents off a target and keeps doing it while the target moves. To make a large static target block agents by its exact collider shape instead, put that collider on a separate GameObject outside the SwarmTarget's hierarchy.
- Obstacle Blocking Correction Strength: fraction of the overlap resolved each step by the incremental depenetration fallback. High values correct penetrations quickly; very high values on large fast-moving crowds can produce jitter. The entry-face and safe-side containment that holds a crowd behind a wall repositions the body in full and is not governed by this value.
- Obstacle Blocking Max Correction Per Step: hard cap on the per-step distance the incremental fallback moves a body, in world units. The full-reposition containment path is not capped by it.
- Obstacle Blocking Velocity Push: velocity impulse added while correcting obstacle overlaps.
- Obstacle Blocking Max Colliders Per Agent: caps obstacle hits returned per query. The buffer is allocated once at startup to this size; raising it adds minor memory cost but allows more obstacles to be resolved per step. In cluttered or compound geometry, setting it too low can drop a wall from the query result and let a body through, so it affects containment, not just performance.
- Obstacle Blocking Query Interval: runs the obstacle query every N fixed steps instead of every step. Higher values cut physics query cost; the capsule still spans the steps in between, so a skipped step is covered rather than left open. The default of
2balances cost against containment. Raise it to save more on lighter scenes; very high values can let a wall under sustained crowd pressure leak the occasional body. - Obstacle Query Trigger Interaction: whether obstacle queries hit trigger colliders in addition to solid colliders.
Obstacle Layer Mask lives on the SwarmSettings asset, not on SwarmManager
You set Obstacle Layer Mask on the SwarmSettings asset in the Obstacle Blocking section. The SwarmManager inspector shows a read-only Effective Obstacle Layer Mask. When Surface Flow Navigation is on, the manager removes its Walkable and Unwalkable layers from the mask at runtime, because the cell-boundary pass already contains walls. The derived value is not stored. Physics & Colliders explains which colliders block agents and which are skipped.
Visibility LOD
Off-screen agents still run full movement integration every step. These settings cut facing-update and animation-refresh cost.
Facing is not purely visual, so throttling it is not free
An agent's forward direction is a simulation input in three places: the Perception sight cone that decides what it notices, the pushback direction an attack applies to whatever it hits, and the direction obstacle depenetration falls back to when the query returns no depth, the agent has no remembered safe side and it is not moving. Throttling facing can therefore shift when an off-screen agent acquires a target and which way a hit shoves the player. It is a cost trade, not a free one. Set Offscreen Facing Update Interval to 1 in a scene where that matters.
Two different visibility signals, and they disagree on shadows
The simulation reads a point-in-frustum test on the agent's POSITION against the gameplay camera. An agent whose mesh is culled but whose shadow is still on screen counts as NOT visible here, so it is facing-throttled and loses its quality grace. That is deliberate: testing every renderer instead would hold a large off-camera shadow-casting crowd at full quality and give back the saving these settings exist for.
The animation path below reads a different signal, whether Unity draws any part of the agent, which DOES count a shadow caster as visible. So the same agent can be animation-visible and simulation-invisible at once. If you are chasing an agent that looks wrong off camera, check which of the two you are actually looking at.
- Offscreen Facing Update Interval: agents whose position has been outside the camera frustum for longer than the grace time only turn this often, in fixed steps. Movement and position integration still run every step. Set to
1to turn every step (no saving); raise it to cut cost on large off-screen crowds. The step that does run integrates the whole interval's worth of time and keeps the angular speed the agent had built up, so a throttled agent turns at the rate its Movement Profile allows and simply does it in coarser increments. It does not turn at one interval-th of its rate. - Offscreen Facing Visibility Grace Time: keeps full-rate facing updates briefly after an agent leaves view, in seconds. Prevents agents from snapping to a stale facing the moment they cross the camera edge.
Animation refresh by camera distance
Animation refresh cadence follows the camera, not the simulation importance tier. An on-screen agent close to the camera refreshes every visual sync. One farther than Distant Visible Distance from the camera refreshes on the Distant Visible Animation Refresh stride. An agent stops refreshing altogether once its Visibility Grace Time runs out, as long as Update Only When Visible is on in its animation component. That box is checked by default. An agent counts as visible whenever Unity still draws any part of it, so one that has left the camera view but is still casting a shadow into frame keeps animating.
- Distant Visible Distance: distance from the camera in world units beyond which an on-screen agent switches from every-sync refresh to the distant stride. Lower values throttle more of the visible crowd; higher values keep more agents at full animation cadence.
- Distant Visible Animation Refresh: how often on-screen agents farther than Distant Visible Distance from the camera refresh Animator and VAT playback parameters, in visual syncs.
1means every sync; higher values reduceMaterialPropertyBlockwrites for distant visible agents at the cost of slightly coarser animation. On agents driven by an Animator andSwarmAgentAnimationthe stride only skipsSetFloatcalls. The Animator still evaluates and skins the character every frame while it is drawn, so the saving there is small. - Off-Screen Animation Refresh: how often agents that Unity is not drawing refresh Animator and VAT playback parameters, in visual syncs. This only governs agents whose animation component has Update Only When Visible unchecked. Agents that keep it on do no refresh work at all while undrawn, so the stride costs them nothing either way.
VAT shader quality LOD
- Enable VAT Quality LOD: keys VAT shader quality on whether Unity draws the agent, not on the simulation importance tier and not on the frustum test the facing throttle uses. An agent in frame always renders at full VAT quality regardless of how far it is from its target, and so does one that has left frame while still casting a shadow into it. Only an agent Unity is not drawing at all gets cheap quality (no frame interpolation, no per-vertex normal tap on the Mobile shader, dominant walk/run clip only), and since nothing draws it no vertex shader runs for it. Anything a camera or shadow shows renders at full quality whether this is on or off, so the setting changes neither the look nor the GPU cost and can stay at its default. Choose GPU cost with the render tier (Mobile, Standard, High) instead. Only affects the package VAT shaders (
VAT Animator/Mobile,/Standard,/High) and custom shaders that read_InstancePlayback.w.
Importance LOD
The Importance LOD system classifies every active agent into one of three tiers each reclassify pass: Full (near the target and within budget), Reduced (visible or mid-range), and Cheap (distant or off-screen). Later passes use the tier to decide how often to run work like Personal Space, Approach & Press, and ground probes.
Dormant agents skip all of that and are Cheap wherever they stand.
Core classification
- Enable Importance LOD: enables per-agent tier classification. Leave on for large counts; all agents run at Full tier when disabled.
- Full Quality Agent Cap: maximum agents allowed in Full tier.
0means unlimited (every qualified agent stays Full). When the budget is reached, borderline agents stay Reduced. - Reduced Quality Start Distance: planar distance from the target at which agents drop from the Full tier to the Reduced tier. Agents closer than this stay Full (before the optional cap).
- Cheap Quality Start Distance: planar distance at which agents drop from the Reduced tier to the Cheap tier. Agents farther than this become Cheap. Clamped at runtime to be no less than Reduced Quality Start Distance.
- Importance LOD Reclassify Interval: runs the full tier classification once per this many fixed steps. Tier transitions are coarse (distance bands are several world units wide) so reclassifying every N steps is visually invisible and reduces classifier self-cost proportionally.
- Cheap Demotion Margin: hysteresis distance in world units applied at the Reduced→Cheap boundary, so agents hovering there do not flicker between the two tiers. A Reduced agent must move past the Cheap Quality Start Distance plus this margin before it drops to Cheap. Other tier boundaries are unaffected.
- Crowd Edge Promotion Strength: integer range
0to2of grid cells scanned around Full-tier agents. Cheap agents inside that range are promoted to Reduced so the visible crowd edge stays stable.0disables the pass. - Off Screen Quality Grace: seconds an agent keeps counting as recently visible after its position leaves the camera frustum. Prevents classification popping near the camera edge. A recently-visible agent is classified Reduced, and only reaches Full if the Full tier's cap has room for it.
Personal Space refresh by tier
- Reduced Personal Space Refresh: how often Reduced-tier agents run the Personal Space separation pass, in fixed steps.
1means every step; higher values reduce cost but make mid-range crowd separation less responsive. - Cheap Personal Space Refresh: how often Cheap-tier agents run the Personal Space separation pass, in fixed steps.
- Reduced Personal Space Neighbor Scale: multiplies the Personal Space max-neighbor sample count for Reduced-tier agents (
0to1). Lower values check fewer neighbors per pass. - Cheap Personal Space Neighbor Scale: multiplies the max-neighbor sample count for Cheap-tier agents.
0disables the Personal Space pass entirely for that tier.
Behavior tier restrictions
- Approach And Press Reduced Interval: how often Reduced-tier agents run Approach & Press steering, in fixed steps. On skipped steps the agent reuses its last approach steering so chase pacing remains stable. Full-tier agents always run every step.
- Approach And Press Cheap Interval: how often Cheap-tier agents run Approach & Press steering, in fixed steps. Full-tier agents always run every step.
For LOD tuning recommendations, see Performance.
Dormancy
Dormant agents skip steering computation when blocked by the crowd and unable to make progress. They wake automatically when space opens up.
Core
- Enable Dormancy: turns the system on. Reduces simulation cost in dense, slow-moving crowds.
- Dormancy Delay Seconds: how long an agent must keep wanting to move while staying inside its stuck distance (see Dormancy Distance Threshold below) before it goes dormant. Lower values save cost faster but raise the chance of brief flicker.
- Dormancy Distance Threshold: the most an agent may move, in world units, during the dormancy delay and still count as stuck. It works as a cap, not a flat value: each agent's real stuck distance is half of what its own max speed covers across that delay, floored at
0.1units, so a slow walker crossing open ground never reads as stuck, however high this is set. Only an archetype fast enough for that half-window distance to clear the threshold is actually held back by it, which at the shipped defaults (0.75here and in Dormancy Delay Seconds) is about 2 units/second and up. Lower this value to demand a more truly motionless agent before it sleeps.
Wake conditions
- Dormancy Wake Blocker Lookahead: how far ahead, in world units, the wake-up check looks for blocking neighbors along the agent's desired direction. Larger values keep agents asleep longer in dense crowds.
- Dormancy Wake Blocker Half Angle Degrees: half-angle of the cone in front of a dormant agent used to count blockers.
90means a full forward hemisphere; smaller values restrict the check to a narrow path ahead. - Dormancy Wake Required Blockers: minimum blockers inside the cone needed to keep the agent asleep.
1wakes as soon as the path is clear; raise it for crowds where some lingering bodies should not stop progress. - Dormancy Wake On Target Move: when on, target movement past the distance threshold immediately wakes dormant agents. Leave off to let blocker / probe / nearby-motion rules stagger wake-up instead.
- Dormancy Random Wake Probe Interval: how often a dormant agent is allowed to wake as a random probe even when its path still looks blocked, in fixed steps.
0disables random wake probes. Checks are spread by agent seed across fixed steps. - Dormancy Nearby Wake Radius: distance around a dormant agent where moving agents can wake it on the next wake check.
0disables nearby-motion wake-up. - Dormancy Nearby Wake Min Speed: minimum planar speed another agent needs before it can wake nearby dormant agents.
Cost tuning
- Dormancy Body Blocking Interval: how often two sleeping agents push each other apart, in fixed steps. Raising it costs less.
0switches sleeper-to-sleeper correction off, and a crowd that settles around a stationary target and falls asleep then keeps whatever overlap it had, packing tighter as more agents arrive with nothing to separate it again. Leave it at the default8unless you want that cost saving and your swarms never sit still. Awake agents resolve against dormant bodies every step either way. - Dormancy Wake Recheck Interval: how often a dormant agent recomputes movement intent and runs its blocker wake check, in fixed steps. Re-checks are spread round-robin across agents so cost is amortized.
Tuning order
Start with Enable Dormancy + Dormancy Delay Seconds + Dormancy Distance Threshold. Raise Dormancy Wake Required Blockers if dormant agents wake too eagerly in a packed crowd; lower Dormancy Random Wake Probe Interval if rear-rank agents look frozen too long after the front lines clear.
Surrender
On by default. In a heavy crush the arrival seek keeps pushing every agent inward every step, even where there is provably no room left. Surrender lets an agent stop fighting for a gap that does not exist: when more bodies are packed inside its counting radius than non-overlapping circles can fit there, it stops steering and moves with the crowd instead.
- Enable Surrender: turns the state on. Aimed at swarms that pile several ranks deep against a target or through a choke point; a swarm that never packs that tightly will never enter it, so leaving it on costs nothing in a loose crowd. Turn it off if you want every agent pressing at full strength no matter how packed the crowd gets.
There is nothing else to set. Both thresholds are arithmetic:
- An agent enters when the count around it exceeds what circle packing allows for its own body size. At the default radius of
0.5that is 14 or more neighbours within 1.5 units. Exceeding the figure is proof the bodies are interpenetrating, not a guess, so there is no sensitivity to tune. - It exits once the count drops to the first contact shell, which is how many bodies can touch it at once (6 at the default radius) and holds there.
- How long it takes to give in reuses Dormancy Delay Seconds. Coming back out takes a third of that, spread across agents so a released crowd does not surge in one frame.
A surrendered agent still attacks, still blocks and is blocked, and still absorbs knockback at full strength. What it stops doing is generating its own steering.
Mixed agent sizes shift the thresholds
Every threshold derives from the smallest body radius currently alive, so both the entry ceiling and the exit figure move when the roster changes, and they move in the same direction. A smaller agent spawning into an established crush raises both, which can make agents sitting near the old exit figure eligible to leave at once. The reverse is sharper: when the last small agent dies the reference rises, both thresholds drop, and agents can cross the entry test together.
If you know your roster, pin it. Set Surrender Minimum Body Radius on the Swarm Manager component (Advanced mode) to the smallest radius you ever spawn, and the thresholds stay fixed for the session. It sits on the manager rather than here because the roster belongs to the scene, while this asset can be shared by several scenes. Leave it at 0 for a single-size swarm, where there is nothing to shift.
Surface Flow Field
SwarmSettings stores the runtime parameters for the optional Surface Flow Field navigation system. Bake-time configuration (cell size, quality, bounds, layers, Bake Now button) lives on the Swarm Manager inspector.
Most fields are covered on the Navigation page. The fields below are not covered there. Every Surface Flow Field setting (the LOD skip intervals, wall margin, and the grounding option below included) lives in the Advanced inspector; Simple mode does not show them.
Advanced: LOD skip intervals
These fields gate how often Reduced and Cheap agents run the entire surface-flow per-agent loop body: cell lookup, release-distance check, and off-grid detection. They are distinct from the sample interval fields, which only gate the field read itself.
- Surface Flow Skip Reduced Interval: Reduced-tier agents refresh surface-flow bookkeeping this often, in fixed steps. On skipped steps the last cached steering direction is applied directly. Setting this to
1makes every Reduced agent run the full loop every step. - Surface Flow Skip Cheap Interval: Cheap-tier agents refresh surface-flow bookkeeping this often, in fixed steps. At the default value the worst-case staleness window is a few frames, which is invisible at Cheap-tier distances.
Advanced: wall clearance
- Surface Flow Wall Margin: extra clearance kept between an agent's body and any blocked cell edge when Surface Flow Enforce Cell Boundaries is on, in world units. Added to the agent's own radius. Raise this if agents still visibly clip into wall cells after enabling boundary enforcement.
Not the same as Wall Clearance
Surface Flow Wall Margin is a runtime body gap. It is separate from the bake-time Wall Clearance Strength / Distance on the Swarm Manager, which shapes the route itself. See the Glossary.
Advanced: grounding on and off the field
- Surface Flow Height Follow Speed: how fast an agent's Y position chases the ground height baked into the cell it is standing on, in units per second. Default
12.0snaps to the cell height every step, which reads as a stair-step on ramps. Lower values glide but lag behind a rising slope. This is the knob for agents that snap or float on stairs under surface-flow grounding, and it only does anything when Surface Flow Grounding Mode isPrefer Field HeightorReplace Physics When Available. See Navigation for the modes themselves. - Assume Flat Ground Outside Field (experimental): when Surface Flow grounding is active and an agent is outside the baked field, skip physics ground probes and assume the surrounding world is flat at the field's lowest walkable cell height. Only enable this on levels where the area outside the baked field is actually flat. Works in both Prefer Field Height and Replace Physics When Available grounding modes.
Warning
Assume Flat Ground Outside Field is marked experimental. Enabling it on levels with varied terrain outside the baked field causes agents to float or sink when they leave the field boundary.
Related
- Swarm Manager: the component that consumes these settings.
- Performance: how Capacity, LOD, and Dormancy affect frame budget.
- Troubleshooting: common Grounding, Body Blocking, and Obstacle Blocking issues.