Brushes
A brush paints a rule instead of a fixed tile. This page explains what a brush asset is, how autotiling decides which tile a cell shows, and how to create, register and pick brushes.
Concept
A brush is an asset in your project, a ScriptableObject that belongs to one tileset. It holds a set of tiles and the logic that chooses between them. A RoadBrush, for example, keeps 16 road pieces and shows the one that matches the cells around it.
You paint a brush the same way you paint a tile. What gets stored in the cell is different, though. Every cell holds a tile id, a brush id and flip and rotation flags. A cell painted with a plain tile has brush id 0. A cell painted with a brush carries that brush's id, and the brush decides which tile id the cell ends up with.
Each brush's id is assigned by its tileset when the brush is registered there. The tileset keeps the list of its brushes and their ids.
Note
"Brush" also names the painting cursor in the Scene view, which holds whatever you are about to paint: a tile, a brush, or a block of tiles you copied. The Brush selection menu section below is about that cursor. The rest of this page is about brush assets.
Autotiling
When you paint a cell, the brush does not pick its tile straight away. Painting marks cells as needing a refresh, and the tiles are chosen later, when the tilemap rebuilds its mesh. The rebuild runs after every stroke, so in practice you see the result immediately.
Two things get marked:
- the cell you painted, if it holds a brush,
- each of the eight surrounding cells whose brush connects to the old or the new content of the painted cell.
During the rebuild, every marked brush cell looks at its neighbours and picks its tile again. That is why painting a road next to an existing road bends the existing piece into a corner. Only the ring of eight neighbours is marked. It works across chunk borders, too.
A few actions refresh every brush cell in a tilemap at once: the Refresh Map button in the tilemap inspector, the Refresh Tilemap button in the scene toolbar, and F5 in the Scene view while a tilemap is selected. The map bounds changing size does the same. For a RandomBrush this means its cells roll new tiles.
Autotiling Mode
Every brush inspector starts with the same four fields.
| Field | What it does |
|---|---|
Tileset |
The tileset the brush belongs to. The rest of the inspector stays hidden until you set it. |
Show In Palette |
Shows or hides the brush in the brush palette. It still paints and refreshes when hidden. |
Group |
The brush group this brush belongs to, chosen from the group names defined in the tileset. |
Autotiling Mode |
Which neighbours count as connected. Several modes can be combined. |
Autotiling Mode is a set of flags. A neighbour counts as connected when any checked mode accepts it:
| Mode | A neighbour connects when |
|---|---|
Self |
it was painted with this same brush. |
Other |
it is not empty and was painted with anything else: a different brush or a plain tile. |
Group |
the tileset's group matrix links this brush's group with the neighbour's group. |
Empty Cells |
it is empty. |
Tilemap Bounds |
it lies outside the tilemap bounds. |
Skip Other Brushes |
never. It is a veto: a neighbour painted with a different brush does not connect, even if another mode would accept it. |
For Group, a neighbour painted with a brush uses that brush's Group. A neighbour painted with a plain tile uses the tile's own autotiling group, which you set in Tile Properties. The group names and the matrix of which groups connect live in the tileset. See Brush Groups.
New brushes start with Self only, so a road connects to itself and nothing else. Add Tilemap Bounds when a shape should run off the edge of the map without drawing a border there.
How to use it
Create a brush
- In the Project window, open the folder where the brush should live.
- Choose
Assets > Create > SuperTilemapEditor > Brushand pick a type. The asset is created asNew <Type>and is ready to rename. - Select the new asset and set its
Tilesetin the Inspector. - Fill in the tiles the brush uses. Each type has its own editor, described in Built-in Brushes.
- Select the tileset, or any tilemap that uses it, and press
Import all brushes found in the projectunder the brush palette.
The last step matters. A brush is not in its tileset's list until you import it, so it does not appear in the palette and cannot be painted. The button scans the whole project, adds every brush whose Tileset is this tileset, and gives each new one an id. Brushes already in the list keep their ids.
Find brushes in the palette
Brushes appear in the brush palette, below the tiles in the Tile Palette. Each one is drawn with its preview tile. An AnimBrush plays its animation there.
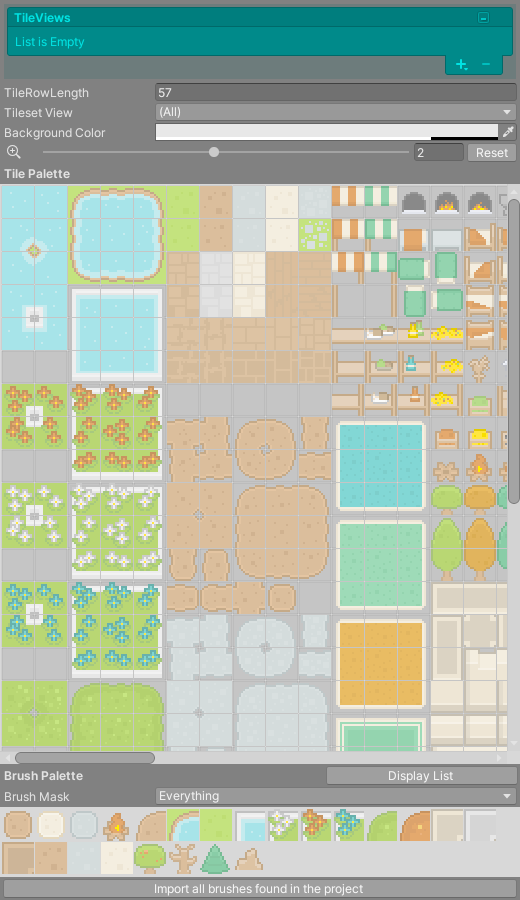
- Click a brush to select it for painting. Its id appears in the heading, as in
Brush Palette (id:3). - Double click a brush to ping its asset in the Project window and show it in the Inspector.
- Right click a brush to open the Tile Properties window on it, where you can edit its autotiling settings and parameters.
Brush Maskfilters the palette by brush type.Display Listswitches to a list ofId(n) namerows. The eye toggle on each row isShow In Palette, and you can drag rows to reorder them. Reordering does not change any brush id.
Pick a brush or its tile from the scene
Right click a painted cell in the Scene view to pick up what is there:
- a plain right click picks the brush the cell was painted with, so you keep painting with the same rule,
- Alt + right click picks the tile the cell is currently showing, with its flip and rotation, as a plain tile.
Use Alt when you want one specific piece out of a brush, for example a single corner of a road, to place by hand.
Delete a brush safely
Warning
Before you delete a brush asset, erase or repaint the cells that use it. Deleting the asset frees its id, and the next brush you import can be given that same id. Any cell that still carries the old id then belongs to the new brush.
Brush selection menu
The SuperTilemapEditor > Brush menu turns whatever the Scene view painting cursor holds into an object. Fill the cursor first, for example by dragging with the right mouse button over a tilemap to copy a block of tiles.
| Menu item | Shortcut | What it does |
|---|---|---|
Create Tilemap From Selection |
Ctrl+T | Creates a GameObject named TilemapSelection with a tilemap that uses the cursor's tileset and material, at the cursor's position, and paints the cursor's contents into it. |
Create Prefab From Selection |
Ctrl+Shift+T | Does the same, then saves the result as a prefab named TilemapSelection.prefab and removes the scene object. The prefab goes in the folder of the selected asset. With a scene object selected it goes next to the scene file, and with nothing selected it goes in Assets. |
On macOS the shortcuts use Cmd instead of Ctrl. Both items need the painting cursor to exist, which it does once you have started editing a tilemap.