Tile Palette
The tile palette is where you pick the tile or brush you are about to paint with. This page covers where it appears, how selection and scrolling work, and how to organise a big tileset with tile views.
Concept
The same palette control shows up in three places, always tied to one tileset:
- the tileset inspector, on the
Tilestab, - the tilemap inspector, on the
Painttab, showing the tilemap's tileset, - the
Tile Palettewindow, opened fromSuperTilemapEditor > Window > Tile Palette Window.
The window follows the selection. Select a tileset, a brush, a tilemap or a tilemap group and it switches to that object's tileset. That makes it useful when you want the palette in its own docked panel instead of scrolling the inspector.
Selection lives in the tileset, so picking a tile in any of the three places picks it everywhere. The zoom level and background color are stored in the tileset asset too.
From top to bottom the control has the TileViews list, the palette settings, the tile area and the brush area.
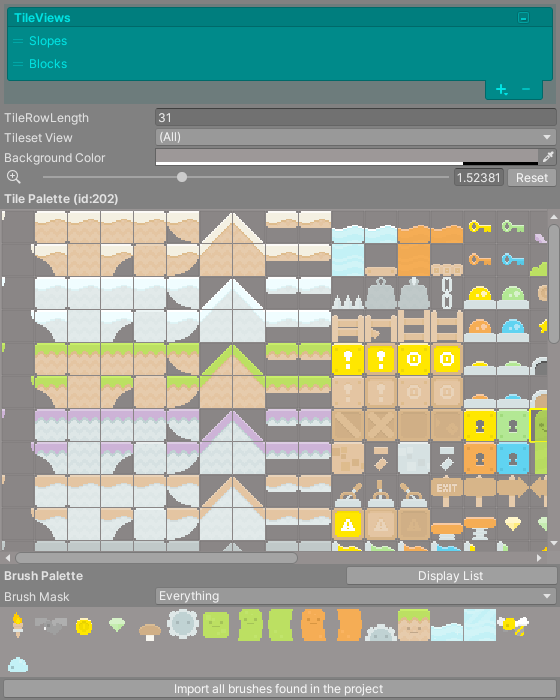
How to use it
Select tiles
- Click a tile to select it. Its id appears in the
Tile Paletteheading, for exampleTile Palette (id:12). - Drag with the left mouse button to select a rectangle of tiles. You paint the whole rectangle at once.
- Right click a tile to select it and open the Tile Properties window on it. See Tile Properties.
Selecting a tile moves keyboard focus to the Scene view, so the painting shortcuts work straight away without clicking the scene first. See Keyboard and Mouse.
Scroll and zoom
Drag with the right or middle mouse button to scroll the tile area. While you drag a rectangle selection towards an edge, the area scrolls on its own.
The slider next to the magnifier icon scales the tiles from 0.25 to 4 times their size in pixels. Reset goes back to a size where each tile is 32 pixels tall on screen.
Palette settings
| Field | What it does |
|---|---|
TileRowLength |
How many tiles to show per row when all tiles are listed. Hidden while a tile view is shown. |
Tileset View |
(All) shows every tile. The other entries show one tile view each. |
Background Color |
Color behind the tiles, useful for tiles with transparency. |
TileRowLength starts at the number of columns in the atlas. Lowering it wraps the atlas into narrower rows, which helps with very wide atlases in a narrow inspector. It is saved in the tileset, and the Atlas Editor uses it as the number of columns when it rebuilds the atlas.
Tile views
A tile view is a saved selection of tiles shown on its own, like a page of the palette. Use them to group the tiles of a large atlas: one view for walls, one for decoration, and so on.
To create one, press + under the TileViews list and choose:
Add Tile Selectionto save the rectangle of tiles you selected in the palette. It is greyed out, asAdd Tile Selection to TileView, while nothing is selected.Add Brush Selectionto save what the painting brush currently holds, for example tiles you copied from a tilemap with a right mouse drag. It only appears when the brush holds tiles from this tileset.
New views are named new TileView. To rename one, click it in the list and type in the name field that appears. Drag views by their handles to reorder them.
Clicking a view in the list shows it in the tile area, the same as choosing it in Tileset View. Choose (All) to go back to every tile. Switching views clears the current tile selection.
The + menu also has Remove All TileViews and Sort By Name. - removes the selected view. Both removals ask for confirmation. The button at the right end of the TileViews header collapses the list to save space.
The brush palette
Below the tiles, Brush Palette lists the brushes that paint with this tileset. Click one to select it. Its id appears in the heading, for example Brush Palette (id:3). Painting with a brush is covered in Brushes.
- Double click a brush to ping its asset in the Project window and show it in the Inspector.
- Right click a brush to select it and open the Tile Properties window, where brushes show their parameters and autotiling settings.
Brush Maskfilters the palette by brush type, for example to hide everyRandomBrush. It only appears once the tileset has brushes.Import all brushes found in the projectsearches the project for brush assets whoseTilesetis this one and adds them. Use it after copying brushes in from another project.
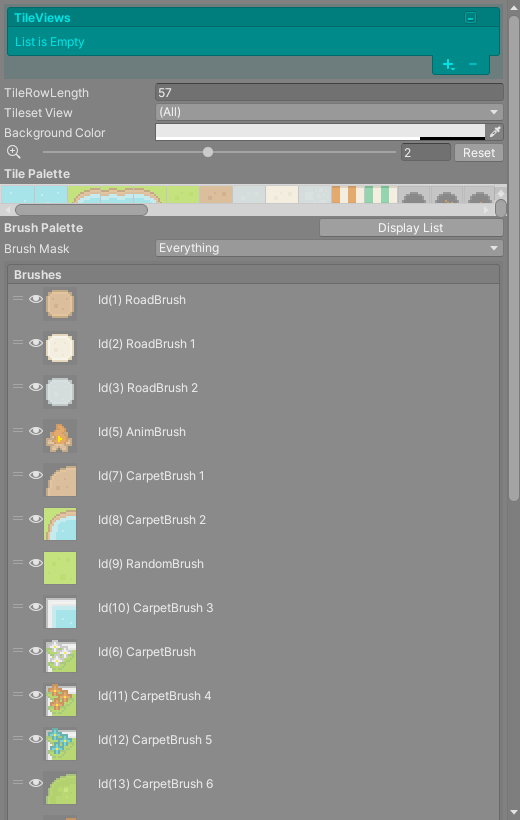
Display List swaps the grid for a list. Each row has an eye toggle, the brush's id and its name. The toggle is the brush's Show In Palette setting: turn it off to keep a brush out of the palette grid without deleting it. You can drag rows to reorder the palette. Reordering never changes a brush's id.
Warning
Deleting a brush asset frees its id, and the next brush you create for the tileset can receive the same id. Tiles painted with the deleted brush would then show the new brush. If you painted with a brush, clear those tiles or keep the asset rather than deleting it.
Pick a tile from a script field
An int field marked with the [TileData] attribute, on a component under a tilemap or on a brush, shows a tile preview in the Inspector. Clicking the preview opens the Tile Palette window on that tilemap's or brush's tileset, and whatever tile or brush you pick there is written into the field. See Tile Data.
Reference
| Action | Mouse |
|---|---|
| Select a tile | Left click |
| Select a rectangle | Left drag |
| Scroll the tile area | Right or middle drag |
| Select and open Tile Properties | Right click a tile or brush |
| Ping and inspect a brush asset | Double click a brush |