Tile Properties
Every tile in a tileset carries its own collider shape, a list of custom parameters, an optional prefab and an autotiling group. This page covers the window where you edit them.
Concept
Open the window from SuperTilemapEditor > Window > Tile Properties Window, or right click a tile or brush in any tile palette. The window is titled Tile Properties.
It always shows the tile or brush currently selected in the palette of the selected tileset. Selecting a tilemap or a brush asset also works, since the window follows that object's tileset. With nothing picked it shows There is no tile selected.
The window has four tabs: Parameters, Collider, Prefab and Autotiling.
Select a rectangle of tiles in the palette to edit several tiles at once. The window then shows * Multi-selection Edition, displays the first tile of the selection, and copies each change to every selected tile.
Tip
Right click a cell in the Scene view while painting to select what is there. A cell painted with a brush selects the brush, and holding Alt selects the tile instead. It is the fastest way to reach the properties of a tile you can see in your level. See Painting.
Colliders
The Collider tab sets the shape each tile adds to the tilemap's colliders. Whether the tilemap builds 2D or 3D colliders, and of which kind, is set on the tilemap; see Colliders.
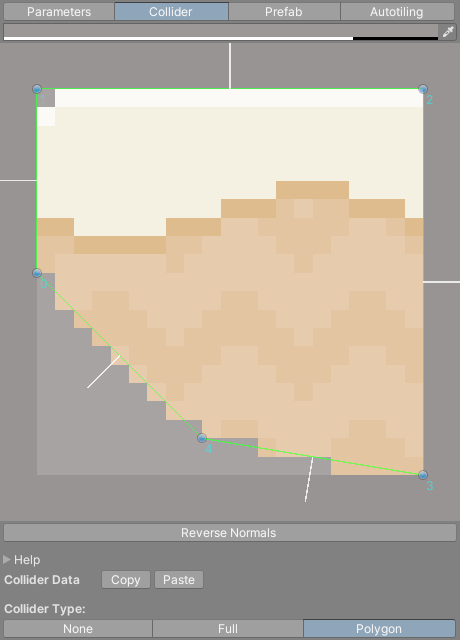
The buttons under Collider Type: set the kind of collider.
| Type | Shape |
|---|---|
None |
The tile adds no collider. |
Full |
The whole square of the tile. Not editable. |
Polygon |
A shape you draw with the vertex editor. |
A new polygon starts as the full square. Switching a tile to None or Full keeps its polygon vertices, so switching back to Polygon restores the shape.
Edit the polygon
The tile is drawn large in the middle of the tab with its collider over it. Edges are green, and each vertex is a numbered handle.
- Click and drag a vertex to move it. Its position in pixels shows above the tile while you hold it.
- Hold
Shiftand click to add a vertex. A preview handle follows the nearest edge, and the click inserts the vertex there. - Hold
Ctrl(Commandon macOS) and click a vertex to remove it. The handle turns red under the mouse. The polygon keeps at least two vertices.
Vertices snap to the tile's pixel grid and cannot leave the tile. A collider with only two vertices is a single line segment.
The color field at the top of the tab sets the background behind the tile. It is the same Background Color the palette uses. The Help foldout lists the mouse controls.
Normals and Reverse Normals
A short white line sticks out of the middle of each edge. It marks the solid side of that edge, and it points outwards when the vertices run clockwise. When a character falls through a wall or snags on the inside of a tile, the normals are often facing the wrong way.
Reverse Normals reverses the vertex order, which flips every normal at once.
Copy and paste
Copy, next to Collider Data, stores the shown tile's collider type and vertices. Select another tile and press Paste to apply them. With a rectangle selected, Paste sets every tile in the selection.
The copied collider is cleared when you enter play mode.
When the tilemap updates
If a tilemap is the selected object, it rebuilds its colliders as soon as you change a tile. Other tilemaps are not rebuilt for you. Select one and press Refresh Map on its Map tab, the refresh button on the Scene view toolbar, or F5 while painting; see Map.
Note
Collider and parameter edits are not recorded in Undo.
Brushes have no collider of their own. With a brush selected the tab shows Brush tile editing not allowed, and a brush tile uses the collider of whichever tile the brush draws.
Parameters
Parameters are named values you attach to a tile or a brush and read from your scripts: a damage value, a footstep sound, a flag that marks water. The types are bool, int, float, string and object, where object takes any asset reference.
- Press
+below theParameterslist and chooseAdd Bool,Add Int,Add Float,Add StringorAdd Object. A new parameter is named after its type, likenew int, with a number added if the name is taken. - Click a parameter to select it and its name becomes editable. Type the new name.
- Drag parameters by their handles to reorder them.
-removes the selected parameter after a confirmation.- The
+menu also hasRemove All,Sort By NameandSort By Type.
With a brush selected, the list is the brush's own. A cell painted with a brush has both: the brush's parameters and those of the tile the brush drew.
With a rectangle of tiles selected, you cannot edit values. The tab offers Merge Tile Parameters instead, which adds every parameter found in any selected tile to all of them. A tile that already has a parameter of that name keeps its value, and a missing one is added with the value from the first tile that has it.
Read parameters from a script
TilemapUtils.GetTileParameter looks up a parameter at a cell. It checks the brush first, then the tile, and returns your default when neither has it.
using UnityEngine;
using CreativeSpore.SuperTilemapEditor;

public class HazardCheck : MonoBehaviour
{
    public STETilemap tilemap;

    public int GetDamage(int gridX, int gridY)
    {
        // 0 when the cell is empty or has no "damage" parameter.
        return TilemapUtils.GetTileParameter(tilemap, gridX, gridY, "damage", 0);
    }

    public bool IsWater(int gridX, int gridY)
    {
        // Or go through the tile itself. GetTile returns null for an empty cell.
        Tile tile = tilemap.GetTile(gridX, gridY);
        return tile != null && tile.paramContainer.GetBoolParam("water");
    }
}
ParameterContainer also has GetIntParam, GetFloatParam, GetStringParam and GetObjectParam, plus SetParam, which changes a value or adds the parameter when it is missing. Reading a parameter as the wrong type logs an assertion and returns that type's default. More on reading cells in Tile Data.
Prefab
The Prefab tab attaches a prefab to a tile. Wherever the tile is painted, the tilemap places an instance of the prefab, parented to the tilemap. Use it for anything that needs components of its own, like a chest the player can open or a torch with a light.
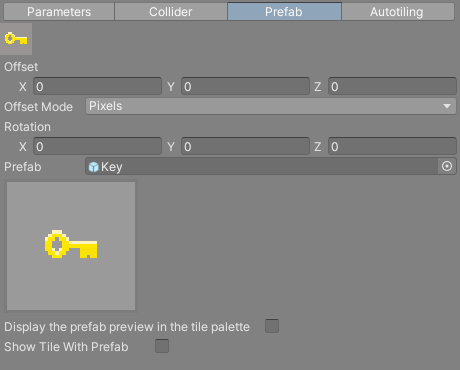
| Field | What it does |
|---|---|
Offset |
Moves the instance away from the center of the cell. |
Offset Mode |
Pixels measures Offset in the tile's pixels, Units in the tilemap's local units. |
Rotation |
Euler angles added on top of the prefab's own rotation. |
Prefab |
The prefab to place. Clear it to remove the prefab. |
Display the prefab preview in the tile palette |
Draws the prefab's preview in the palette instead of the tile image. Shown once Unity has a preview of the prefab. |
Show Tile With Prefab |
Draws the tile under the instance. Off hides the tile, so only the prefab is seen. |
Pixels keeps the offset proportional to the tile. If you change the tilemap's Cell Size later, the instance stays at the same spot within its cell. The z of Offset is added to the prefab's own z position.
When you first assign a prefab that contains a MeshRenderer and Rotation is still zero, the window sets Rotation to -90, 0, 0 and turns on the palette preview. That suits 3D models placed on a tilemap lying flat on the XZ plane. Change it back if your map stands upright.
The tile's flip and rotation flags apply to the instance too. A flipped tile mirrors its prefab's scale, and a rotated tile turns the prefab with it.
With a rectangle of tiles selected, changes to Offset, Rotation and the other settings go to every tile, but each tile keeps its own prefab unless you change the Prefab field itself.
The instance receives an OnTilePrefabCreation message when it is created, with the tilemap and the grid position. See Tile Prefabs for using it.
Brushes cannot hold a prefab. With a brush selected the tab shows Brush tile editing not allowed.
Autotiling
The Autotiling tab sets which brush group a tile or brush belongs to. Groups decide what autotiles with what; see Brush Groups.
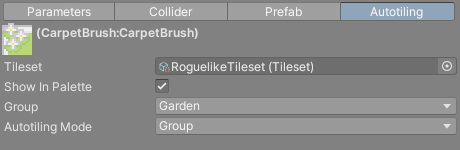
For a tile, the tab has one field, Group, listing the named groups of the tileset. A tile starts in Default. Brushes set to the Group autotiling mode use the tile's group to decide whether to join up with it.
For a brush, the tab shows the brush's name and type followed by the common brush settings, the same ones at the top of the brush's own inspector:
| Field | What it does |
|---|---|
Tileset |
The tileset the brush paints with. |
Show In Palette |
Shows the brush in the brush palette. |
Group |
The brush's group. |
Autotiling Mode |
What the brush treats as a matching neighbour. See Brush Groups. |
Brush tiles already on a map keep the pieces they have until you refresh the tilemap with Refresh Map, the toolbar's refresh button or F5.