Troubleshooting
Find your symptom below. Each entry lists the causes in the order worth checking. For questions about how to do something, see the FAQ.
Lines, seams or gaps between tiles
Thin lines that flicker between tiles as the camera moves are the texture sampler reading a few pixels of the neighbouring tile in the atlas. Check in this order:
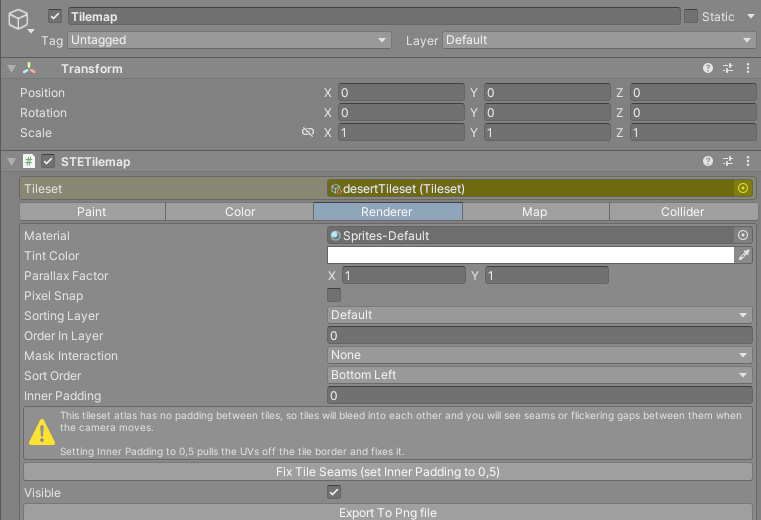
- Inner Padding. When the tileset's atlas has no padding between tiles and
Inner Paddingis 0, the tilemap'sRenderertab shows a warning with aFix Tile Seamsbutton. It setsInner Paddingto 0.5, which pulls each tile's UVs half a pixel in from its border. If you still see lines when the camera zooms far out, raise the value a little. - Atlas import settings. Select the tileset and press
Optimize Atlas Texture Settingsin its inspector. It sets the atlas to a sprite texture withFilter ModePoint, mipmaps off and no compression. Bilinear filtering and mipmaps both blend neighbouring pixels. - Padding and extrusion in the atlas. Open
SuperTilemapEditor > Window > Atlas Editor Window, select the tileset, setPadding (pixels)andExtrude (pixels)underNew Settings, and pressApply Settings. Extrusion copies each tile's border pixels outwards, so a sampler that strays reads the same colour. This rewrites the atlas texture and slices the tileset again, so keep a copy of the original image. - Pixel Snap. If the tilemap's material supports it, the
Renderertab showsPixel Snap. It snaps vertices to screen pixels, which changes where the edges between tiles land. If the steps above did not remove the lines, try the toggle both ways.
Painting does nothing
- Nothing to paint on. Select the tilemap, or its tilemap group, in the hierarchy. The paint toolbar overlay appears in the scene view only while one is selected.
- No tileset. The tilemap inspector says
There is no tileset selected. Assign one. - Wrong tab. Painting only works with the
Painttab selected in the tilemap inspector. - Wrong scene tool. With the Move, Rotate or Scale tool active, the toolbar overlay says
Select the Rect Tool (T) or press any toolbar button to start painting. Do that. - Empty selection. If the overlay says
Empty tile selected, there is nothing to paint with. Pick a tile or a brush in the tile palette. - Locked Inspector. The painting tools run through the tilemap's inspector. If your only Inspector is locked to another object, unlock it or open a second one.
- Outside the map. With
Allow Painting Out of Boundsoff in theMaptab, nothing lands outside the map bounds.
Compile errors right after importing
Three CS0234 errors in Tileset.cs about UnityEditor.U2D.Sprites mean the project lacks the
2D Sprite package. The 2D project templates include it and the 3D ones do not. Install 2D Sprite
from Window > Package Manager, in the Unity Registry list. From version 1.7.7 the asset declares
the package as a dependency, so the Package Manager installs it along with the asset.
Console errors after updating Super Tilemap Editor
Importing a new version over an old one leaves behind files that the new version deleted or moved, and they can clash with the new code. Replace the folder cleanly:
- Back up your project, or commit it.
- Make sure none of your own files live inside
Assets/CreativeSpore/SuperTilemapEditor. Your tilesets, brushes and scenes belong elsewhere. - Close any scene that holds a tilemap, then delete
Assets/CreativeSpore/SuperTilemapEditor. - Import the new version from the Package Manager.
The package's files keep their GUIDs between versions, so your scenes, tilesets and brushes reconnect to the new scripts when the import finishes.
If errors persist after you changed the Unity version rather than the asset version, close Unity,
delete the project's Library folder and open the project again.
Sprite masks do not work in a build
Mask Interaction on a tilemap switches its chunks to one of two bundled shaders,
Sprites/Stencil-Default or Sprites/Stencil-Diffuse, looked up by name at runtime. A build
only contains them if they are in Project Settings > Graphics > Always Included Shaders. The
editor adds any that are missing each time it loads the asset's scripts, and logs
shader successfully added to GraphicsSettings when it does. If your graphics settings were reset or never saved to version control, add
them to the list by hand.
The switch only happens for materials using Sprites/Default or Sprites/Diffuse. Any other
material works with masks only when its shader has both _Stencil and _StencilComp
properties.
Before 1.7.7, the first import logged a red Sprites/Stencil-Default shader not found!
error. Nothing was broken; the shaders had not finished importing yet. Version 1.7.7 no longer
logs it.
The console warns TileId or BrushId not found
TileId ... not found! means a cell holds a tile id past the end of the tileset's tiles, and the
cell is emptied. BrushId ... not found! means the cell was painted with a brush that is no
longer in the tileset, and the cell keeps only its tile. Both appear after a tileset is resliced
into fewer tiles or a brush asset is deleted. Restore the tileset or brush from version control if
you need those cells back. See Tile Data.
Undo is slow on a huge map
Every paint operation records the chunks it touches, and on large maps recording and restoring
takes time. Version 1.7.7 made undo after a fill rebuild only the chunks that changed, which took
a 10,000 tile fill on a 1024x1024 map from 1,086 ms to 51 ms, so update first. If it is still too
slow, untick Enable Undo under Advanced Options in the Map tab while you paint large areas.
See How It Works.