Painting
How to paint, erase, fill, copy and transform tiles in the Scene view, using the tilemap's Paint tab and the Tilemap Tools overlay.
Concept
Painting needs three things: a selected tilemap (or a Tilemap Group, which paints on its selected tilemap), the Paint tab open in its inspector, and something picked in the tile palette. The palette is drawn inside the Paint tab. Tile Palette covers selecting tiles, rectangles of tiles and brushes in it.
What you pick becomes the brush, and the brush follows the mouse in the Scene view as a preview of what a click will paint. The brush can be:
- a single tile,
- a rectangle of tiles selected in the palette or copied from the map,
- a brush asset such as an autotiling brush. See Brushes.
The Tilemap Tools overlay
The paint toolbar is a Scene view overlay called Tilemap Tools. By default it docks at the top of the left column of the Scene view. You can drag it, dock it elsewhere or collapse it like any other overlay, and Unity remembers where you put it.
It only appears while there is something to paint on: the Paint tab is open and the selected tilemap, or the group's selected tilemap, has a tileset. On the other tabs it goes away.
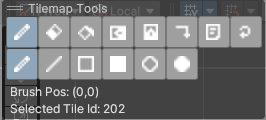
The top row holds the tools and actions:
| Button tooltip | What it does |
|---|---|
Paint |
Paint with the brush. Shows the second row of paint modes. |
Erase (Hold Shift) |
Erase an area the size of the brush. |
Fill (Double click) |
Flood fill the area under the mouse, with a live preview. |
Flip Horizontal (X) |
Mirror the brush left to right. |
Flip Vertical (Y) |
Mirror the brush top to bottom. |
Rotate 90 clockwise (Period); anticlockwise (Comma) |
Rotate the brush 90 degrees clockwise. The button only turns clockwise; use the Comma key for the other way. |
Display Help (F1) |
Show or hide a help box with the mouse and key controls in the Scene view. |
Refresh Tilemap (F5) |
Rebuild the selected tilemap, or every tilemap in the selected group. |
The second row appears only with the Paint tool active and picks the paint mode:
| Button tooltip | Key | What it draws |
|---|---|---|
Paint |
B |
Stamps the brush wherever you click or drag. |
Line |
L |
A line from where you press to where you release. |
Rectangle |
R |
A rectangle outline. |
Filled Rectangle |
R again |
A solid rectangle. |
Ellipse |
E |
An ellipse outline. |
Filled Ellipse |
E again |
A solid ellipse. |
Pressing R switches between the outline and filled rectangle, and E does the same for the ellipse. These keys also select the Paint tool.
Under the buttons the overlay shows Brush Pos: (x,y), the grid cell under the mouse, and what is selected in the palette: Selected Tile Id: n, Selected Brush Id: n or Empty tile selected.
Why painting sometimes does nothing
Painting only works while Unity's active tool is none or the Rect tool (T). With the Move, Rotate or Scale tool active, the Scene view keeps those tools and the brush is hidden.
The editor handles most of this for you. Selecting a tilemap switches the active tool to none, and deselecting it brings back the tool you had before. Every button on the overlay also switches the tool to none. If you pick a transform tool while a tilemap is selected, the overlay shows a warning:
Select the Rect Tool (T) or press any toolbar button to start painting
Click any tool button and you can paint again.
The brush also hides while you drag an asset into the Scene view and while the mouse is outside the Scene view. For other causes, see Troubleshooting.
Mouse and keys
| Action | How |
|---|---|
| Paint | Left mouse button, click or drag. |
| Erase | Shift + left mouse button with the Paint mode, or the Erase tool. |
| Fill | Double click with a single tile brush, or the Fill tool. |
| Pick a tile or brush from the map | Right click on a cell. |
| Pick the tile instead of its brush | Alt + right click. |
| Copy a rectangle | Drag with the right mouse button. |
| Cut a rectangle | Shift while releasing a right mouse button drag. |
| Pick from the whole group | Ctrl + right click, inside a Tilemap Group. |
| Pan the view | Middle mouse button. |
| Flip, rotate | X, Y, . (period), , (comma). |
| Refresh the tilemap | F5 |
| Help box | F1 |
On macOS, Cmd and Option take the place of Ctrl and Alt as usual in Unity. The full list for the whole asset is on Keyboard and Mouse.
Painting with each mode
Paint
Click to stamp the brush, drag to keep stamping as the mouse enters new cells. A multi-tile brush does not paint its empty cells, so a copied shape with holes leaves what was underneath. A single empty tile does paint, which makes it a one-cell eraser: right click an empty cell to pick it up.
Line, Rectangle and Ellipse
Press, drag and release. While you drag, the shape is drawn into the brush preview, and it is written to the tilemap only when you release the button. With a multi-tile brush, the shape is drawn with the brush's tiles as a repeating pattern.
Modifiers while dragging:
| Key | Line | Rectangle | Ellipse |
|---|---|---|---|
Ctrl |
Mirrors the line around the point you pressed. | Centers the shape on the point you pressed. | Centers the shape on the point you pressed. |
Shift |
Keeps it square. | Keeps it a circle. | |
Alt |
Draws a 9-slice: the brush's corners go on the corners, its edges repeat along the sides and its middle fills the inside. |
Erase
The Erase tool clears an area the size of the brush under the mouse, so a 3 by 2 brush erases 3 by 2 cells at a time. Holding Shift in Paint mode does the same thing without switching tools. In the other paint modes Shift is the square or circle constraint instead.
Fill
With the Fill tool active, cells that a click would fill are shaded white in the Scene view before you click. The preview updates each time the mouse moves to another cell, so you can find the leak in an outline before it floods the whole map.
How the fill decides what to cover:
- It replaces the connected region of cells that match the one you clicked, spreading up, down, left and right.
- Cells painted with a brush match on the brush, so filling over an autotiled area replaces all of it, whatever variant each cell shows.
- A multi-tile brush fills with its tiles as a pattern aligned to the grid.
- The fill stays inside the map bounds. An empty area outside the bounds is not filled, and neither is the preview. Grow the bounds in the Map tab first if you need to.
Double clicking in Paint mode also fills, but only with a single tile brush.
If a fill runs for more than five seconds, a dialog titled FloodFill is taking too much time asks whether to Wait, Cancel or Wait and Don't ask again.
Copy, cut and pick
A right click on one cell picks what is there:
- a cell painted with a brush selects that brush in the palette,
- any other cell selects its tile, keeping its flip and rotation,
- an empty cell selects the empty tile.
With Alt held, a brush cell gives you its tile instead of the brush.
Drag with the right mouse button to copy a rectangle of cells into the brush. Hold Shift when you release and the cells are cut instead of copied. The copied brush keeps the tiles' flags, and you paint it like any other brush.
Inside a Tilemap Group, Ctrl + right click looks through the group's visible tilemaps in list order, starting at the top. It picks from the first one with a tile in that cell and makes it the selected tilemap.
Flip and rotate
X flips the brush horizontally and Y flips it vertically. . (period) rotates it 90 degrees clockwise and , (comma) rotates it back. The positions of the brush's cells move, and each tile gets its flip or rotation flag so its image turns too.
Hold Shift with any of these keys to move only the cell positions and leave the tile images as they are.
Tiles painted with a brush asset never get flip or rotation flags. Their positions still move, but the brush decides what each cell looks like.
Tiles versus brushes
Painting a tile writes that tile. Painting a brush writes the brush's id into the cell, and the brush chooses the tile to show when the mesh is rebuilt, looking at the neighbours. That is how autotiling works, and it is why painting one brush cell can change the cells around it. See Brushes.
Undo and redo
Ctrl+Z undoes paint, erase, fill and cut operations, and Ctrl+Y redoes them.
Undo is controlled per tilemap by the Enable Undo toggle under Advanced Options in the Map tab. It is on by default. Each paint operation records the tilemap and every one of its chunks before it changes anything. On a small map that costs nothing you will notice. On a map with many chunks it makes every stroke slower, so turn Enable Undo off while you block out a big level and turn it back on for detail work. With it off, painting cannot be undone at all.
Color painting has its own Enable Undo toggle in the Color tab, and that one starts off.