Tilesets
A tileset is the asset every tilemap paints from. This page covers creating one, slicing its atlas into tiles, and changing the atlas later without breaking maps you have already painted.
Concept
A Tileset is a ScriptableObject in your project. It holds three things:
- an atlas texture with all the tile images,
- the list of tiles sliced out of that atlas, each with its own collider, parameters, prefab and autotiling group,
- the brushes that paint with it, each under a numeric id.
A tilemap in the scene stores only numbers: which tile id and which brush id sits in each cell. The pictures, colliders and everything else come from the tileset. Change a tile's collider in the tileset and every map that uses the tile gets the new collider on its next rebuild.
How to use it
Create a tileset
- In the Project window, choose
Assets > Create > SuperTilemapEditor > Tileset. - Select the new asset and drag your atlas texture into the
Atlas Texturefield. - Check
Pixels Per Unit, set the slicing values underAtlas Settingsand pressSlice Atlas.
If a texture is selected in the Project window when you run the menu item, the new tileset takes the texture's name and already has it assigned. Assigning it that way skips the step that reads the texture's import settings, so Pixels Per Unit stays at its default of 100. Drag the texture into Atlas Texture again if you want those settings read.
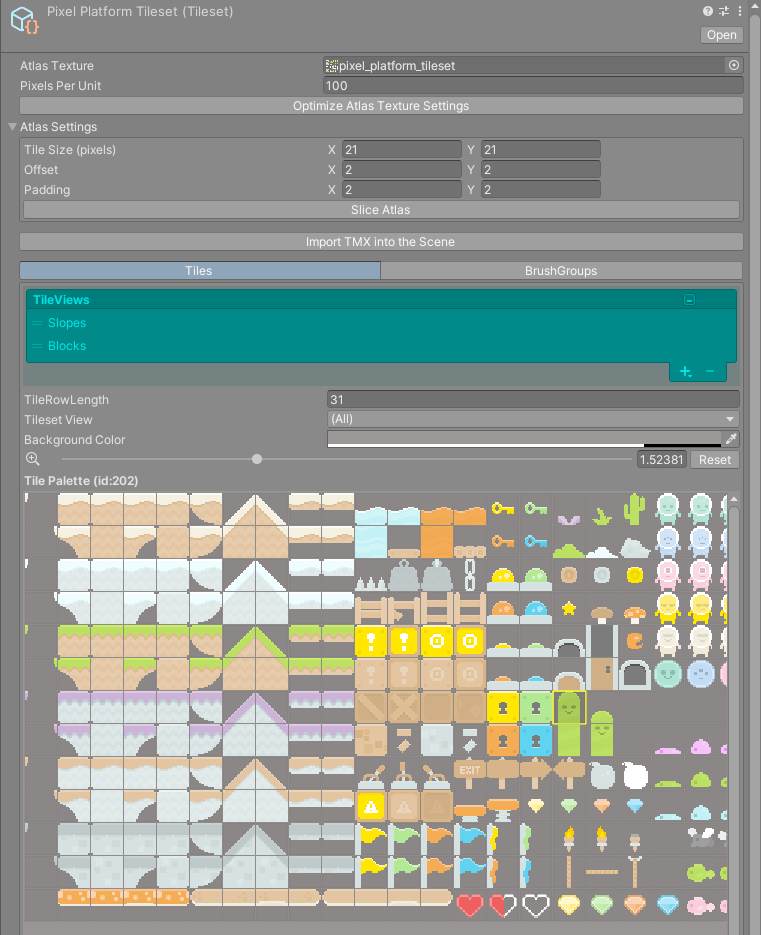
Assign the atlas
When you drop a texture into Atlas Texture, the tileset copies the texture's Pixels Per Unit from its import settings.
If the texture is already sliced in Unity's Sprite Editor (Sprite Mode set to Multiple, with two or more sprites) and the tileset has no tiles yet, the tileset builds its tiles straight from those sprite rectangles. It also fills in Tile Size (pixels), Offset and Padding from the first sprites, so you do not need to press Slice Atlas.
Pixels per unit
Pixels Per Unit only decides the starting cell size of a tilemap. When you assign this tileset to a tilemap whose cell size has not been set, the cell size becomes the tile size in pixels divided by this value. A 32 pixel tile at 32 pixels per unit gives cells of one unit.
Changing it later does not resize existing tilemaps. Each tilemap keeps its own Cell Size, and the R button next to that field recalculates it from the tileset. See Map.
Optimize the texture import settings
Optimize Atlas Texture Settings rewrites the atlas texture's import settings for tile rendering:
| Import setting | Value |
|---|---|
Texture Type |
Sprite (2D and UI) |
Sprite Mode |
Single, only if it was None; Multiple is left alone |
Generate Mip Maps |
off |
Filter Mode |
Point (no filter) |
Compression |
None |
Max Size |
the smallest power of two that holds the whole texture |
The Max Size step matters for big atlases. Unity imports textures at 2048 by default, and an atlas larger than that is scaled down, which moves every tile off its slice. The button accepts sizes up to 8192. A larger texture shows a Texture is too big dialog and keeps its old Max Size.
Point filtering suits pixel art. If your tiles are painted at high resolution and you want them smoothed, switch Filter Mode back to Bilinear in the texture's import settings after pressing the button, and read Atlas Editor about the seams that filtering causes.
Slice the atlas
Open the Atlas Settings foldout. Slicing works on a regular grid:
| Field | What it does |
|---|---|
Tile Size (pixels) |
Width and height of one tile. Minimum 1. |
Offset |
Pixels to skip from the top left corner of the texture before the first tile. |
Padding |
Pixels between one tile and the next, horizontally and vertically. |
Slice Atlas |
Cuts the texture into tiles with the values above. |
All three fields take whole pixels. Slicing starts at the top left, walks right along a row, then moves down a row. A tile is only created where it fits completely inside the texture, so a partial column on the right or a partial row at the bottom is dropped.
If you get a value wrong, fix it and press Slice Atlas again. When the tileset already has tiles, a Keep previous tile properties? dialog appears. Yes copies each old tile's collider, parameters, prefab and autotiling group onto the new tile with the same id.
Slicing also resets the palette's TileRowLength to the number of columns in the atlas.
Tip
An atlas with Padding at zero is the usual cause of thin lines between tiles while the camera moves. The tilemap inspector warns about it and offers a one click fix; see Renderer. The Atlas Editor can rebuild the atlas with padding instead.
Add tiles later without breaking your maps
A tile's id is its position in the slice order: row by row from the top left. With an atlas 8 tiles wide, the first tile of the second row is id 8. Tilemaps, brushes and tile views all refer to tiles by id, so the ids of the tiles you already use must not move.
That gives one safe way to grow an atlas:
- Keep the texture's width, the tile size, the offset and the padding exactly as they are.
- Add new rows at the bottom of the texture and save it.
- Press
Slice Atlasand answerYestoKeep previous tile properties?.
New tiles get ids after the existing ones, and every existing id still points at the same picture.
Making the atlas wider changes the number of tiles per row. Every tile after the first row gets a new id, and maps painted before the change show the wrong tiles.
Warning
After growing the atlas, check that Max Size in the texture import settings is still big enough. Optimize Atlas Texture Settings sets it for you.
The Tiles and BrushGroups tabs
Below the slicing settings the inspector has an Import TMX into the Scene button, covered in Tiled (TMX), and two tabs:
Tilesshows the tile palette, where you pick tiles, manage tile views and see the tileset's brushes. See Tile Palette.BrushGroupsnames the autotiling groups and sets which groups autotile with which. See Brush Groups.
Per-tile settings such as colliders and parameters are not in the inspector. They live in the Tile Properties window; see Tile Properties.
Build an atlas from separate images
If your tiles are separate image files, SuperTilemapEditor > Window > Atlas Creator Window packs them into one atlas.
- Drag a tileset into
Tileset (optional), or pressCreate Tilesetto make a new one. - Drag the tile images into the
Tile Textureslist. Optionally pressSort by Name, so the order stays the same when you add more images later. - Set
PaddingandMax. Texture Size. - Press
Create Atlas & Update Tileset. Without a tileset the button readsCreate Atlasand only saves the texture.
Tile ids follow the order of the Tile Textures list: the first image is tile 0. When there is no atlas yet, a save dialog asks where to put the new PNG. Afterwards, select the tileset and press Optimize Atlas Texture Settings so the new texture is imported for tiles.
The packer places images wherever they fit, and the tileset takes each tile's position straight from it. Do not press Slice Atlas on a tileset built this way, since slicing replaces those positions with a regular grid that may not match.
Warning
When the tileset already has an atlas, Create Atlas & Update Tileset packs into that texture and overwrites its file. Keep a copy if you need the old one.
Reference
| Field | What it does |
|---|---|
Atlas Texture |
The texture the tiles are cut from. Assigning it reads Pixels Per Unit and any Sprite Editor slicing. |
Pixels Per Unit |
Sets the starting cell size of a tilemap that gets this tileset. |
Optimize Atlas Texture Settings |
Rewrites the texture's import settings for tiles. |
Tile Size (pixels) |
Size of one tile in the atlas. |
Offset |
Pixels skipped at the top left before slicing starts. |
Padding |
Pixels between tiles. |
Slice Atlas |
Rebuilds the tile list from the atlas. |
Import TMX into the Scene |
Builds tilemaps from a Tiled map that uses this tileset. |