Pyxel Edit
The Pyxel Edit importer turns a tilemap exported from Pyxel Edit into a tileset and a tilemap group. This page covers what to export, how to run the import, and the demo scene that shows the result.
Concept
The importer is a component, PyxelEdit, that you add to an empty GameObject. You point it at the tilemap JSON exported from Pyxel Edit and press a button. It builds a tileset from the tileset image and fills one tilemap per Pyxel Edit layer.
It lives in Assets/CreativeSpore/SuperTilemapEditor - Extra/Importers/Pyxel Edit, outside the main tool folder. It was contributed by AndyGFX of CubesTeam, and its code uses the CubesTeam namespace.
How to use it
Export from Pyxel Edit
Export two files from Pyxel Edit and give them the same name:
- the tilemap, as JSON, for example
Level.json, - the tileset, as a PNG image, for example
Level.png.
Copy both into the same folder under Assets. Unity imports the JSON file as a text asset.
Run the import
- Create an empty GameObject in the scene.
- Add the
PyxelEditcomponent to it. Search forPyxel EditinAdd Component. - Drag the JSON file into
Tilemap JSON. - If the tileset image has a border or gaps between tiles, set
Slice OffsetandSlice Paddingin pixels. Leave them at 0 otherwise. - Press
Generate PyxelEdit Tilemap.
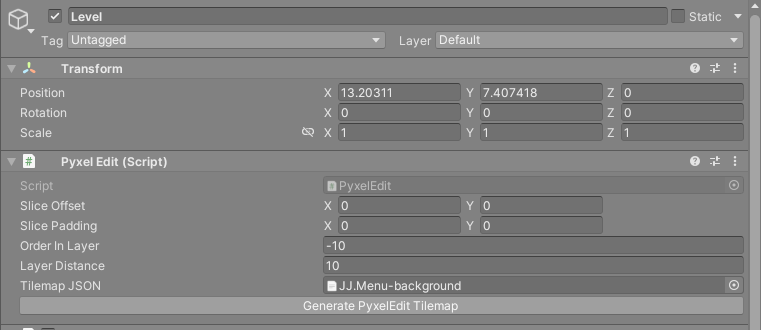
If the image is not found, the Console shows PyxelEdit ERROR: missing texture at followed by the path it looked for. Check that the PNG sits next to the JSON with the same name.
What gets created
A tileset, saved next to the JSON as <name>_tileset.asset. Its atlas is the PNG, its tile size comes from the JSON, and its Pixels Per Unit equals the tile width, so one tile is one unit wide. The importer also sets the PNG's import settings for tiles, as the tileset's Optimize Atlas Texture Settings button does.
A tilemap group on the GameObject you added the component to. The importer adds a TilemapGroup component if the object has none.
One tilemap per layer, as a child GameObject named after the Pyxel Edit layer. Each child uses the new tileset. The first layer in the JSON gets the component's Order In Layer value, and each layer after it gets Layer Distance less than the one before. With the defaults of -10 and 10, the layers get -10, -20, -30 and so on, so the first layer draws on top.
Flipped tiles keep their flip, and tiles rotated 180 degrees come through as flipped both ways. Empty cells in the JSON are left empty.
Importing again
You can press Generate PyxelEdit Tilemap again after changing the map in Pyxel Edit.
- The tileset asset is reused. Its settings are overwritten and the atlas is sliced again. Unity asks
Keep previous tile properties?. AnswerYesto keep the colliders, parameters, prefabs and autotiling groups you set on its tiles. - Each child whose name matches a layer is deleted and created again. Anything you painted or changed in those tilemaps is lost, so keep manual work on layers with other names.
Reference
| Field | What it does |
|---|---|
Slice Offset |
Pixels to skip at the edge of the tileset image before the first tile. |
Slice Padding |
Pixels between tiles in the tileset image. |
Order In Layer |
Sorting order of the first layer. |
Layer Distance |
How much lower each following layer's sorting order is. |
Tilemap JSON |
The tilemap exported from Pyxel Edit. |
Note
Tiles rotated by 90 or 270 degrees in Pyxel Edit are imported without their rotation. Rotate them by hand after the import, or avoid those rotations in maps you plan to import.
Demo scene
Assets/CreativeSpore/SuperTilemapEditor - Extra/Importers/Pyxel Edit/Extra - PyxelEdit/PyxelEdit - Demo Scene.unity shows a finished import. Its Level GameObject carries the PyxelEdit component pointed at JJ.Menu-background.json, and its child Layer 0 is the imported layer. The same folder holds the matching JJ.Menu-background.png and the generated JJ.Menu-background_tileset.asset.
Select Level and press Generate PyxelEdit Tilemap to watch the import run again.