Renderer
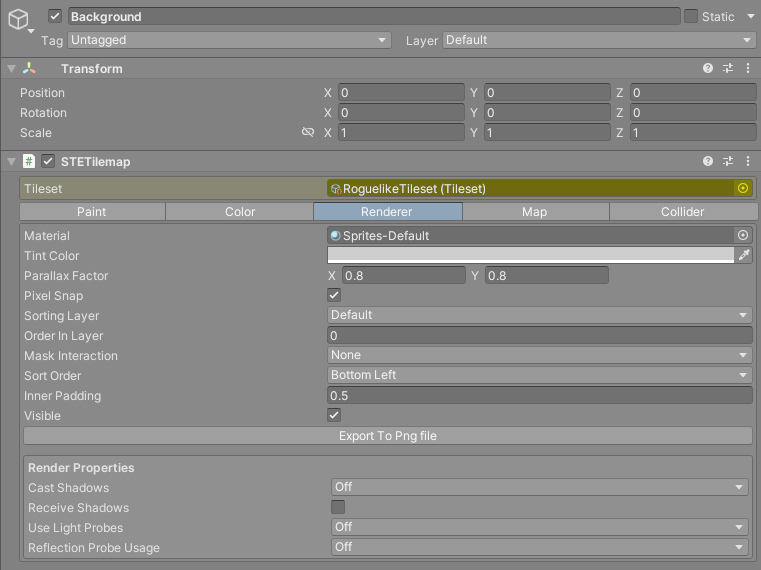
The Renderer tab holds everything about how a tilemap is drawn: its material and tint, parallax, sorting, the fix for seams between tiles, and the options Unity's mesh renderer exposes.
Concept
Each chunk of a tilemap is drawn by its own MeshRenderer. You never set those renderers up by hand. The tilemap copies the settings from this tab to every chunk, including chunks it creates later as you paint.
Reference
| Field | What it does |
|---|---|
Material |
The material every chunk renders with. A new tilemap starts with Unity's built-in Sprites-Default. The tileset's atlas texture is applied for you, so the material only needs a shader that reads a main texture. |
Tint Color |
Multiplies the color of the whole tilemap. Its alpha fades the tilemap. |
Parallax Factor |
How much the tilemap moves relative to the camera, per axis. See Parallax. |
Pixel Snap |
Snaps vertices to screen pixels. Only shown when the material's shader has a PixelSnap property, as Sprites-Default does. |
Sorting Layer |
The sorting layer of every chunk renderer. |
Order In Layer |
The order within that sorting layer. Values are limited to the range -32768 to 32767. |
Mask Interaction |
How the tilemap reacts to Sprite Masks. Works with shaders that have stencil properties. Sprites/Default and Sprites/Diffuse are swapped for stencil versions shipped with the asset. |
Sort Order |
The order tiles are drawn in inside a chunk: BottomLeft (the default) or TopRight. It only matters where tiles overlap, for example tiles drawn larger than their cell. |
Inner Padding |
Shrinks the area of the atlas each tile samples by this many texels on every side. The fix for seams, below. |
Visible |
Shows or hides the tilemap. The same toggle as the eye icon in a Tilemap Group list. |
Export To Png file |
Saves an image of the tilemap as a PNG file. |
Under Render Properties:
| Field | What it does |
|---|---|
Cast Shadows |
Passed to each chunk's MeshRenderer. Off by default. |
Receive Shadows |
Passed to each chunk's MeshRenderer. Off by default. |
Use Light Probes |
Passed to each chunk's MeshRenderer. Off by default. |
Reflection Probe Usage |
Passed to each chunk's MeshRenderer. Off by default. |
Anchor Override |
Only shown when Reflection Probe Usage is not Off. The transform used to pick probes. |
Seams and gaps between tiles
If you see thin lines between tiles, or gaps that flicker while the camera moves, the tiles are sampling pixels of their neighbours in the atlas. It happens when the atlas has no spacing between tiles: at some zoom levels and camera positions the GPU reads a texel just past the tile's edge.
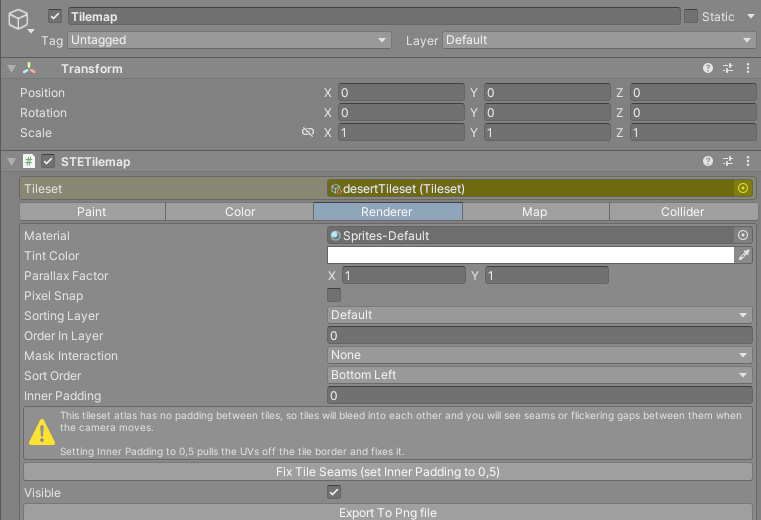
When the tilemap's tileset has no slice padding and Inner Padding is 0, this tab warns you:
This tileset atlas has no padding between tiles, so tiles will bleed into each other and you will see seams or flickering gaps between them when the camera moves.
Click Fix Tile Seams (set Inner Padding to 0.5) below the warning. It sets Inner Padding to 0.5, which pulls every tile's texture coordinates half a texel inward. That keeps the sampler off the neighbouring tile and the tile does not visibly shrink.
Some practical points:
- Keep
Inner Paddingsmall. Every whole texel of padding crops one more row of pixels off each edge of every tile, and pixel art shows it straight away. - The lasting fix is an atlas with space between the tiles and their edge pixels extruded into it. The Atlas Editor rewrites an existing atlas that way from its
Padding (pixels)andExtrude (pixels)settings. It overwrites the texture file and updates the tileset's slicing to match, which also clears the warning. - Point filtering and no compression on the atlas texture also help. The tileset inspector's
Optimize Atlas Texture Settingsbutton sets them. See Tilesets. - A camera that moves in steps smaller than a pixel still shimmers on pixel art even without seams.
Pixel Snapor a pixel perfect camera takes care of that.
Parallax
Parallax Factor sets how far the tilemap moves when the camera moves, separately on X and Y. While a camera renders, the tilemap is shifted by the camera position multiplied by one minus the factor, then put back afterwards.
| Value | Result |
|---|---|
1 |
No parallax. The tilemap stays where it is. This is the default. |
Between 0 and 1 |
Moves with the camera by part of the distance, so it looks further away. 0.5 looks like a distant background. |
0 |
Follows the camera completely and never scrolls, like a sky. |
Above 1 |
Scrolls faster than the rest of the scene, like a foreground layer close to the camera. |
The Scene view camera counts as a camera, so a parallax layer shifts in the Scene view as you pan. Painting and the grid take the shift into account, so you can still paint on it.
The Pixel Platform sample scene uses a factor of 0.8 on its Background tilemap.
Note
The shift is measured from the origin. A parallax layer lines up with the rest of the level only when the camera is at X 0 and Y 0, so build parallax layers around that point.
Export to PNG
Export To Png file asks where to save, then renders the map area through a copy of the scene's main camera and writes it to disk. The image is one pixel per texel of the tileset, so a 16 pixel tile comes out 16 pixels wide. When the tilemap is in a group, the image covers the bounds of every tilemap in the group, and the file name defaults to the group's name. The copied camera sees whatever else is in the scene too.